Our Farmhouse | Toy Kitchen Makeover

Kitchen Full Reno.jpg
Kitchen Reno Short.jpg

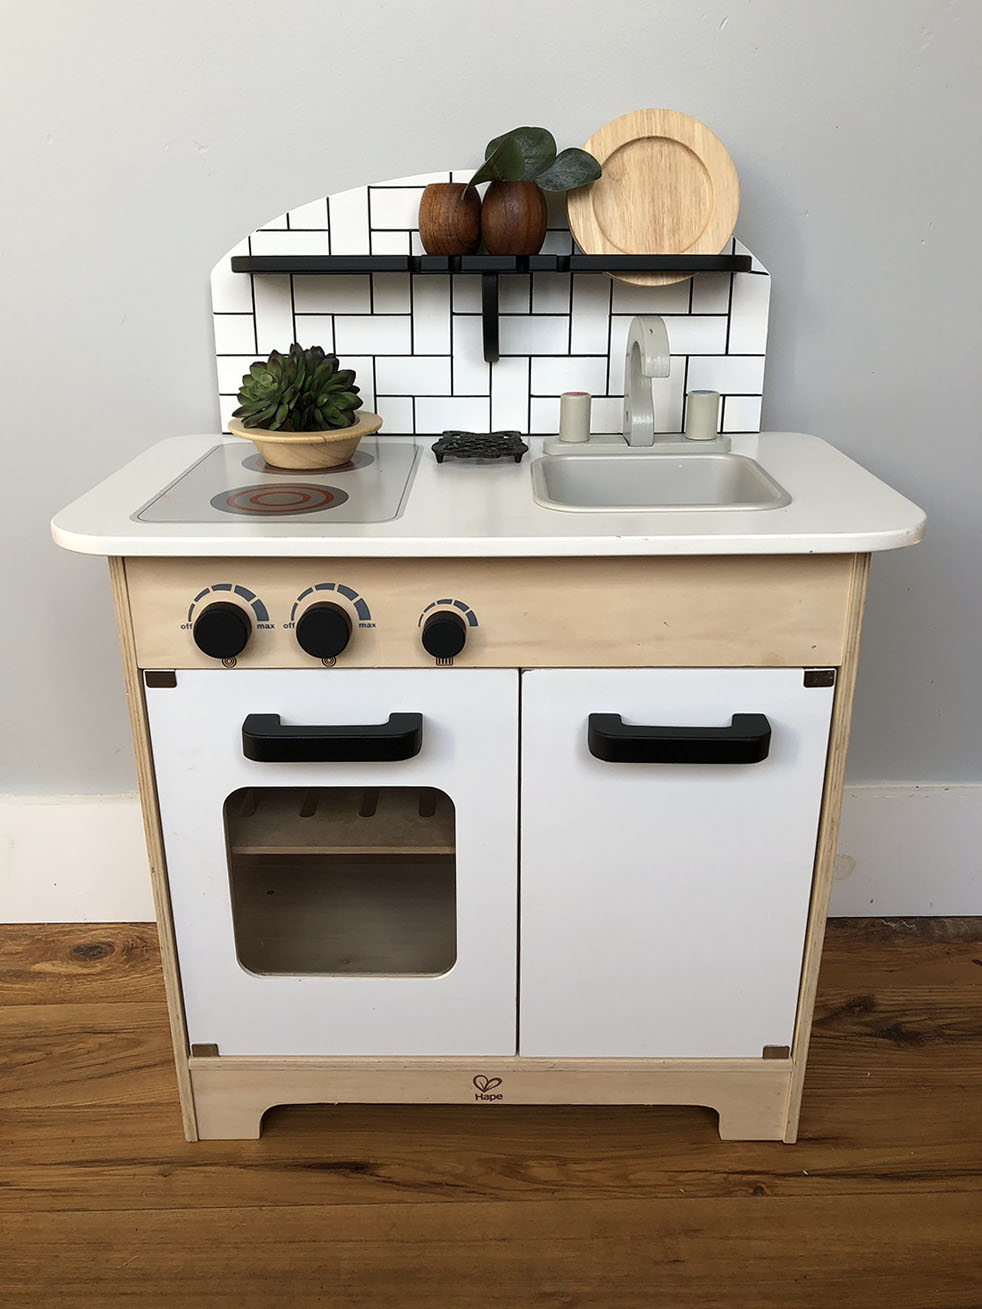
We’ve had this little toy Hape kitchen with us since Felix was a toddler. It’s cute enough but I’ve never been a huge fan of bright orange and red it felt better placed in the kids’ room instead of out in the main living space. Bea really likes playing house, so I thought I’d give the little toy kitchen a quick update (I started this morning, so under 4 hours total with drying time) and move it to the family room.

See also: Mama loves a makeover.

So here’s what I did: first I unscrewed all of the orange parts - two front handles and the kitchen ledge and cleaned them well. I found some matte black spray paint in the basement and gave them a few light coats outside.

Meanwhile, I removed the backsplash and painted it white (again, with what I had on hand). After dry, I got do to the fun part - painting on the tile (or more accurately, the grout lines!) I used a pencil to make a 1.25” grid and then “painted” in the grout using a black chalk marker. I’ve always wanted to do this layout with subway tile, so this little project is a fun way to envision it. I made sure to do my pencil strokes on the light side so a quick coat of white paint would cover up pencil marks.

Hape Toy Kitchen Makeover.jpg
Kitchen Reno Top .jpg

Once I screwed this panel back on, I ran my black marker along the crease were it meets the countertop to give it a crisp, perfect finish. I got pretty lucky that my “tiles” fit perfectly. I love how the small scale makes them look realistic!

I wanted to do something about the red knobs, but they weren’t coming off easily to be spray painted. I tried some craft paint but it didn’t grab onto the lacquered finish - so I just used the chalk marker on that too.

Finally I spent way too much time styling it out. Those little wooden “vases” are napkin rings and I grabbed some of my faux plants to make it cute. There’s also a little iron owl trivet on there.

Guys - this project was easy, quick and totally free because I used supplies from my stash. Also a good way to get out my need to renovate and finish a space while my other projects are currently being demo’d.

Time Traveling | Making 18th Century Stays

Stays Leader 3.jpg
Embroidery 1.jpg
Stays Full 3.jpg
Stays Embroidery.jpg
Stays Leader 4.jpg

Voila! I've put the finishing touches on my 18th century stays and I could not be more excited and proud of the final result. I've made these as the foundation to complete my 1780's style costume that I'll wear this fall with my family to a Revolutionary War re-enactment. But before I go into any of those plans, let me tell you more about this project!

Historical Background

Once upon a time, stays were the foundation to every woman's daily outfit. They provide an elegant conical shape, give back support, lift and enhance the bosom (hello!) and inform one's posture. Women of all social classes wore stays, which later evolved into corsets. Normally stays would be worn with a linen shift or chemise underneath, but I haven't completed mine yet so I'm just wearing a simple white dress I already had in my closet. 

Inspiration

I wanted my stays to have an antique quality to them, which is why I chose natural linen as my fashion fabric. I also knew I wanted to make them a little extra special, and chose to embroidery an 18th century design. I'm not going for a super bourgeois look nor am I wanting to be a laborer/camp follower. So although this fabric does lend itself to a more modest (financially speaking) approach, I think the embroidery makes it special and a little more luxurious. All that said, no one but me and you will see this piece because it will be completely covered by my gown and petticoats!  

Embroidery 3.jpg

Embroidery

The floral design I've used was actually something I found at a garage sale! The pattern was part of a Colonial Williamsburg embroidery kit for a bell pull. I used this design as a basis by scanning it into Photoshop and adjusting it to fit the center front pattern piece (which was a PDF download). Next I printed that design out to scale on adhesive embroidery paper, which dissolves in water once you have completed your design. It was really cool! I also recolored it into shades of blue, which really pop against the natural linen! 

Pattern

I purchased the digital download from RedThreaded patterns online. I met the proprietress Cynthia at the Jane Austen Festival and she was great! I had a look at her stock corsets and this particular 18th century design spoke to me. I like the look of the horizontal boning and the shaping of the all in one tabs. I sewed a medium and did not make alterations to the pattern pieces. I did add some additional decorative boning channels because I love the ribbed effect it creates.

Stitching Notes

Stays Back.jpg

Because I embroidered the motif directly onto the linen, I did a lot of stopping and starting with my boning channels, as I did not want to sew over/through my design (minus some small branches). The end result is so beautiful and I don't think the starts and stops will negatively effect the functionality!

I used a faux silk charmeuse (It's poly and the best I could find locally! It has a really nice hand feel for not being the real thing) for my binding and hand sewed it around the entirety of the stays, using the bias to create as smooth of an effect as possible. This was fiddly, but I actually really loved doing the hand work on this step. I then wrapped the bias around the edges and basted it into place. Finally, I stitched in the ditch oh-so-carefully to hold the binding in place.

I also really loved doing all of the eyelets BY HAND (there are 24 of them!) Using a sewing awl and button thread, these lil guys are so sturdy. And they're beautiful! 

Finally - I did end up making two orders for my boning and had to adjust the lengths (I needed longer) than the pattern notions suggested. And that's my fault because the pattern says to measure before you order (but I wanted all of the supplies at once...)

Final Thoughts

I LOVED this project. All of the handwork was really enjoyable and something I am able to do as my children play nearby or while they are napping (getting time with my sewing machine is a different story). Sewing it was a pleasure and it's fun to create something with such attention to detail, even if I'm the only one who will be able to appreciate them.

Actually lacing up and wearing these stays was even better than making them!! I love the silhouette it creates and how it really directs how you move about. Weird as it may sound, I always feel more myself when I'm dressing in costume and this foundation garment is no exception. It's remarkably comfortable and doesn't constrict my breathing as you might expect. Now I cannot wait to get started on my 1780s Italian style gown! 

Project Sources

Stays Happy 1.jpg
IMG_3335 copy.jpg

Our Farmhouse | Sunroom Makeover

Leader Sunroom 2.jpg

This makeover has been a long time in the making! It's been nearly 10 months since we first started making changes and I am so excited that it's finally done. Like many other rooms in our home, this space has been revamped from floor to ceiling and entirely done by us (including my brother Dan and father-in-law Jim). Wanna have a look? Come on over!

White Washed Stone Fireplace and Sunroom Makeover

Before

Let's start by checking out what this room looked like before we made changes (click on any image to view larger). It's such a cool space and it's absolutely what sold me on this house. I love the high ceilings, wooden beams and all of that natural light! This side of the house was a mid sixties addition and we even have the blueprints from the original owner! 

White Washed Stone Fireplace using Chalk Paint

Paint

All of the walls, floor and ceiling got a fresh coat of paint in addition to white washing the fireplace. The brown stone just wasn't for me and I love the almost Nordic feeling it gives off now. I mixed Rustoleum chalk paint in Aged Gray 50/50 with water and applied with a paint brush. It took just a smidge over two quarts and twelve-ish hours to complete this huge fireplace. 

The ceiling had some patching and water damage, so that needed a complete paint job. Thanks to my 6'7" tall brother, I was able to pass over the job. Phew. He also took care of the floors (using garage floor paint) while we were out of town. 

On the walls is my go to white - Chantilly Lace from Benjamin Moore. It's a warmer white which helps keeps things from feeling too sterile.

Black and White Sunroom Plants Jungalow Style

Iron Work

Railings between the first floor and sunken living room were a necessity for safety but stylistically, the midcentury scrolls were not really our style. We opted to simplify the design from a double curved shape to a horizontal run and matching stair rails. Josh of Clutch Fabrication did the custom design and installation and if you have the chance to work with him, I can't recommend him enough. The matte finish rails really set the tone of both the dining room and sunroom and give the space a really modern farmhouse vibe.

Farmhouse MCM hybrid custom iron railing
Kids Play Area CLEAN
Sunroom Railings MCM Farmhouse White Washed Fireplace

Lighting

The south wall originally had what I can best describe as  window box style wooden feature with seventeen (17!!) exposed bulbs creating an uplighting effect over the two sliding doors (see before photo above).  There is only one electrical point, so Adam wired it with conduit and then routed the back of 3x1" boards we used around the entire room (we kept the paneling and needed the horizontal railing to conceal the seams). Adam then installed these lights, which came in at under $30 a piece, which I think is a great deal for such a handsome light. 

New Lighting

Bookshelf

This built in bookshelf and shelves were originally painted the same color as the walls but I decided to use a contrast color on the back boards. When the stone was it's original color I used a really pretty pale green but the whitewash needed something different so I chose Peppercorn in a matte finish from Sherwin Williams. The actual wood from the shelves was reclaimed from the old stair treads leading down to the living room from the upper level. Adam cut them to length and sanded them to the smooooothest finish and I coated them with a mixture of beeswax and mineral oil. 

Bookcase.jpg

As far as the shelf decor goes, everything is second hand or pulled from another room in the house. I like to regularly move accessories around from room to room! Here are similar baskets (I use them all over my home!)

Fireplace and Bookcase

Furniture

When we moved in I bought the black leather couch (with a matching ottoman currently in another room) for $100 off Craigslist. The large black leather chair next to it is from Article and it's awesome! I will buy a couch from them when I'm ready to upgrade this one or for another room. Between the two of those, there's a side table I picked up second hand and made over with primer, paint and some new knobs.

Sunroom Makeover

Behind those pieces is a vintage radio I had in my old house. It's a great piece for interest and character and perfect for hiding cords and gadgets (the front opens up to reveal an old record player that doesn't work)

On the opposite side of the room is a kids sized table my dad built along with some modern style chairs. 

Vintage Radio and Plants

Accessories

On the floor are two sizes of the same indoor/outdoor rug from Ballard. This pattern hides all the dirt which is great for kids! I layered a smaller rug on top of the big one in front of the fireplace which was from Hobby Lobby. 

The pillows on the couch are a mix of homemade, second hand (sort of!) and bought new (back in 2017!) From left to right - a pillow I made myself, one from Loloi by Joanna Gaines (named Joslin if you're searching!). The front owl pillow is another one I made using a vintage embroidery I found out thrifting that I removed from a frame and used as the front fabric. 

MCM farmhouse hybrid

Plants

Because of the abundance of light we have a lot of plants in this room! On the fireplace is a fiddleleaf fig, in the bookshelf and on the radio are pothos plants. Plus we have that groovy 1960s built in planter and the big ledge for our huge monstera! 


That's our sunroom makeover! Wanna hire me for your next home project? I'm available! You can see all of our farmhouse updates here!

Inspired By | Modern Farmhouse Laundry Room

Farmhouse Style Laundry & Mudroom Inspiration

I am so close to completing my laundry/mudroom makeover I can almost taste it! We enter and exit primarily through the back of our home and needed a design update to flow with the rest of our home (which you can see here if you want!).

For those of you who are new around here - we live in a farmhouse built in the 40s with a major addition put on in the mid sixties. In true farmhouse style, rooms have been added on or spaces made larger and I suspect our laundry/mudroom used to be a porch of some sort before it was finished. 

When I started planning for making over this home, my catchall was "Midcentury Modern Farmhouse" (Here's my huge Pinterest board of the same name) And when I say farmhouse, I mean more of the bones of the space and less in the way of decor (probably no chicken wire in my future!) I've also found myself really doing a lot with bohemian style too - lots of wooden vessels, baskets and houseplants. So for this laundry space, I wanted to set the tone for the whole house and pull together everything I love!

These photos are a great example of what I've been inspired by!

1. Shiplap | Thanks to Jo Jo and Fixer Upper, shiplap has become a popular texture and makes perfect sense for a farm style entry room. I can't wait to show you what my dad and I installed! I have become pretty decent at the miter saw and at swinging a hammer too! And I felt like a boss at the lumber yard loading up my pallet and picking the best wood. 

2. Open Wooden Shelves |  In our last home we did open shelving in our kitchen remodel and I loved it. Adam has a technique for making the boards super smooth and for laundry organization it just makes perfect sense to have your cleaning supplies right by the machines. For this house we've been able to upcycle all of our open shelves and that fits in really nicely into my Make, Do & Mend mission. More on that when I show the final space! 

3. Plants! | This is kind of an aside, but I feel that my seasonal depression has been mitigated by how many houseplants I have hanging out with me (now up to over 20 #plantgang!) My laundry space has two huge 70" windows so there's a lot of opportunity for growing! 

4. Bright White | Nothing say so clean and so fresh (Cue Outkast) like bright white walls in a laundry space. I used to feel like white walls screamed RENTAL! but after years of doing so much color I really like them. And white black and wooden accents they just look so pretty. 

So that's kind of a hint to how the space will come together. I am 85% complete right now and just waiting on a delivery to finish up and then photograph (and a nice sunny day!) Guys - I'm pumped! I've found a lot of joy in my home projects and can't wait to share!