Our Farmhouse | Toy Kitchen Makeover

Kitchen Full Reno.jpg
Kitchen Reno Short.jpg

We’ve had this little toy Hape kitchen with us since Felix was a toddler. It’s cute enough but I’ve never been a huge fan of bright orange and red it felt better placed in the kids’ room instead of out in the main living space. Bea really likes playing house, so I thought I’d give the little toy kitchen a quick update (I started this morning, so under 4 hours total with drying time) and move it to the family room.

See also: Mama loves a makeover.

So here’s what I did: first I unscrewed all of the orange parts - two front handles and the kitchen ledge and cleaned them well. I found some matte black spray paint in the basement and gave them a few light coats outside.

Meanwhile, I removed the backsplash and painted it white (again, with what I had on hand). After dry, I got do to the fun part - painting on the tile (or more accurately, the grout lines!) I used a pencil to make a 1.25” grid and then “painted” in the grout using a black chalk marker. I’ve always wanted to do this layout with subway tile, so this little project is a fun way to envision it. I made sure to do my pencil strokes on the light side so a quick coat of white paint would cover up pencil marks.

Hape Toy Kitchen Makeover.jpg
Kitchen Reno Top .jpg

Once I screwed this panel back on, I ran my black marker along the crease were it meets the countertop to give it a crisp, perfect finish. I got pretty lucky that my “tiles” fit perfectly. I love how the small scale makes them look realistic!

I wanted to do something about the red knobs, but they weren’t coming off easily to be spray painted. I tried some craft paint but it didn’t grab onto the lacquered finish - so I just used the chalk marker on that too.

Finally I spent way too much time styling it out. Those little wooden “vases” are napkin rings and I grabbed some of my faux plants to make it cute. There’s also a little iron owl trivet on there.

Guys - this project was easy, quick and totally free because I used supplies from my stash. Also a good way to get out my need to renovate and finish a space while my other projects are currently being demo’d.


Our Farmhouse | Felix's Room

We’re on a roll updating the farmhouse and today I’m so excited to post photos of Felix’s room! While most of my decorating preferences lean towards neutrals, I just love color in kids’ rooms. I incorporated many of the items from Felix’s bright nursery (first here and updated here) from our old house but went bold with colorful walls, ceiling and door. Come on in and lemme show you around!

Felix's+Room+4.jpg
Felix's+Room+2.jpg

PAINT

Is it sacrilegious to use paint chips from one company and have them matched elsewhere? If so I’m going to decorating hell because that’s exactly what I did in this room. The pale blue walls are ‘Poolside’ from Benjamin Moore, but filled at Lowe’s using Valspar Signature in a matte finish. Ditto goes for the ceiling (China Blue) and darker walls (Blueberry). I’ve used a couple of brands of paint in the past month and I think the middle range paints are very comparable. But if you want the Cadillac of paint, Aura from Benjamin Moore is really superior (I used it on his door in Yosimite Blue and a satin finish) and the coverage and final look are incredible. It’s pricey and I only bought a quart, but it was worth it.

NOTE: I’ve edited these photos to reflect the paint colors I see in real life, but all screens will display them differently. I absolutely recommend taking home paint swatches before committing to a full gallon!


Felix's+Room+5.jpg

BED

As you can see, we’ve upgraded to a full sized bed, but we’ve actually had it for a while now. Adam did a ton of research and based on his findings, we bought a Casper mattress (not sponsored, but you can get $75 off if you use my promo code). We also have a foam mattress in our room and I think Felix’s is better. In fact, both parents regularly zonk out in there when we put him to bed and because it doesn’t have springs, it’s easier to Houdini out once he’s off in dreamland. 

Behind it, check out that amazing Jenny Lind headboard. Errr… footboard! I bought it last weekend at this amazing garage sale for… $4.50. The real headboard was falling apart so I asked if I could just take this end. I cleaned it and then painted it using Valspar Signature in Lovely Love Song with a satin finish. I SHOULD HAVE PRIMED IT because it took about five coats. I wanted to apply them thinly as to not get brush strokes (which are still kinda there) but I also came away from it thinking… I found this, I updated this, this is not a factory finish, and I’m ok with that

The sheets and quilt are what inspired the painting pallet at the start of this project. Big thanks to my mom who generously bought them for us! We chose the Pillowfort whale watching sheets, a navy bed skirt and a two toned navy quilt (it photographs more colbalt, but it’s a true navy IRL). Again, not sponsored but the quality of the quilt (which has been through the wash three times already) is really lovely and it would be great in an adult’s room too. The two other navy shams were from our linen closet. The rainbow pillow was from our previous nursery, the yellow one came with the Monte rocker and the teddy bear was a gift.

Felix's+Room+7.JPG

DESK

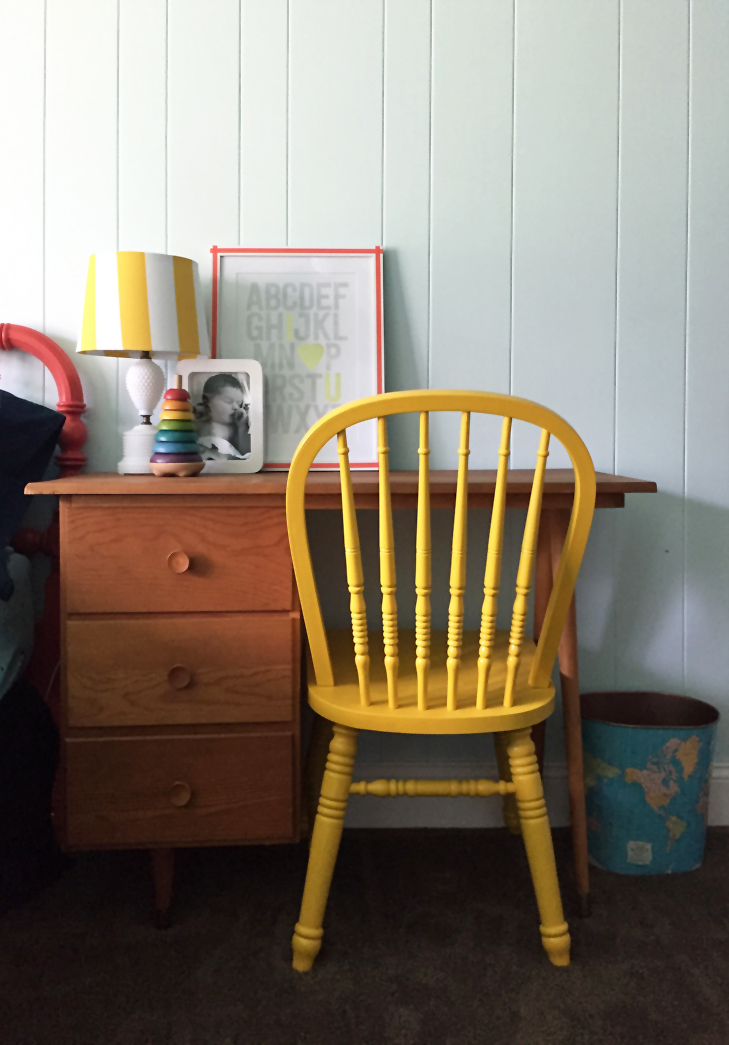
We found this little wooden desk in the garage and it was made by the original owner of the house! I brought it back to life with a coat of butcher’s block wax and I think it’s perfect for a child’s room! It serves the dual purpose of being a bedside table as well.  The lamp was either a garage or Goodwill find that’s been in the nursery all along. I covered the shade for Bea Bea’s nursery (which, sorry, I never got good photos of!) in the wide yellow stripe. The ABC print was also in her nursery and I updated it with a little washi tape.  I also updated the chair. You might remember it from my Instastories a while back. I found a set of four and at the time we were considering furnishing the old house as an Air BnB rental. These were going to be the dining room chairs.  Now that we’re set to close on that house, I had them here for a project. I spray painted it a bright yellow, which took about 4-5 coats to get in all of the nooks and cranies. I’m glad I did though! It’s a nice pop next to the wooden desk. The map print trashcan is a second hand vintage find from years ago.

Felix's+Room+11.jpg

THE ROCKER

Babies love being rocked to sleep and I have nursed both of my kids hundreds of times in this rocking chair. I bought it before I had a million other things to spend money on, and truth be told, it’s pricey. I justified it by thinking it would be a nice addition to any room in the house eventually and I think that’s still true. It’s on sale at Land of Nod if you’re so inclined to check it out.  I designed and made the rainbow quilt and the yellow and white blanket was a gift to my mom when she was pregnant with me. The little fox was also a gift (side note! I saw our little fox again this morning! I have such a huge crush on him!!!!)

CURTAINS

We’ve got mega wide (128″) windows, so it took four panels to span across. We bought navy and white striped blackout curtains (also Pillowfort from Target). The curtain rod was repurposed from our living room and I painted it the same dark blue as the back wall - it practically disappears! 

TOYS

You don’t see a lot of toys here… because they’ve all been in storage for a couple of months. It’s amazing how little kids need and how much they can imagine on their own. In addition to “my giraffey friend” (baby shower gift), the fire truck (from Nana, found at a garage sale) and some wooden stacking and bead toys (similar), we have blocks and trains in the family room. Eventually we’ll rotate in some of his old toys, but less is more with that one for us.


Felix's+Room+6.jpg

BOOKCASE

The bookcase was made by my dad and Adam before Felix was born. It’s filled with his books and stuffed animals that we’ve received as gifts. Honestly it’s usually a sort of mass collection of books and not well organized, so I just took everything out, stacked books into rainbow colors and placed them back in that way. I’m calling it clean/semi-styled. I promise you it will not look like this a week from now, but hey! if he’s grabbing books and “reading” them I’m not complaining!

The vintage pull down school map is something I’ve wanted in a kid’s room for a long time and I had seen it at an antique store a while back. After we painted the walls, I kept thinking about the map and luckily it was still available!! One thing I’ve realized is that if you see a second hand piece you love, get it then and there! Etsy also has some of these beauties if you don’t want to treasure hunt forever to find one! The colors on ours happen to match perfectly and it was a complete accident! I originally had it over the dresser/changing table, but both kids (especially Bea) played with it and while it’s not an old antique, it’s too nice to potential get poop on. Ha! It also matches the width of the book shelf better, and I love how it just pops off the wall!

DECORATIONS

I haven’t done much in the way of putting stuff on the walls besides the map and the kitty prints over the bed. Those are also from Felix’s nursery. I used bright poster board and cat treats to get these shots of our Raymond and Gizmo and are printed on canvas. We also kept the rainbow balloon Adam and I bought on our last solo vacation before kids and we still love it! 

I’m so in love with this room! It’s absolutely possible to make an update incorporating sentimental nursery items with practical pieces that will grow into boyhood. Thanks to my parents helping us out, I only bought paint, the vintage map and the new headboard specifically for this space! Everything else was brought along from the nursery or repurposed from elsewhere in the house!

Felix's+Room+Final.jpg