Our Farmhouse | Toy Kitchen Makeover

Kitchen Full Reno.jpg
Kitchen Reno Short.jpg

We’ve had this little toy Hape kitchen with us since Felix was a toddler. It’s cute enough but I’ve never been a huge fan of bright orange and red it felt better placed in the kids’ room instead of out in the main living space. Bea really likes playing house, so I thought I’d give the little toy kitchen a quick update (I started this morning, so under 4 hours total with drying time) and move it to the family room.

See also: Mama loves a makeover.

So here’s what I did: first I unscrewed all of the orange parts - two front handles and the kitchen ledge and cleaned them well. I found some matte black spray paint in the basement and gave them a few light coats outside.

Meanwhile, I removed the backsplash and painted it white (again, with what I had on hand). After dry, I got do to the fun part - painting on the tile (or more accurately, the grout lines!) I used a pencil to make a 1.25” grid and then “painted” in the grout using a black chalk marker. I’ve always wanted to do this layout with subway tile, so this little project is a fun way to envision it. I made sure to do my pencil strokes on the light side so a quick coat of white paint would cover up pencil marks.

Hape Toy Kitchen Makeover.jpg
Kitchen Reno Top .jpg

Once I screwed this panel back on, I ran my black marker along the crease were it meets the countertop to give it a crisp, perfect finish. I got pretty lucky that my “tiles” fit perfectly. I love how the small scale makes them look realistic!

I wanted to do something about the red knobs, but they weren’t coming off easily to be spray painted. I tried some craft paint but it didn’t grab onto the lacquered finish - so I just used the chalk marker on that too.

Finally I spent way too much time styling it out. Those little wooden “vases” are napkin rings and I grabbed some of my faux plants to make it cute. There’s also a little iron owl trivet on there.

Guys - this project was easy, quick and totally free because I used supplies from my stash. Also a good way to get out my need to renovate and finish a space while my other projects are currently being demo’d.


Our Farmhouse | White Washing a Stone Fireplace

Stone Fireplace Makeover

One of the most dramatic updates in my home cost less than $100 and was something I did myself over the course of a (kid free) weekend - white washing my stone fireplace. A lot of you have been asking me for more details, so buckle up! Here we go. 

White Washed Stone Fireplace
White Washing Fireplace

The giant sandstone fireplace was a huge selling point for us - we use it daily in the winter and love the cozy feeling a wood burning fireplace brings to a home. One thing I didn't love - the soot stains from years of use and the dirty look that came along with it. I tried scrubbing it but never got the stone to look the way I wanted. I also don't love brown tones, so... I took a risk and I love the final result.

But before we go on - I must caution you - this is a permanent solution. The porous nature of the stone absorbs the white wash and there is NO GOING BACK. I've seen some not-so-great examples on Pinterest that really had me pressing pause on this project for a long time. That said, there are also some gorgeous results out there, so I knew it was possible. 

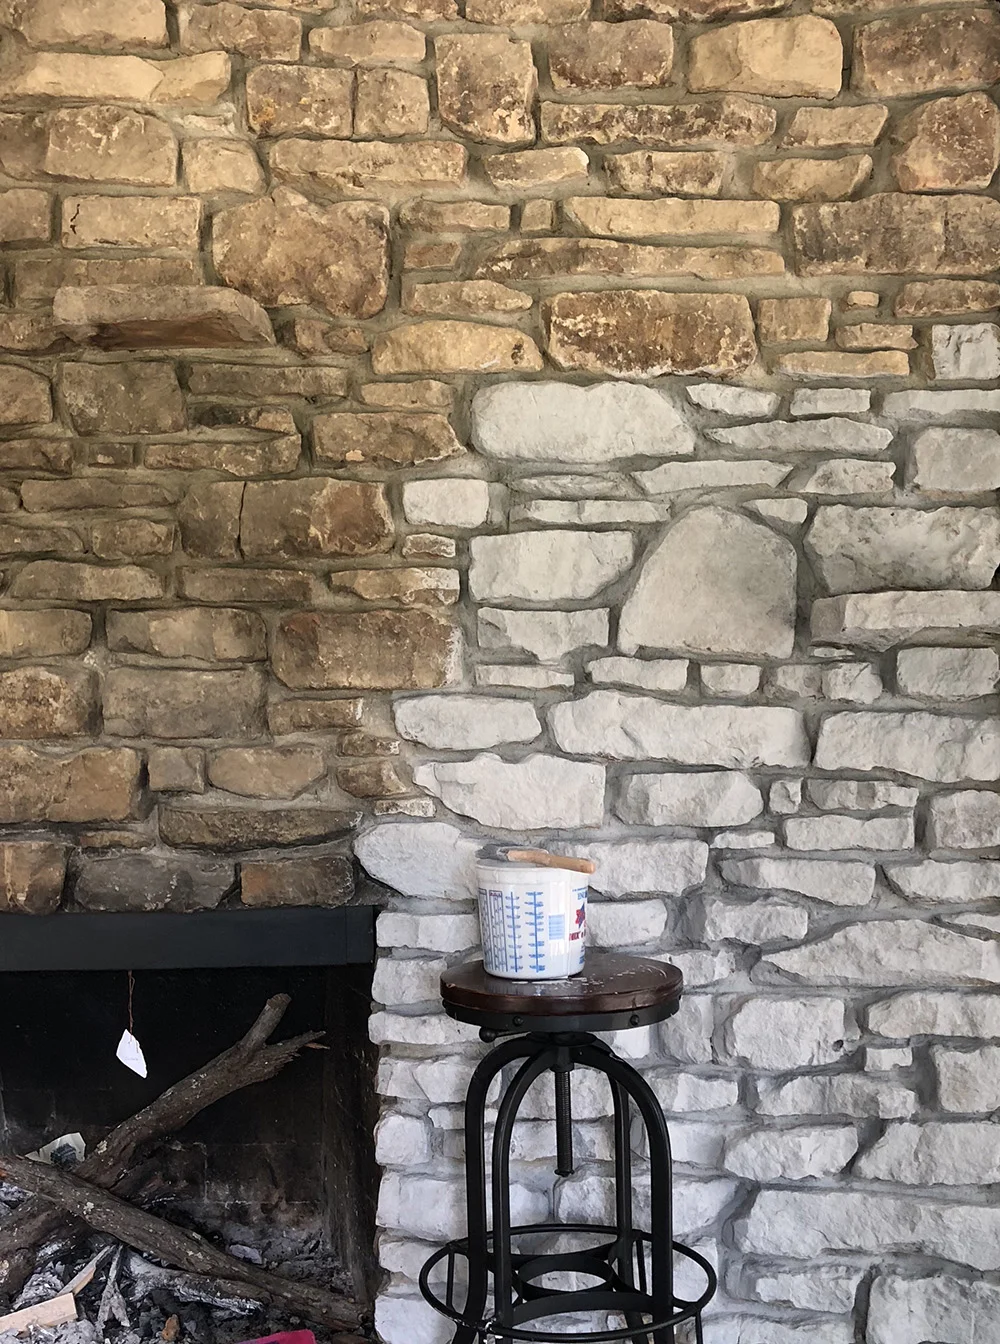
The process is pretty simple. I chose Rustoleum Chalked paint in Aged Grey and used a measuring bucket to ensure I could get the same ratio of paint to water with each batch (1:1 worked great for me). Once you've mixed up your paint and water, all you need is a stiff brush, rags to dab the wet slurry, a couple of awesome podcasts and time. Check out these progress shots (click to for larger view)

Fireplace Lead.jpg

I think this project was successful for a couple reasons:

 The 1:1 mixture of paint allowed for some of the natural variation in the color of the stone to come through. No matter what ratio you use, make note of it and repeat it! 

Matte paint is a must. Chalk paint worked well for this and the grey tone looks really nice against my bright white walls.

I worked in small sections and dabbed excess liquid as I went, especially in places I wantd some of the rock patterns to be more visible.

The actual texture of the stone work has a lot of highlights and shadows which adds to the dimension of the finished project.

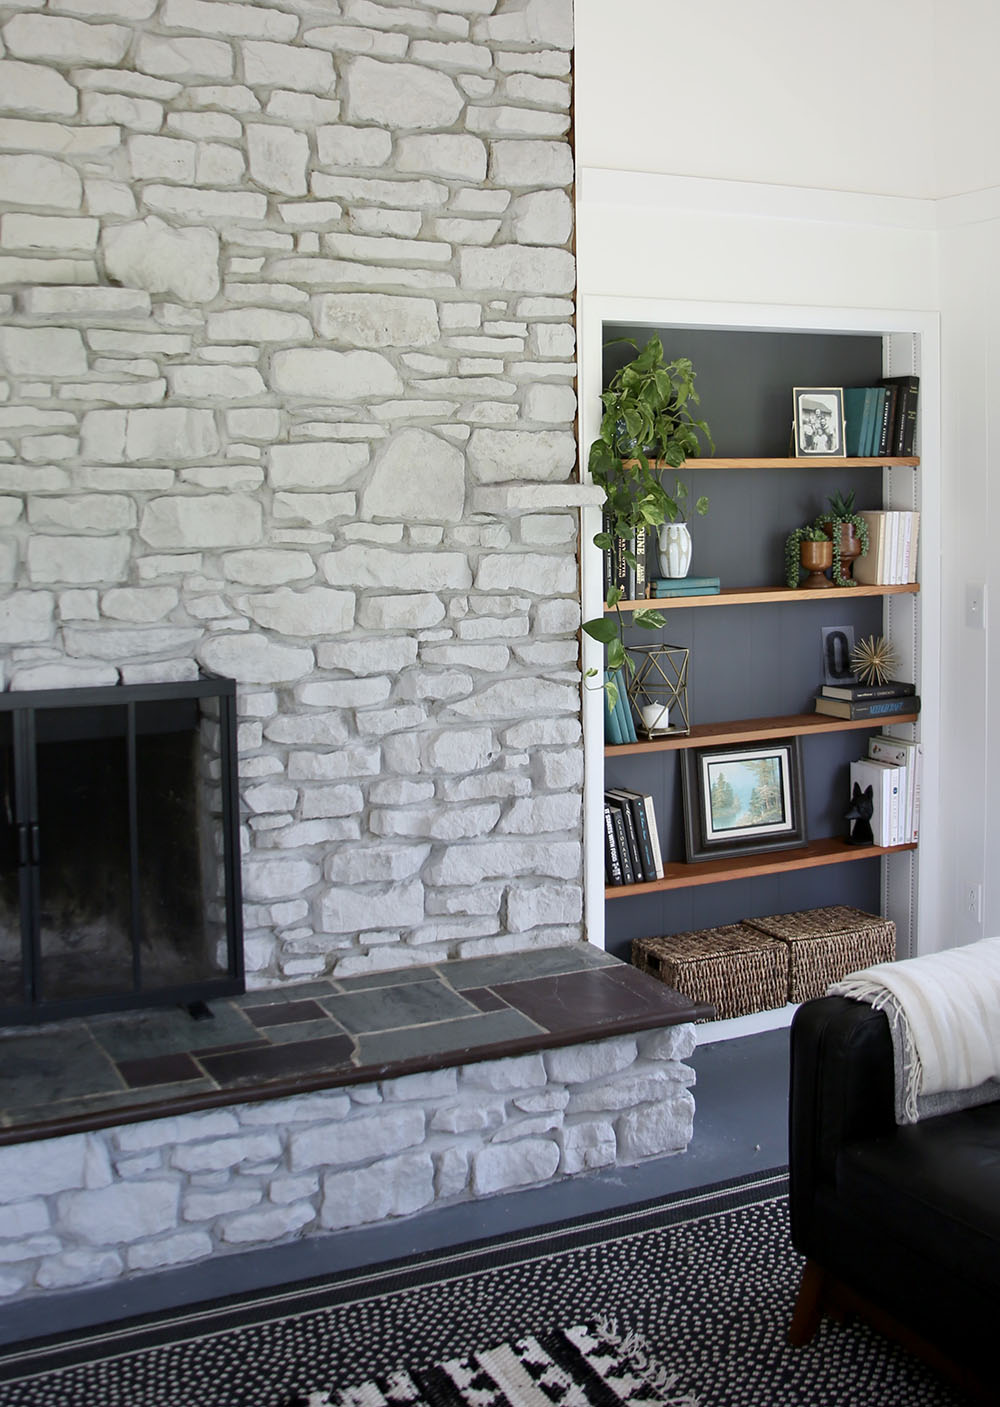
I'm thrilled with the final results! It brightens the room by reflecting all of that pretty natural light and maintains an organic look. If you haven't seen the full room make over, you can do that here.

White+Washed+Stone+Fireplace+and+Sunroom+Makeover.jpg

Lastly, this is kind of wild, but I was nominated and selected as a finalist by Domino Magazine for Best Renovation Blog as part of their Design Blog Awards. WTH!? The winner will get featured on their site and win a trip to Chicago! Public votes will determine that! If you've enjoyed any of my before and after makeovers, I'd love your support! 


Our Farmhouse | Sunroom Makeover

Leader Sunroom 2.jpg

This makeover has been a long time in the making! It's been nearly 10 months since we first started making changes and I am so excited that it's finally done. Like many other rooms in our home, this space has been revamped from floor to ceiling and entirely done by us (including my brother Dan and father-in-law Jim). Wanna have a look? Come on over!

White Washed Stone Fireplace and Sunroom Makeover

Before

Let's start by checking out what this room looked like before we made changes (click on any image to view larger). It's such a cool space and it's absolutely what sold me on this house. I love the high ceilings, wooden beams and all of that natural light! This side of the house was a mid sixties addition and we even have the blueprints from the original owner! 

White Washed Stone Fireplace using Chalk Paint

Paint

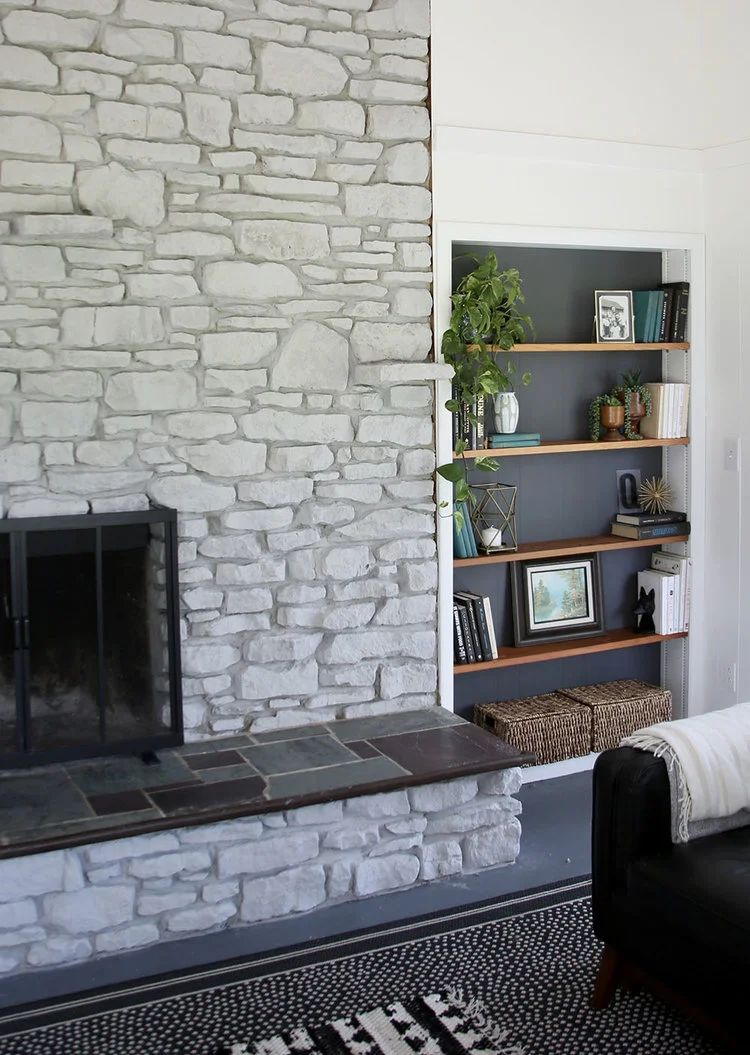
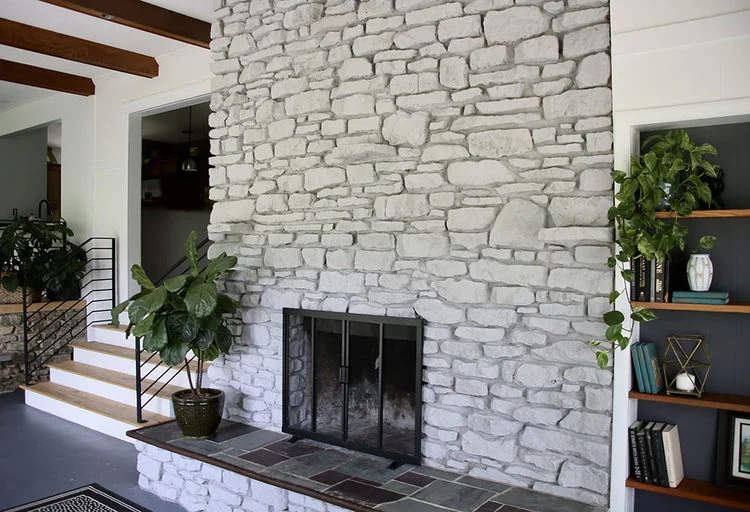
All of the walls, floor and ceiling got a fresh coat of paint in addition to white washing the fireplace. The brown stone just wasn't for me and I love the almost Nordic feeling it gives off now. I mixed Rustoleum chalk paint in Aged Gray 50/50 with water and applied with a paint brush. It took just a smidge over two quarts and twelve-ish hours to complete this huge fireplace. 

The ceiling had some patching and water damage, so that needed a complete paint job. Thanks to my 6'7" tall brother, I was able to pass over the job. Phew. He also took care of the floors (using garage floor paint) while we were out of town. 

On the walls is my go to white - Chantilly Lace from Benjamin Moore. It's a warmer white which helps keeps things from feeling too sterile.

Black and White Sunroom Plants Jungalow Style

Iron Work

Railings between the first floor and sunken living room were a necessity for safety but stylistically, the midcentury scrolls were not really our style. We opted to simplify the design from a double curved shape to a horizontal run and matching stair rails. Josh of Clutch Fabrication did the custom design and installation and if you have the chance to work with him, I can't recommend him enough. The matte finish rails really set the tone of both the dining room and sunroom and give the space a really modern farmhouse vibe.

Farmhouse MCM hybrid custom iron railing
Kids Play Area CLEAN
Sunroom Railings MCM Farmhouse White Washed Fireplace

Lighting

The south wall originally had what I can best describe as  window box style wooden feature with seventeen (17!!) exposed bulbs creating an uplighting effect over the two sliding doors (see before photo above).  There is only one electrical point, so Adam wired it with conduit and then routed the back of 3x1" boards we used around the entire room (we kept the paneling and needed the horizontal railing to conceal the seams). Adam then installed these lights, which came in at under $30 a piece, which I think is a great deal for such a handsome light. 

New Lighting

Bookshelf

This built in bookshelf and shelves were originally painted the same color as the walls but I decided to use a contrast color on the back boards. When the stone was it's original color I used a really pretty pale green but the whitewash needed something different so I chose Peppercorn in a matte finish from Sherwin Williams. The actual wood from the shelves was reclaimed from the old stair treads leading down to the living room from the upper level. Adam cut them to length and sanded them to the smooooothest finish and I coated them with a mixture of beeswax and mineral oil. 

Bookcase.jpg

As far as the shelf decor goes, everything is second hand or pulled from another room in the house. I like to regularly move accessories around from room to room! Here are similar baskets (I use them all over my home!)

Fireplace and Bookcase

Furniture

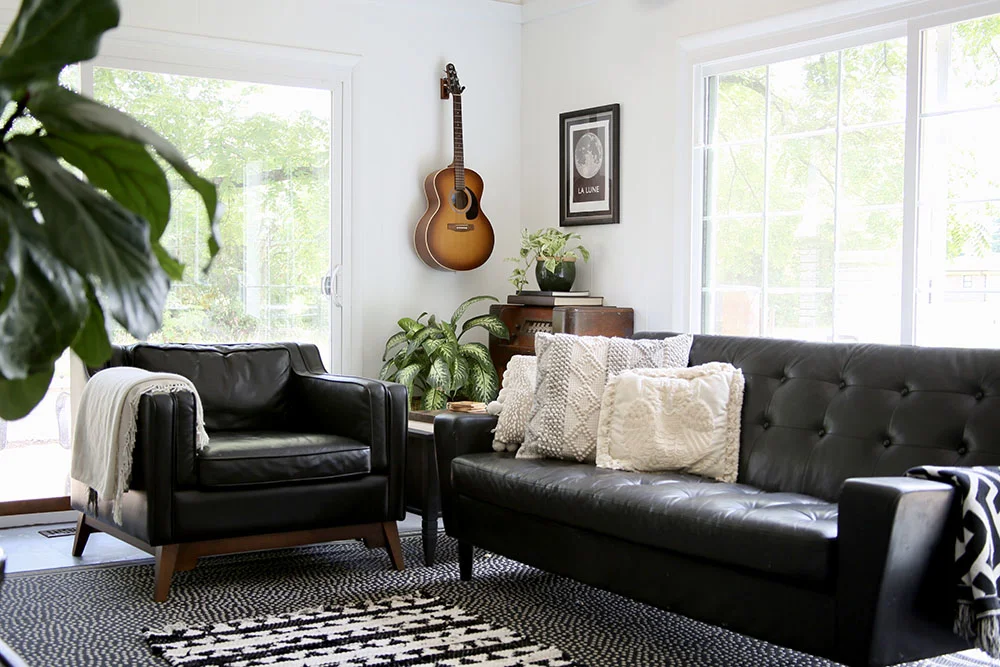
When we moved in I bought the black leather couch (with a matching ottoman currently in another room) for $100 off Craigslist. The large black leather chair next to it is from Article and it's awesome! I will buy a couch from them when I'm ready to upgrade this one or for another room. Between the two of those, there's a side table I picked up second hand and made over with primer, paint and some new knobs.

Sunroom Makeover

Behind those pieces is a vintage radio I had in my old house. It's a great piece for interest and character and perfect for hiding cords and gadgets (the front opens up to reveal an old record player that doesn't work)

On the opposite side of the room is a kids sized table my dad built along with some modern style chairs. 

Vintage Radio and Plants

Accessories

On the floor are two sizes of the same indoor/outdoor rug from Ballard. This pattern hides all the dirt which is great for kids! I layered a smaller rug on top of the big one in front of the fireplace which was from Hobby Lobby. 

The pillows on the couch are a mix of homemade, second hand (sort of!) and bought new (back in 2017!) From left to right - a pillow I made myself, one from Loloi by Joanna Gaines (named Joslin if you're searching!). The front owl pillow is another one I made using a vintage embroidery I found out thrifting that I removed from a frame and used as the front fabric. 

MCM farmhouse hybrid

Plants

Because of the abundance of light we have a lot of plants in this room! On the fireplace is a fiddleleaf fig, in the bookshelf and on the radio are pothos plants. Plus we have that groovy 1960s built in planter and the big ledge for our huge monstera! 


That's our sunroom makeover! Wanna hire me for your next home project? I'm available! You can see all of our farmhouse updates here!

Our Farmhouse | Spring Bedroom Refresh

Jungalow Style Master Bedroom

Finally! The sun came out! So here we are with my latest interior project - a master bedroom refresh. Right now we're not in a place to dismantle our lives (ie the kitchen) for a big renovation, so decided to take on a smaller project instead. When I'm styling a space I tend to borrow from other rooms, and after I completed the master last year I moved around a lot of plants, books, odds and ends. The space was feeling a little empty. Time to refresh!

First let me share what stayed the same, which is actually a lot. The paint, window treatments and almost all of the furniture are still in use. We moved the crib over to the kids' room and in it's place I finally assembled a desk Adam gave me for mother's day last year (which was also the weekend we closed on this house and moved it, so that box became hidden under other boxes and on and on). I should also note that I kept my 'Secondhand First' mission with this space! My mom did bring me to a new set of sheets as a gift, but everything else is either second hand or self made. I'll go into detail below!

So what's new, Jess? Come on over and have a look!

Master Bedroom Secondhand First Jungalow Style
Custom Made Bedroom Pillows - Jessica Quirk
Bed with Blue.jpg

Bedding

To brighten things up, I started with a new-to-me white coverlet (found second hand on etsy). Underneath are the organic cotton sheets my mom gave me, which are also white with a small grey print. I swapped out my navy bedskirt with a white version I already had in my linen closet. I also kept the two quatrefoil cream pillows and blue textured pillow that I made last year for this bed. Although green velvet might not conjure up spring to most, it reminded me of moss and since I have a thing for using houseplants in all of my rooms now, it helped pull those colors into the bed area. I'm not sure that last sentence totally makes sense. For the throw pillow I used a modern paisley with a combo of pompom trims that I made myself. (and for the bench makeover you'll see on the opposite side of the room). I also kept the white throw at the end of my bed. 

Behind the bed, I created a new headboard using 600 feet of cotton cord affixed to an oak base (which I also made). It was probably a week of knotting and Adam and I both love the end result!

Above the bed, I installed an oak shelf (on sturdy brackets, mounted to studs!). I'm still working on how I want to style it, so you'll see two different versions of that #shelfie in this post. One version has a Robert Cox oil painting I love and the other is just plants. I like how the painting brings in some blues and yellows (and in that version, I have the blue pillow on the bed) but I also like just plants. I might rearrange it every time I clean the room! Who knows! I've been playing around a lot with that shelf and I think as the plants mature and grow it's going to be even cooler.

Plants in Master Bedroom On Shelf Over Bed
Master Bedroom Update
Shelf Over Bed with Plants Jungalow style
Rattan Chair Makeover and Desk in Master Bedroom

Desk

The desk was a gift from last year and I'm keeping it simple with a couple plants and a framed photo of me and Felix. The chair was such a score for me - I'd been wanting to add something rattan to the space and this baby popped up at the Habitat ReStore just a couple days later. I sanded down the peeling poly and then rubbed on some beeswax conditioning paste I made. Finally, I used some leftover velvet to reupholster the seat. Hello retro! I love it! The woman who cut my fabric was like "is this color coming back in style? It's very 1970s!" to which I answered "I'm not sure, but that's exactly what I'm going for!" Green isn't going to float everyone's boat, but baby, it rocks mine! And velvet is just so lux! I used a 50% off coupon to buy it as well so la-ti-da!

Decor

Small basket wall i bedroom
Plants B.jpg

Over the wide dresser is my ever growing collection of baskets and trivets and anything straw. Everything is second hand minus the hat which I made myself. I also have a Calethia plant that I repotted (it made its first appearance in my upper living room) and is thriving now that I actually take care of it. It's kind of been one of those that I let totter near the edge of death before reviving (or used to!) Now she has more room for her roots and gets enough water to be happy. 

I swapped the location of the dressers, but kept the mirror where it was, so I put a plant, a globe and some yellow billy balls up there (those were formerly on my bedside tables!) Looks cute! On the left is the bench I reupholstered, using the same fabric as the throw pillow on the bed. Before it was a cat scratched mess with a loose leg and after it's sturdy and perfect for... gathering laundry and getting piled up with junk. Seriously. I'll try to keep it empty to use for putting on shoes or whatever. Mainly I bought it because I wanted a project and it was $6 so I'm pleased with the end result. 

MCM Dresser with Globe and Round Mirror
Habitate ReStore Bench Makeover

Lighting

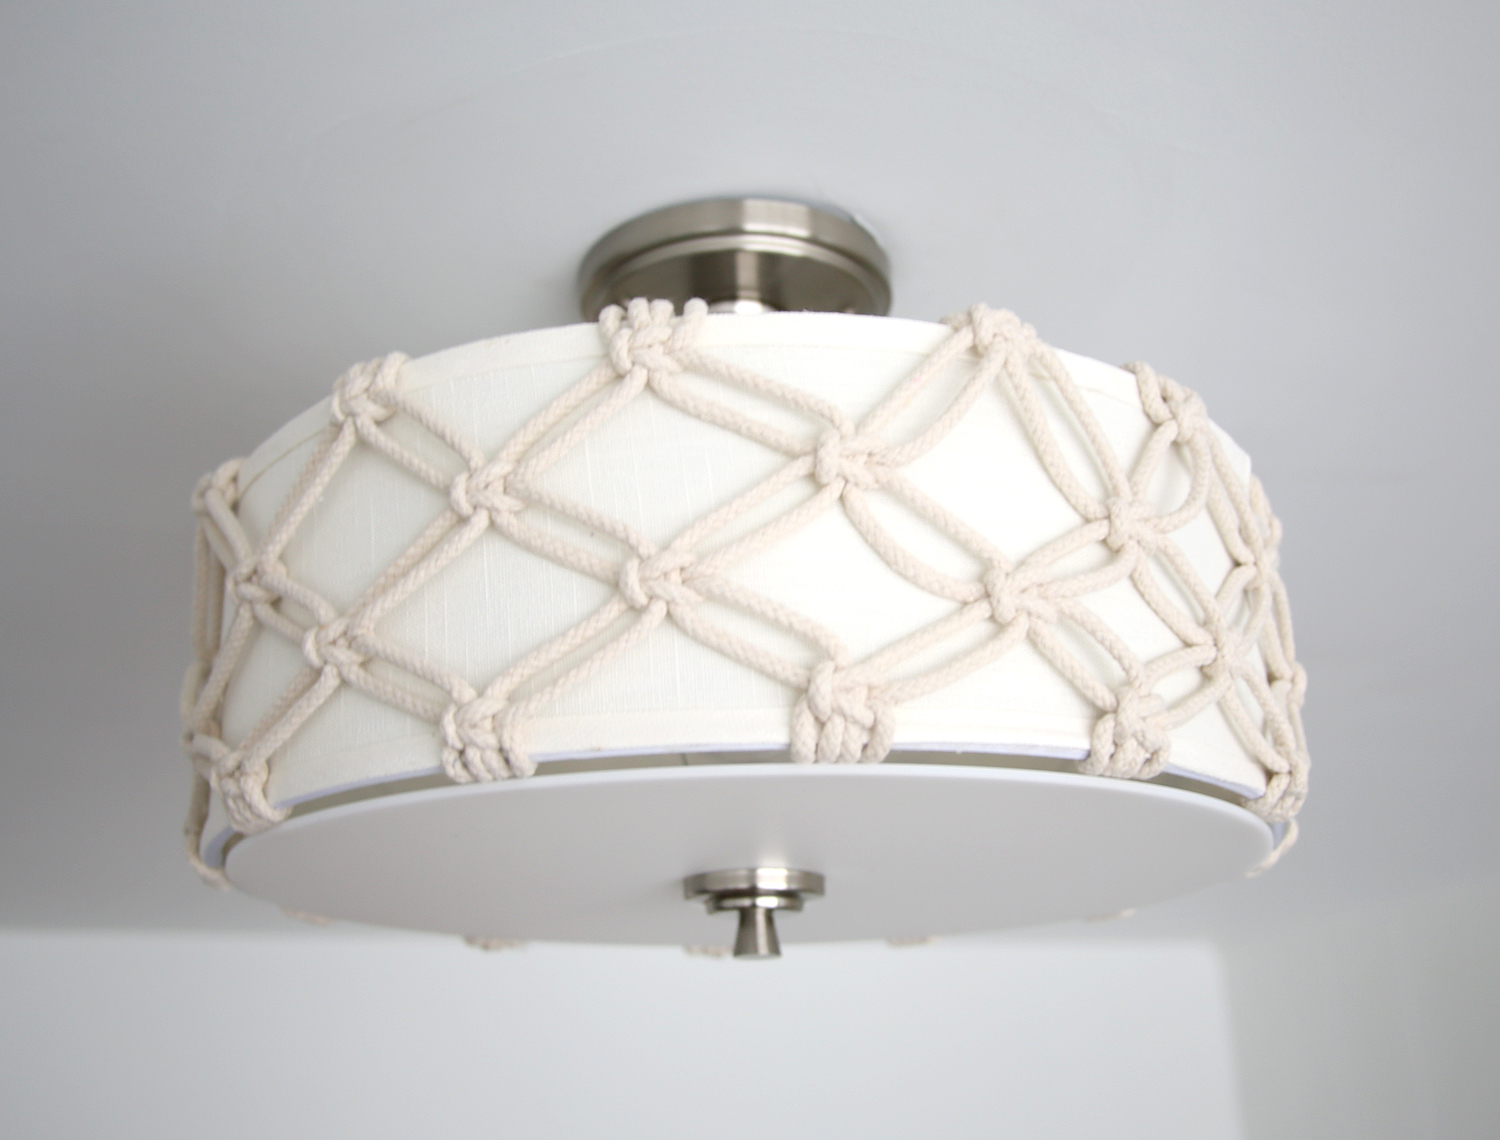
Macrame Modern Light Update

I kept my same bedside lamps but finally installed an overhead light! You guys - I left the old wiring sticking out of my ceiling for 9 months. WTF?! Earlier this week I installed the new light, which I updated with some more macrame. It's subtle enough but still improves the look of a basic builder's fixture. And because I made it into a project, I consider it a "supply" which is kind of a round about way to keep within the second hand first. (I allow myself to buy project materials new.) Because nothing was up there at all, I couldn't just live with what I had and lights can be tricky finding used (there are plenty of boob flush mounts out there, but not my thing style wise). I hope there's no one out there bored enough to blog about the times I had to buy something new from the store! I'm sure I'm the only one who cares about the whole 'Make, Do, Mend' thing anyways!

Jungalow Style Master Bedroom Spring Refresh

So that's my spring refresh on my bedroom. I grew up with parents who loved to move around furniture and make small changes (or big, my mom would re-paint rooms all the time!) and it makes me happy to do the same thing. Huge thanks to my mom who helped me sew, pry out old staples and watch the kids so we could make this happen! If I missed anything, please let me know if the comments!