Our Farmhouse | White Washing a Stone Fireplace

Stone Fireplace Makeover

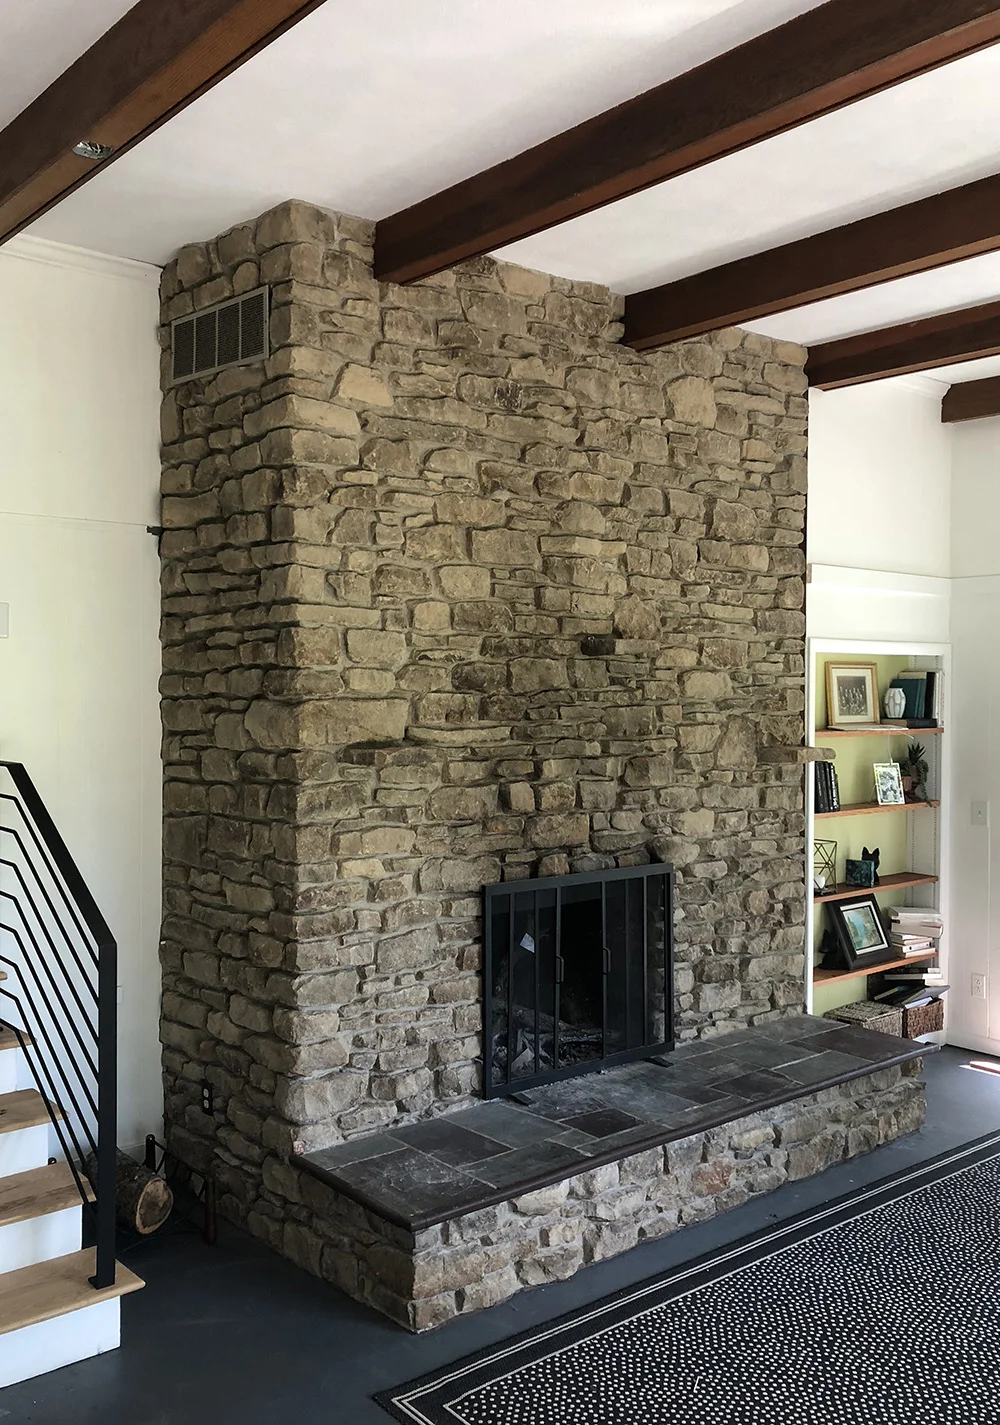
One of the most dramatic updates in my home cost less than $100 and was something I did myself over the course of a (kid free) weekend - white washing my stone fireplace. A lot of you have been asking me for more details, so buckle up! Here we go. 

White Washed Stone Fireplace
White Washing Fireplace

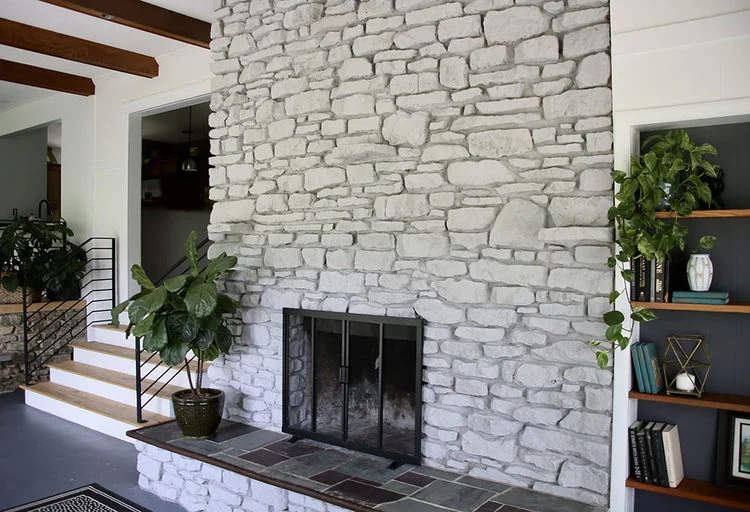
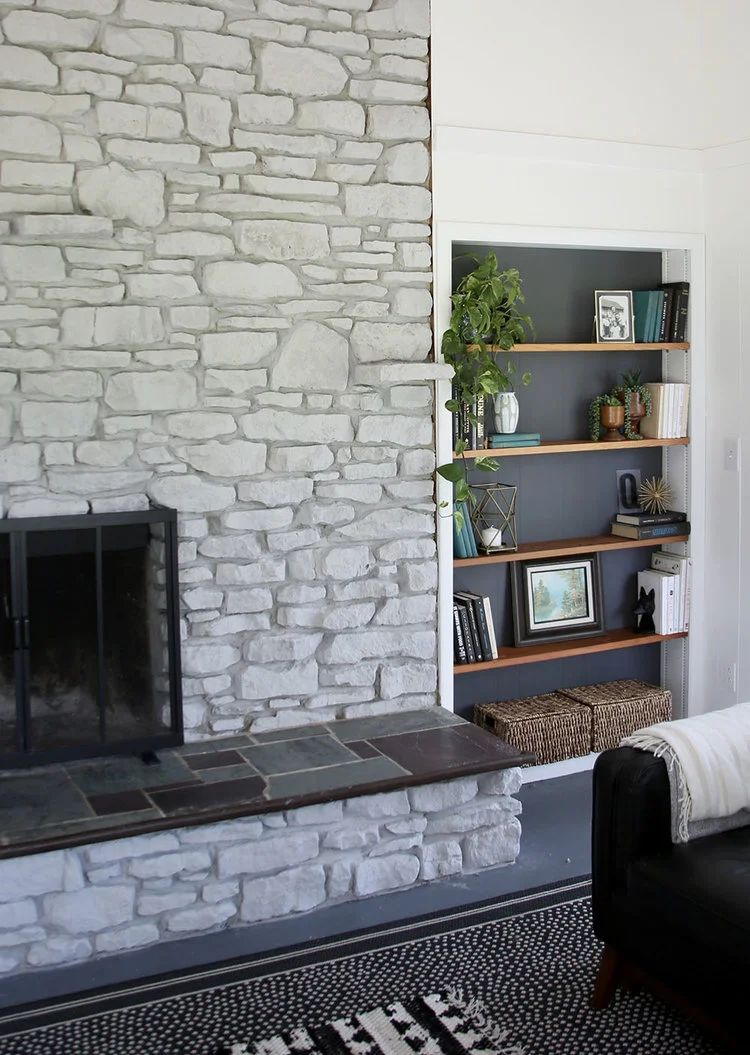
The giant sandstone fireplace was a huge selling point for us - we use it daily in the winter and love the cozy feeling a wood burning fireplace brings to a home. One thing I didn't love - the soot stains from years of use and the dirty look that came along with it. I tried scrubbing it but never got the stone to look the way I wanted. I also don't love brown tones, so... I took a risk and I love the final result.

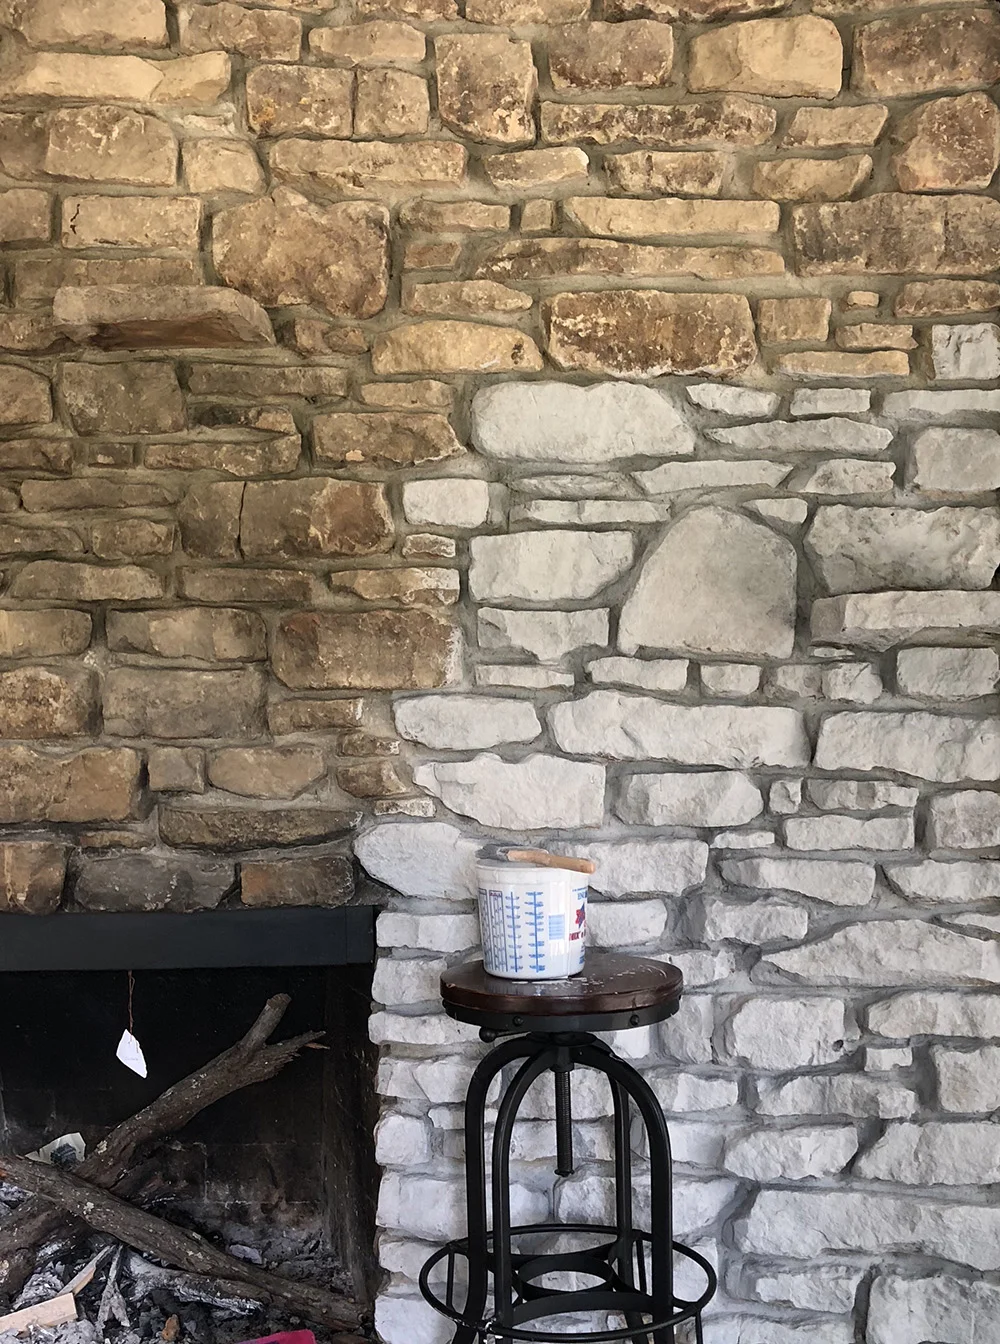
But before we go on - I must caution you - this is a permanent solution. The porous nature of the stone absorbs the white wash and there is NO GOING BACK. I've seen some not-so-great examples on Pinterest that really had me pressing pause on this project for a long time. That said, there are also some gorgeous results out there, so I knew it was possible. 

The process is pretty simple. I chose Rustoleum Chalked paint in Aged Grey and used a measuring bucket to ensure I could get the same ratio of paint to water with each batch (1:1 worked great for me). Once you've mixed up your paint and water, all you need is a stiff brush, rags to dab the wet slurry, a couple of awesome podcasts and time. Check out these progress shots (click to for larger view)

Fireplace Lead.jpg

I think this project was successful for a couple reasons:

 The 1:1 mixture of paint allowed for some of the natural variation in the color of the stone to come through. No matter what ratio you use, make note of it and repeat it! 

Matte paint is a must. Chalk paint worked well for this and the grey tone looks really nice against my bright white walls.

I worked in small sections and dabbed excess liquid as I went, especially in places I wantd some of the rock patterns to be more visible.

The actual texture of the stone work has a lot of highlights and shadows which adds to the dimension of the finished project.

I'm thrilled with the final results! It brightens the room by reflecting all of that pretty natural light and maintains an organic look. If you haven't seen the full room make over, you can do that here.

White+Washed+Stone+Fireplace+and+Sunroom+Makeover.jpg

Lastly, this is kind of wild, but I was nominated and selected as a finalist by Domino Magazine for Best Renovation Blog as part of their Design Blog Awards. WTH!? The winner will get featured on their site and win a trip to Chicago! Public votes will determine that! If you've enjoyed any of my before and after makeovers, I'd love your support! 

Ā 

Ā 

Our Farmhouse | Laundry and Mudroom Makeover

laundry leader.jpg
Farmhouse Laundry Room
Farmhouse Style Laundry and Mudroom Makeover
Laundry Room Top.jpg

Ta da! I just put the finishing touches on my laundry slash mudroom makeover and I am so excited with how it all turned out! We did this one all ourselves with no outside contractors and I got to really expand my skills working with wood and electricity. I've got a big pot of coffee waiting, so come on over and have a look!

Before

before laundry.jpg

Let's start by talking about this room in it's before state. The walls were the same dark brown color as the majority of the rest of the house and the floor tiles and rug were in the same family. Even with big windows the space felt pretty small. The ceiling had some damage from a former leak and some drywall shifting left two big cracks in the ceiling (covered by a delightful pink wallpaper boarder). Speaking of windows, neither had any casement trim on them either.  The washer and dryer came with the house and we knew they'd stay, but the tubes and power and this and that behind them was an eyesore. And for a long time our microwave sat on the floor in the corner. It was just one of those spaces that didn't contain any joy and because we come and go through this door nearly 100% of the time, I wanted to fix 'er up!

Farmhouse Style Laundry and Mudroom Makeover

Ceilings

First up - the ceilings. My folks came to town to stay with me while Adam had a business trip. Since my dad likes to stay busy with a project when he visits, I proposed two options - help me with the laundry room or paint the ceiling of our sunroom (which is super high). Dad chose the laundry room and he may have regretted it because it ended up being so much more work than we thought (I wanted to complete the room and surprise Adam when he got home from his trip). 

I knew I was going to go for a shiplap style treatment on the slanted ceiling. As I mentioned in a past post, this room was probably a porch at sometime that was eventually closed in and the boarded ceiling gives a nod to that. I had looked for inexpensive options (like ripping plywood down into planks) but because of the humidity and moisture created by the dryer, my dad and I agreed solid wood boards would be a better choice. I went with 6" wide pieces that I cut down to length. Because we were nailing above our heads, we also did pilot holes to get the nails started (I do pilot holes for everything now! Makes hammering so much easier and faster). 

Even after carefully picking through the lumber yard for the straightest boards, there was still some variation, which we evened out by installing some trim on either side. This part really puzzled my dad (he's super handy and does projects around the house all the time). We tried so many different things to try to push and pull them into perfection, but by that time I told him "done is better than perfect" and used caulk to pretty it all up. It is a farmhouse after all! 

My mom and I painted the ceiling with just one coat to let some of the character of the wood come through. I used Chantilly Lace from Benjamin Moore in an eggshell finish for both the ceiling and walls (they took 3 coats!)

Laundry Self 2.jpgFarmhouse Style Laundry and Mudroom Makeover


Appliance Surround and Shelf

Another big priority was disguising the mechanical stuff behind the washer and dryer (there's still easy access should we need to get to the water!). I designed a surround using 6" wide boards with two horizontal pieces on the front. We found the top board in the garage which Adam sanded down beautifully. I coated it with a mix of beeswax and mineral oil and i love the natural finish. Adam built and installed this whole piece for me and I love it! Thanks babe!

Farmhouse Style Laundry and Mudroom Makeover

Window, Door and Baseboard Trim

Casing those windows was also a priority for me and I did those 100% myself. Because of the space available, I went with smaller width boards (the sides are 2x1, bottoms 3x1 and top a flat 3x1 and side mounted 2x1).

The casing on the door was run of the mill stuff, so I tore it down and did a similar finish to the windows. The side boards are 3x1, and the top is a combo of two 2x1s and a flat 3x1.

Lastly, I installed 6" baseboards around the room. All of the trim is Black by Benjamin Moore in a semi gloss finish

Vinyl Tile Decals Cement Tile Look Alike

Floors

I want to devote a whole post to the floors, but here's the long and short of it. I painted the grout (Pearl Grey MAPEI Grout Refresh) and then applied vinyl stickers over my old tile. This is a short term solution for the next year or so and a way to test out if I really want to spend the money on cement tile. It was super easy to install but I am not sure of the durability yet. I'll be putting a rug of some sort right by the door to help with that!

Decor

Farmhouse Style Laundry and Mudroom Makeover
Baskets.jpg

This is my favorite part and I had a lot of fun pulling this together. I kept with my homemade/second hand mission too! Over the washer/dryer are some glass vessels I picked up in years past at garage sales. We have different kinds of detergent we're using up but Adam prefers dry and I like liquid so we have both. And if I'm being honest, it just looks cute to have a variety up there. I already had the clothespins too and they are purely decorative! The amber glass bottles have my tea tree and lavender oils in them that I sometimes use for different washes (like cloth diapers). 

Next to the appliances is a small cabinet we already had and the bowl on top was bought from an elderly gentleman who makes them by hand at a holiday market a few years ago. 

All of the baskets (and placemat/trivets) are second hand finds (similar groupings are available in my etsy shop!)  I love those pocket style guys and think they look so cute with little succulents in them! The letter board was a gift from Adam two or three years ago and I love how it looks on the original farmhouse wall (it was covered in vinyl that my dad pulled off and in pretty good shape. I filled in the nail holes and we painted it the same white as the rest of the room). I made and installed the macrame plant holders on both sides of the room too. Plant wise there's a lipstick plant, two pothos (one is the daughter plant of the other!) and a bunch of succulents all in terra cotta pots. 

Miscellaneous

Other bits and bobs - I swapped out all of the power outlets for white instead of almond and put new covers on them too. I reused the existing light but put in an edison bulb and a globe I got at the ReStore for $1. I also painted the back of the door black to match the trim but I have dreams of putting a Dutch door in it's place this summer (Gotta save up first!) I also put in a new floor register that I spray painted black. 

I think that's it! This project was a solid week of work spread out over three weeks. This space brings me so much joy! 

Hall Side.JPG
Laundry Finale.jpg