

Our Farmhouse | Laundry and Mudroom Makeover
/


Ta da! I just put the finishing touches on my laundry slash mudroom makeover and I am so excited with how it all turned out! We did this one all ourselves with no outside contractors and I got to really expand my skills working with wood and electricity. I've got a big pot of coffee waiting, so come on over and have a look!
Before


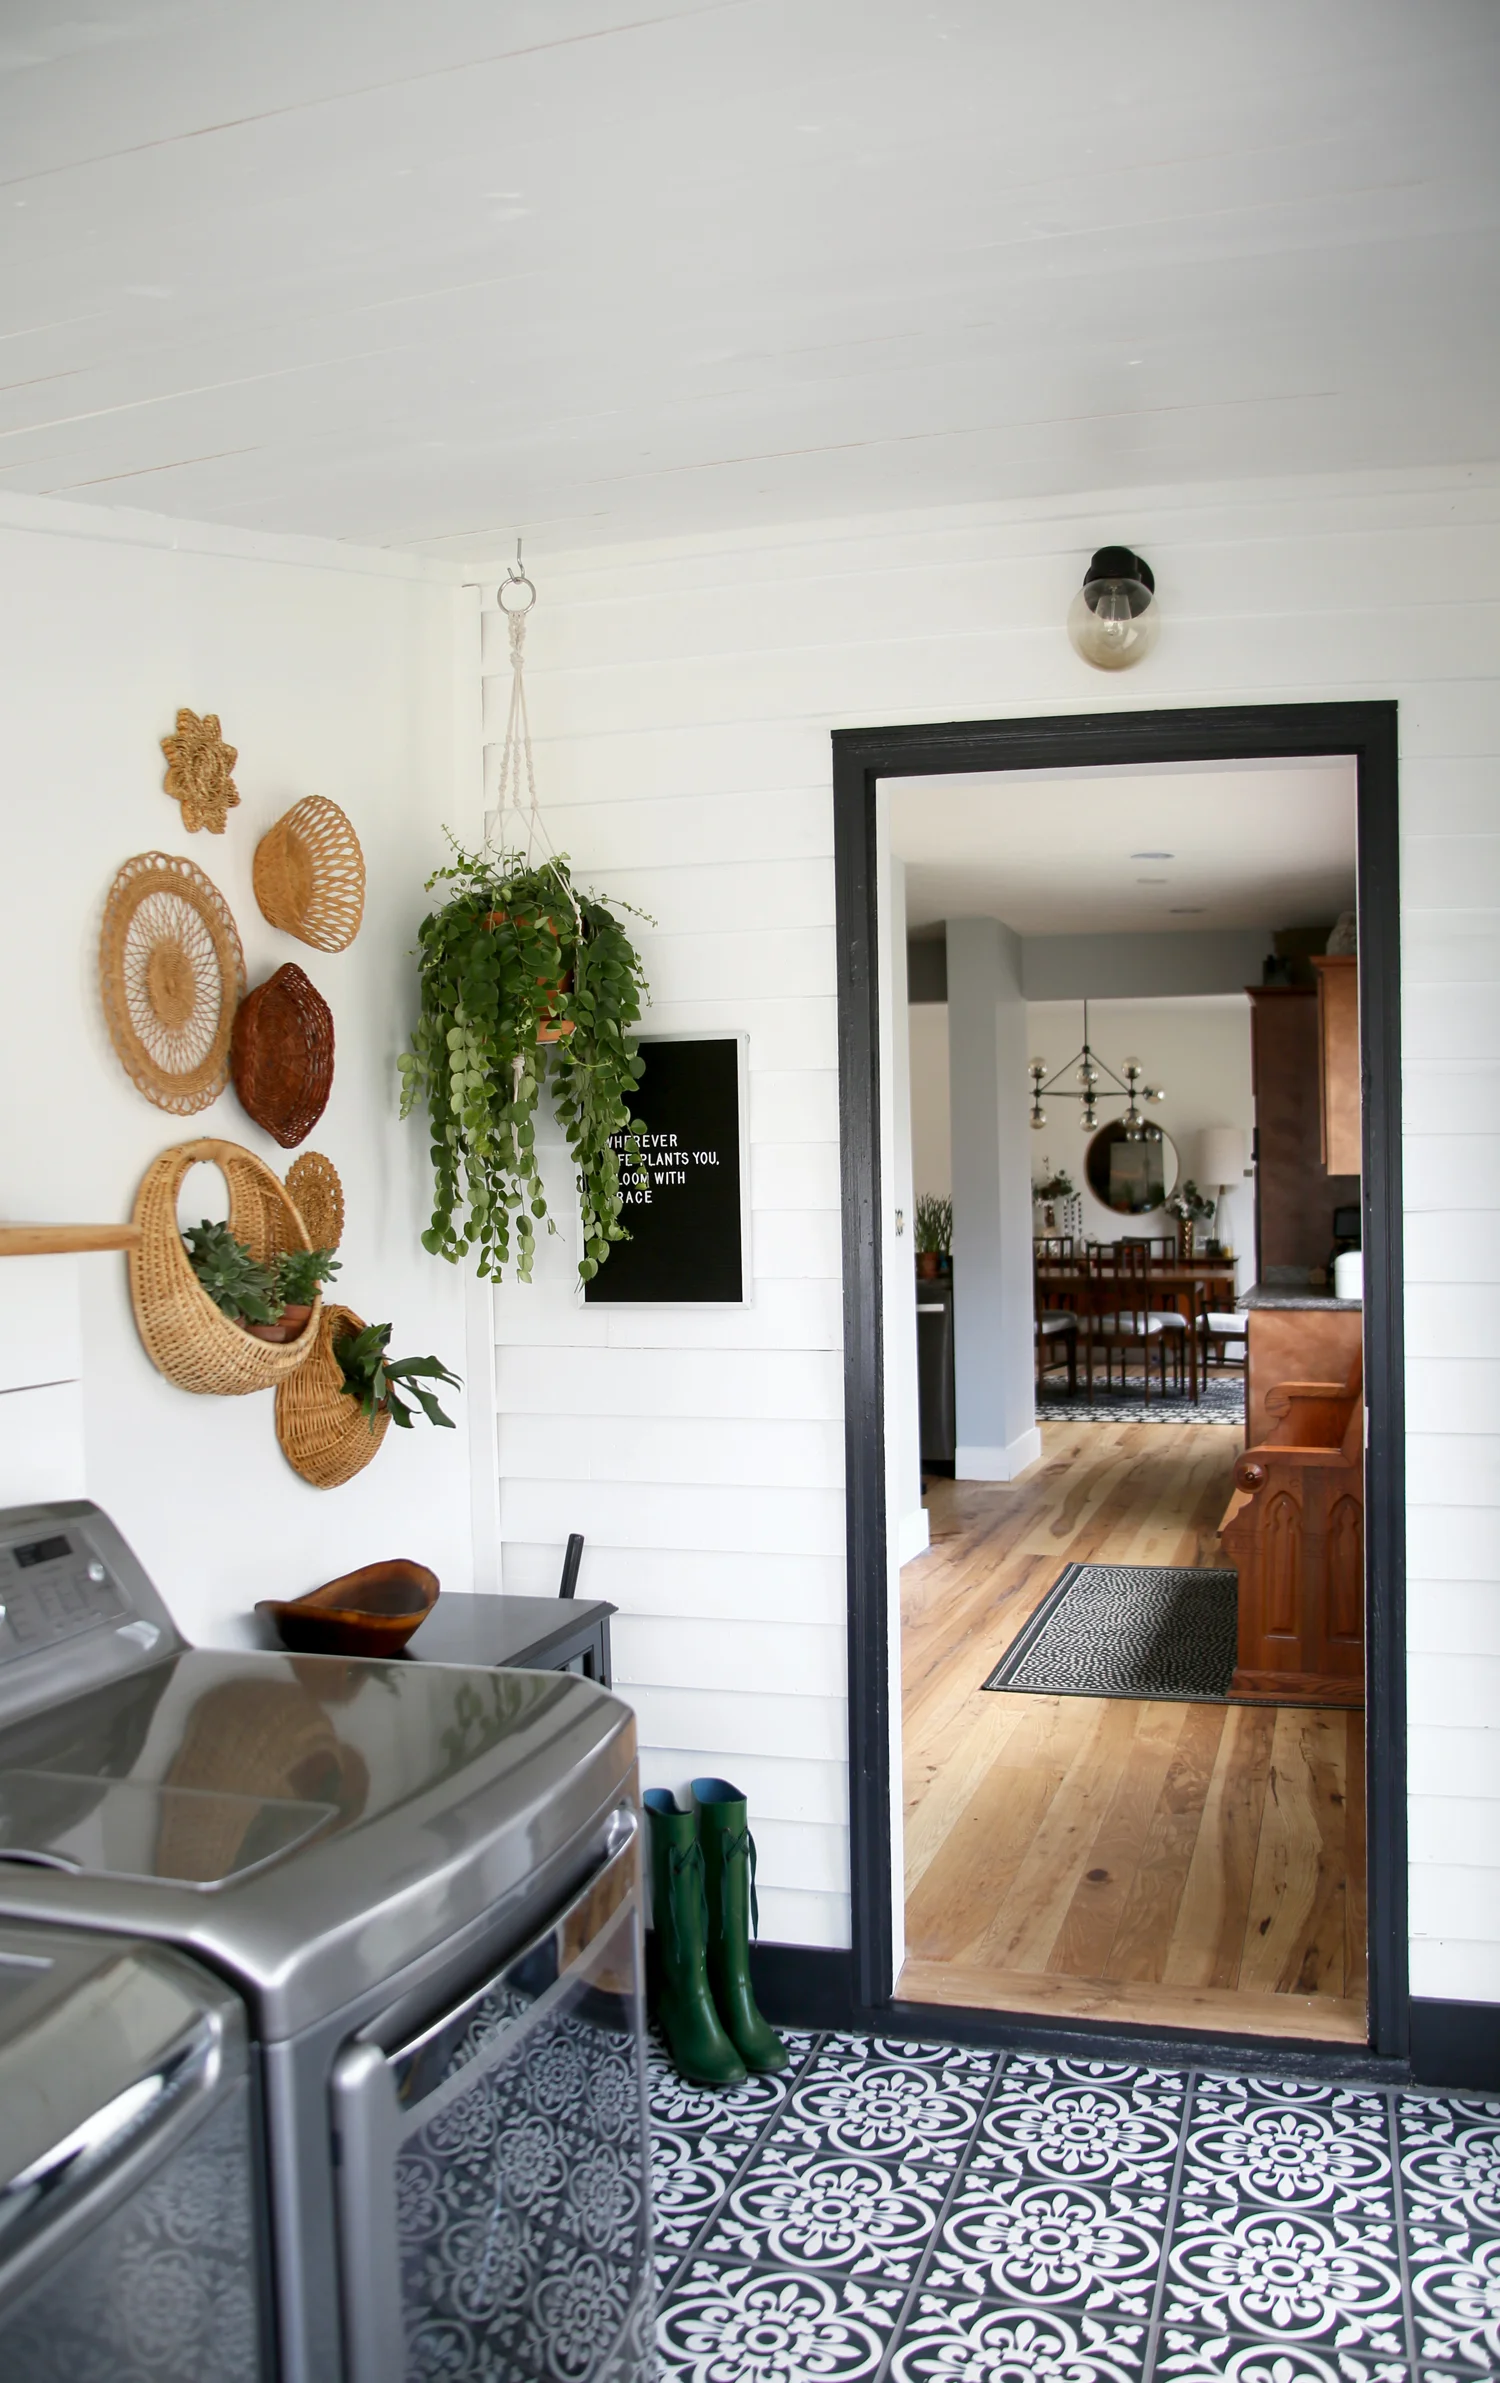
Let's start by talking about this room in it's before state. The walls were the same dark brown color as the majority of the rest of the house and the floor tiles and rug were in the same family. Even with big windows the space felt pretty small. The ceiling had some damage from a former leak and some drywall shifting left two big cracks in the ceiling (covered by a delightful pink wallpaper boarder). Speaking of windows, neither had any casement trim on them either. The washer and dryer came with the house and we knew they'd stay, but the tubes and power and this and that behind them was an eyesore. And for a long time our microwave sat on the floor in the corner. It was just one of those spaces that didn't contain any joy and because we come and go through this door nearly 100% of the time, I wanted to fix 'er up!

Ceilings
First up - the ceilings. My folks came to town to stay with me while Adam had a business trip. Since my dad likes to stay busy with a project when he visits, I proposed two options - help me with the laundry room or paint the ceiling of our sunroom (which is super high). Dad chose the laundry room and he may have regretted it because it ended up being so much more work than we thought (I wanted to complete the room and surprise Adam when he got home from his trip).
I knew I was going to go for a shiplap style treatment on the slanted ceiling. As I mentioned in a past post, this room was probably a porch at sometime that was eventually closed in and the boarded ceiling gives a nod to that. I had looked for inexpensive options (like ripping plywood down into planks) but because of the humidity and moisture created by the dryer, my dad and I agreed solid wood boards would be a better choice. I went with 6" wide pieces that I cut down to length. Because we were nailing above our heads, we also did pilot holes to get the nails started (I do pilot holes for everything now! Makes hammering so much easier and faster).
Even after carefully picking through the lumber yard for the straightest boards, there was still some variation, which we evened out by installing some trim on either side. This part really puzzled my dad (he's super handy and does projects around the house all the time). We tried so many different things to try to push and pull them into perfection, but by that time I told him "done is better than perfect" and used caulk to pretty it all up. It is a farmhouse after all!
My mom and I painted the ceiling with just one coat to let some of the character of the wood come through. I used Chantilly Lace from Benjamin Moore in an eggshell finish for both the ceiling and walls (they took 3 coats!)

Appliance Surround and Shelf
Another big priority was disguising the mechanical stuff behind the washer and dryer (there's still easy access should we need to get to the water!). I designed a surround using 6" wide boards with two horizontal pieces on the front. We found the top board in the garage which Adam sanded down beautifully. I coated it with a mix of beeswax and mineral oil and i love the natural finish. Adam built and installed this whole piece for me and I love it! Thanks babe!

Window, Door and Baseboard Trim
Casing those windows was also a priority for me and I did those 100% myself. Because of the space available, I went with smaller width boards (the sides are 2x1, bottoms 3x1 and top a flat 3x1 and side mounted 2x1).
The casing on the door was run of the mill stuff, so I tore it down and did a similar finish to the windows. The side boards are 3x1, and the top is a combo of two 2x1s and a flat 3x1.
Lastly, I installed 6" baseboards around the room. All of the trim is Black by Benjamin Moore in a semi gloss finish
Floors
I want to devote a whole post to the floors, but here's the long and short of it. I painted the grout (Pearl Grey MAPEI Grout Refresh) and then applied vinyl stickers over my old tile. This is a short term solution for the next year or so and a way to test out if I really want to spend the money on cement tile. It was super easy to install but I am not sure of the durability yet. I'll be putting a rug of some sort right by the door to help with that!
Decor


This is my favorite part and I had a lot of fun pulling this together. I kept with my homemade/second hand mission too! Over the washer/dryer are some glass vessels I picked up in years past at garage sales. We have different kinds of detergent we're using up but Adam prefers dry and I like liquid so we have both. And if I'm being honest, it just looks cute to have a variety up there. I already had the clothespins too and they are purely decorative! The amber glass bottles have my tea tree and lavender oils in them that I sometimes use for different washes (like cloth diapers).
Next to the appliances is a small cabinet we already had and the bowl on top was bought from an elderly gentleman who makes them by hand at a holiday market a few years ago.
All of the baskets (and placemat/trivets) are second hand finds (similar groupings are available in my etsy shop!) I love those pocket style guys and think they look so cute with little succulents in them! The letter board was a gift from Adam two or three years ago and I love how it looks on the original farmhouse wall (it was covered in vinyl that my dad pulled off and in pretty good shape. I filled in the nail holes and we painted it the same white as the rest of the room). I made and installed the macrame plant holders on both sides of the room too. Plant wise there's a lipstick plant, two pothos (one is the daughter plant of the other!) and a bunch of succulents all in terra cotta pots.
Miscellaneous
Other bits and bobs - I swapped out all of the power outlets for white instead of almond and put new covers on them too. I reused the existing light but put in an edison bulb and a globe I got at the ReStore for $1. I also painted the back of the door black to match the trim but I have dreams of putting a Dutch door in it's place this summer (Gotta save up first!) I also put in a new floor register that I spray painted black.
I think that's it! This project was a solid week of work spread out over three weeks. This space brings me so much joy!


