Our Farmhouse | Sunroom Makeover

Leader Sunroom 2.jpg

This makeover has been a long time in the making! It's been nearly 10 months since we first started making changes and I am so excited that it's finally done. Like many other rooms in our home, this space has been revamped from floor to ceiling and entirely done by us (including my brother Dan and father-in-law Jim). Wanna have a look? Come on over!

White Washed Stone Fireplace and Sunroom Makeover

Before

Let's start by checking out what this room looked like before we made changes (click on any image to view larger). It's such a cool space and it's absolutely what sold me on this house. I love the high ceilings, wooden beams and all of that natural light! This side of the house was a mid sixties addition and we even have the blueprints from the original owner! 

White Washed Stone Fireplace using Chalk Paint

Paint

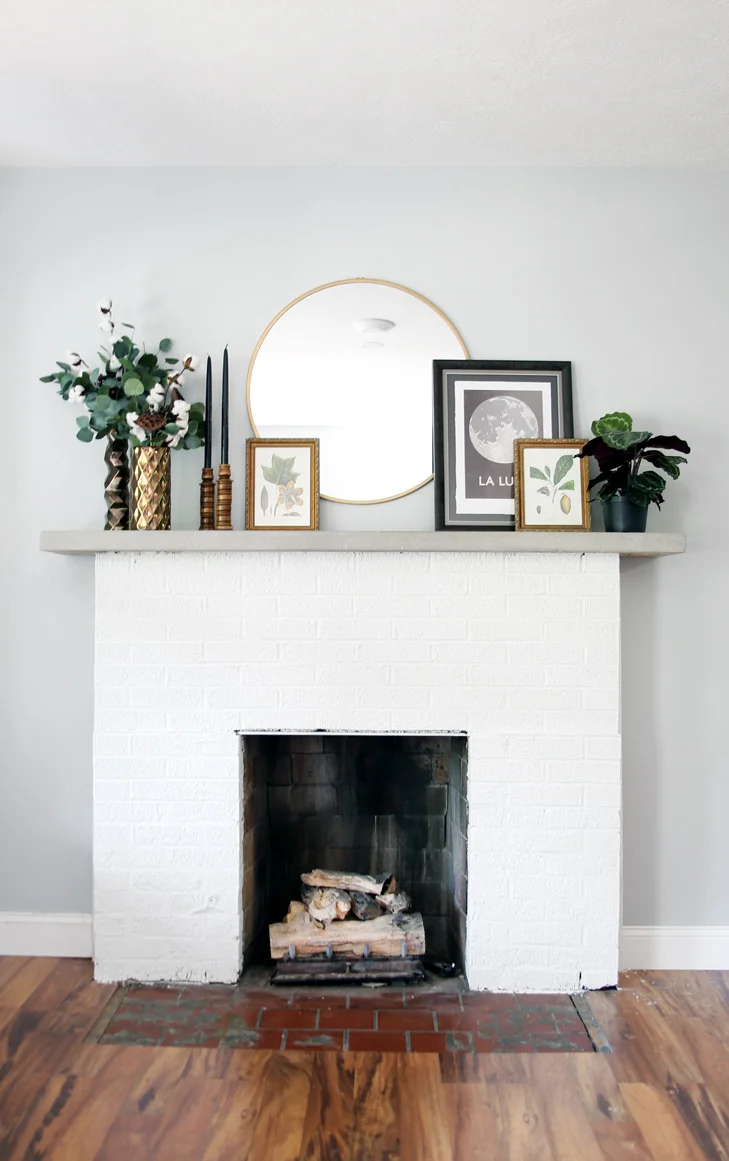
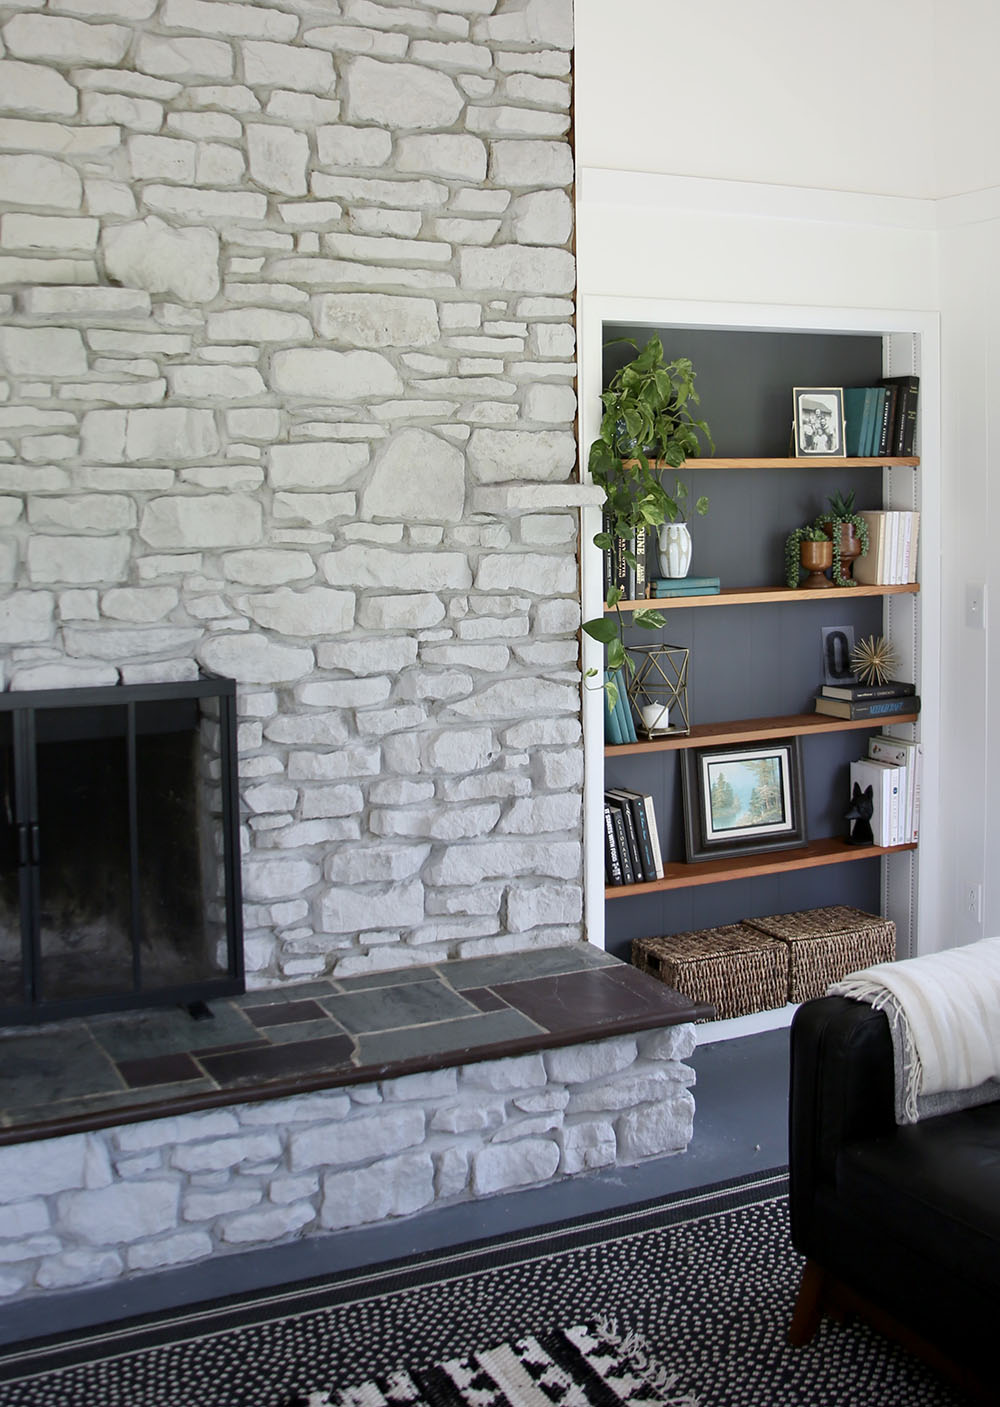
All of the walls, floor and ceiling got a fresh coat of paint in addition to white washing the fireplace. The brown stone just wasn't for me and I love the almost Nordic feeling it gives off now. I mixed Rustoleum chalk paint in Aged Gray 50/50 with water and applied with a paint brush. It took just a smidge over two quarts and twelve-ish hours to complete this huge fireplace. 

The ceiling had some patching and water damage, so that needed a complete paint job. Thanks to my 6'7" tall brother, I was able to pass over the job. Phew. He also took care of the floors (using garage floor paint) while we were out of town. 

On the walls is my go to white - Chantilly Lace from Benjamin Moore. It's a warmer white which helps keeps things from feeling too sterile.

Black and White Sunroom Plants Jungalow Style

Iron Work

Railings between the first floor and sunken living room were a necessity for safety but stylistically, the midcentury scrolls were not really our style. We opted to simplify the design from a double curved shape to a horizontal run and matching stair rails. Josh of Clutch Fabrication did the custom design and installation and if you have the chance to work with him, I can't recommend him enough. The matte finish rails really set the tone of both the dining room and sunroom and give the space a really modern farmhouse vibe.

Farmhouse MCM hybrid custom iron railing
Kids Play Area CLEAN
Sunroom Railings MCM Farmhouse White Washed Fireplace

Lighting

The south wall originally had what I can best describe as  window box style wooden feature with seventeen (17!!) exposed bulbs creating an uplighting effect over the two sliding doors (see before photo above).  There is only one electrical point, so Adam wired it with conduit and then routed the back of 3x1" boards we used around the entire room (we kept the paneling and needed the horizontal railing to conceal the seams). Adam then installed these lights, which came in at under $30 a piece, which I think is a great deal for such a handsome light. 

New Lighting

Bookshelf

This built in bookshelf and shelves were originally painted the same color as the walls but I decided to use a contrast color on the back boards. When the stone was it's original color I used a really pretty pale green but the whitewash needed something different so I chose Peppercorn in a matte finish from Sherwin Williams. The actual wood from the shelves was reclaimed from the old stair treads leading down to the living room from the upper level. Adam cut them to length and sanded them to the smooooothest finish and I coated them with a mixture of beeswax and mineral oil. 

Bookcase.jpg

As far as the shelf decor goes, everything is second hand or pulled from another room in the house. I like to regularly move accessories around from room to room! Here are similar baskets (I use them all over my home!)

Fireplace and Bookcase

Furniture

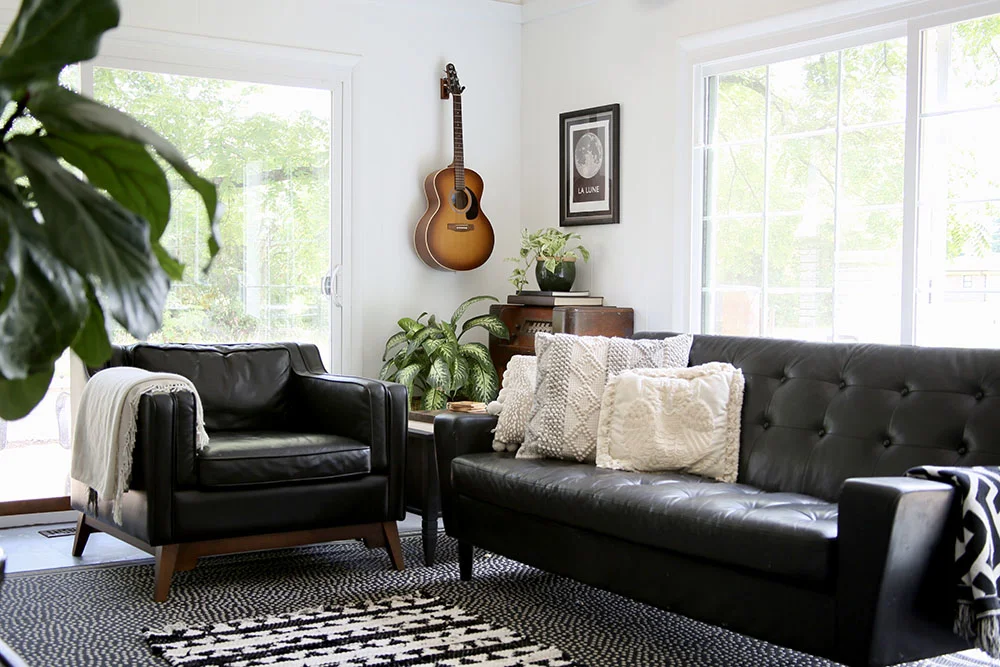
When we moved in I bought the black leather couch (with a matching ottoman currently in another room) for $100 off Craigslist. The large black leather chair next to it is from Article and it's awesome! I will buy a couch from them when I'm ready to upgrade this one or for another room. Between the two of those, there's a side table I picked up second hand and made over with primer, paint and some new knobs.

Sunroom Makeover

Behind those pieces is a vintage radio I had in my old house. It's a great piece for interest and character and perfect for hiding cords and gadgets (the front opens up to reveal an old record player that doesn't work)

On the opposite side of the room is a kids sized table my dad built along with some modern style chairs. 

Vintage Radio and Plants

Accessories

On the floor are two sizes of the same indoor/outdoor rug from Ballard. This pattern hides all the dirt which is great for kids! I layered a smaller rug on top of the big one in front of the fireplace which was from Hobby Lobby. 

The pillows on the couch are a mix of homemade, second hand (sort of!) and bought new (back in 2017!) From left to right - a pillow I made myself, one from Loloi by Joanna Gaines (named Joslin if you're searching!). The front owl pillow is another one I made using a vintage embroidery I found out thrifting that I removed from a frame and used as the front fabric. 

MCM farmhouse hybrid

Plants

Because of the abundance of light we have a lot of plants in this room! On the fireplace is a fiddleleaf fig, in the bookshelf and on the radio are pothos plants. Plus we have that groovy 1960s built in planter and the big ledge for our huge monstera! 


That's our sunroom makeover! Wanna hire me for your next home project? I'm available! You can see all of our farmhouse updates here!

Inspired By | Modern Farmhouse Laundry Room

Farmhouse Style Laundry & Mudroom Inspiration

I am so close to completing my laundry/mudroom makeover I can almost taste it! We enter and exit primarily through the back of our home and needed a design update to flow with the rest of our home (which you can see here if you want!).

For those of you who are new around here - we live in a farmhouse built in the 40s with a major addition put on in the mid sixties. In true farmhouse style, rooms have been added on or spaces made larger and I suspect our laundry/mudroom used to be a porch of some sort before it was finished. 

When I started planning for making over this home, my catchall was "Midcentury Modern Farmhouse" (Here's my huge Pinterest board of the same name) And when I say farmhouse, I mean more of the bones of the space and less in the way of decor (probably no chicken wire in my future!) I've also found myself really doing a lot with bohemian style too - lots of wooden vessels, baskets and houseplants. So for this laundry space, I wanted to set the tone for the whole house and pull together everything I love!

These photos are a great example of what I've been inspired by!

1. Shiplap | Thanks to Jo Jo and Fixer Upper, shiplap has become a popular texture and makes perfect sense for a farm style entry room. I can't wait to show you what my dad and I installed! I have become pretty decent at the miter saw and at swinging a hammer too! And I felt like a boss at the lumber yard loading up my pallet and picking the best wood. 

2. Open Wooden Shelves |  In our last home we did open shelving in our kitchen remodel and I loved it. Adam has a technique for making the boards super smooth and for laundry organization it just makes perfect sense to have your cleaning supplies right by the machines. For this house we've been able to upcycle all of our open shelves and that fits in really nicely into my Make, Do & Mend mission. More on that when I show the final space! 

3. Plants! | This is kind of an aside, but I feel that my seasonal depression has been mitigated by how many houseplants I have hanging out with me (now up to over 20 #plantgang!) My laundry space has two huge 70" windows so there's a lot of opportunity for growing! 

4. Bright White | Nothing say so clean and so fresh (Cue Outkast) like bright white walls in a laundry space. I used to feel like white walls screamed RENTAL! but after years of doing so much color I really like them. And white black and wooden accents they just look so pretty. 

So that's kind of a hint to how the space will come together. I am 85% complete right now and just waiting on a delivery to finish up and then photograph (and a nice sunny day!) Guys - I'm pumped! I've found a lot of joy in my home projects and can't wait to share! 

Our Farmhouse | Mini Living Room Makeover

farmhouse+makeover+lead.jpg
Mantle+1.jpg
Living+Room+After.jpg

Today I’m excited to show you a little progress I’ve made in the living space of our farmhouse - the upper living room. We have so many different projects in motion right now so instead of waiting until the entire space is finished (and furnished!) I wanted to highlight the little changes that have made a huge difference in this room. Come on over and let me show you around!


BEFORE

This is the original living room and main entry to the 1942 portion of our home. I love the arched door and gas fireplace, but wanted to change quite a bit. The brown walls paired with the limited light from the windows under the front porch made the room feel very dark. These are just iPhone photos taken the same time of day, yet you can see how cavelike it felt!

PAINT

 I used Cool Gray by Valspar in an eggshell finish and filled in the RESERVE quality paint. Let me tell you guys - this is hands down the nicest paint for the dollar. It compares to Aura from Benjamin Moore but is way more affordable (I believe I paid around $42/gallon). We only used one coat on the walls (two on edged because I tend to go a little lighter when I’m cutting in). I LOVE THIS PAINT!!! I bought two gallons thinking I’d need at least two or three coats but now I have enough for another space in the house. 

Another little trick I used for painting was to take a small art brush and flat white out of the can and go all along the ceiling edges. The previous paint job had a few areas that touched the ceiling and I am such a diehard about crisp paint lines! Once that was dry I used a rubber handled brush to get up in there. I think it works better than painter’s tape as long as you’ve got a steady hand.

I also painted my fireplace using leftover white paint from my bedroom. I did this in my last house too and it made such a huge difference. This brick was not in amazing condition so I did fill in holes and gaps with both caulk and some spray foam.

All of my trim also got a fresh coat of white paint in a satin finish that I had on hand (Valspar Signature in Wedding Veil)

farmhouse+style+window+casing.jpg


WINDOW TRIM

It’s hard to pick a favorite update, but the new farmhouse style casing I installed on my window might be it. And I did it all by myself! Using inspiration I found on Pinterest, I purchased the following lumber: four 6′ 1x4s, two 6′ 1x2s and one 6′ 1x3. I used a nicer pine and double checked each piece to make sure there weren’t any big knots.

Once home, I made cuts for the piece below the sill (which looked original) and the two vertical side pieces. Luckily the size of the window was perfect to keep the top casing pieces all right at 72″.

I started at the bottom and worked my way up, being careful to nail into studs. One spot did need a screw, but I’m pretty pleased with how easily it came together! 

I then used a caulk gun to get into all of the gaps for a perfect finish. A couple coats of paint later and mama has a gorgeous window and a lot of confidence for more wood based projects.

LIGHTING

This room had two larger hanging light fixtures that I was always getting close to knocking my head into (especially the one closer to the kitchen). I felt like they visually muddled up the space as well and with no plans for any dining spaces in this room, I opted to take them down. My father in law (an electrical engineer) taught me what to do with the first one (which also had older wiring - I’m really glad he was here to help me there!) and then I installed the second myself. I used flush mount LED lights that have daylight style bulbs (some LEDs are so commercial looking). I’m so excited to have the confidence to do more electrical projects but people! Err on the safe side with this and hire an electrician or get someone who knows what he or she is doing before you attempt this kind of thing. Safety First! 

DECOR

We’re not 100% sure what we want to use this room for right now so we’re holding off on how we’ll furnish it.  The fireplace is gas with a ceramic log so we’re looking forward to wintertime fires there and a pair of comfy chairs would be great. I also think I’ll put a desk on the opposite side of the room and if we ever got a piano it would be swell in there too. For now I just decorated my mantle with some faux leaves and cotton branches, candles and thrift store holders, a circular mirror (same as the one in my master!), art (more moon prints here) I had around the house and a plant (that needs a better pot - I know!). It’s a work in progress! 

We’re also going to uncover the original white oak hardwood floors (we have photos the previous owner shared with us - it needs some TLC but we are excited to take that on some day!) but for now, the current floor will do. After refinished we’ll also add new baseboards. For now I’m pleased that it’s a lot lighter and brighter and ready for whatever we decide to do next! 

Living+Room+landscape.jpg


Our Farmhouse | Bathroom Update

Farmhouse+Bathroom+Update.jpg
Wreath+Close+Up.JPG
Vanity+Close+Up.jpg

We’ve official owned our little farmhouse in the country for an entire month!  We love living out here and we’ve had a lot of fun making updates to the property. We’ve dug over 1000 square feet of gardens, removed an entire 1970s addition to the house (a sunroom that will now be a patio) and have freshened up two rooms in the house. Today I’m excited to show you photos of my “new” bathroom.

We started off with a nice raw space. It had been enlarged, retiled, and drywalled by the second owner and outfitted with a new vanity and storage area. I kept almost all of the hardware and fixtures, like toilet, tub and surround, hooks and faucets too. Are you scratching your head and wondering what the heck I actually changed? Ok! It’s time for some before photos and a rundown of the sources!

Bathroom+BEFORE.jpg

VANITY

We kept the existing vanity, but I changed the knobs and pulls. I also swapped out the lighting for a trio of barn style goose neck lights and added Edison bulbs (all from Lowes). I also changed the mirror to a more industrial style with a shelf, perfect for a vase of my hydrangeas!

All of the glassware was thrifted at Goodwill, but the soap and lotion pumps are available at Target (I have two in my shower as well!) I also treated myself to a pretty white hand towel with pale yellow stripe to bring in the slightest hint of color (similar).

PAINT

Green is my favorite color, but I thought the space would look bright and fresh with a neutral light grey. To save myself time on cutting in the many edges, I did both ceiling and walls the same (Benjamin Moore ‘Marilyn’s Dress’) in a semi gloss finish. 

One of my favorite improvements - the painted (gasp!) grout!  I did a lot of research online and had seen success stories, so I decided to say buh bye to the creamish-brown existing grout with a medium toned grey. I was aiming for something lighter, but this is what Adam picked up for me, so I tried it and liked it (Pearl Grey MAPEI Grout Refresh) What a huge difference!

Around the tub I pulled out all of the stained silicone and re-applied it. I also did new caulk between the trim and walls. I LOVE THAT PART!

Finally I spray painted the floor grate (originally an orangish metal) to rubbed oil bronze. While I had that out, I also sprayed the pulled on the storage armoire as well. I love the spray paint I used! (Rustoleum in Metallic Paint and Primer in One - Rubbed Oil Bronze)


Tulip+Tree+Print.jpg

Between the nook for the storage cabinetry and the tub/shower was a spot I missed when I filled in the nail holes. Luckily, I scored this vintage print (with Tulip Trees and birds - we have so many of both on our property!) I kept it in it’s original frame and it was an awesome one buck finishing touch on the space. I also got a one dollar silver toned trash bucket/trash can that I love! (Possible to love a trash can? Why not!)

One of my favorite parts of pulling together a new space is the big trip to Target. You know what i mean, right? I picked out a new shower curtain and rug. I can’t put my finger on why I like them so much, but I think they have the right vibe for the room and for our farmhouse in general.

Over the toilet, I hung a window shaped mirror that was in Bea’s room at the old house. Over it, I used a white wreath hanger to display a new white, green and yellow wreath I made last week (here’s a tutorial if you want to make one yourself!). I felt like the space was incredibly neutral and some flowers would brighten things up. I am crazy obsessed with faux flowers in wreaths! 

Finally, we hung a toilet paper holder (which we never got around to in our old house!) and added some baskets we already  had here and there for storage/decoration.

I’m really pumped with the results. The bathroom is a much used part of the home and it feels great to start and end my day in that lovely space!