Our Farmhouse | Mini Living Room Makeover

farmhouse+makeover+lead.jpg
Mantle+1.jpg
Living+Room+After.jpg

Today I’m excited to show you a little progress I’ve made in the living space of our farmhouse - the upper living room. We have so many different projects in motion right now so instead of waiting until the entire space is finished (and furnished!) I wanted to highlight the little changes that have made a huge difference in this room. Come on over and let me show you around!


BEFORE

This is the original living room and main entry to the 1942 portion of our home. I love the arched door and gas fireplace, but wanted to change quite a bit. The brown walls paired with the limited light from the windows under the front porch made the room feel very dark. These are just iPhone photos taken the same time of day, yet you can see how cavelike it felt!

PAINT

 I used Cool Gray by Valspar in an eggshell finish and filled in the RESERVE quality paint. Let me tell you guys - this is hands down the nicest paint for the dollar. It compares to Aura from Benjamin Moore but is way more affordable (I believe I paid around $42/gallon). We only used one coat on the walls (two on edged because I tend to go a little lighter when I’m cutting in). I LOVE THIS PAINT!!! I bought two gallons thinking I’d need at least two or three coats but now I have enough for another space in the house. 

Another little trick I used for painting was to take a small art brush and flat white out of the can and go all along the ceiling edges. The previous paint job had a few areas that touched the ceiling and I am such a diehard about crisp paint lines! Once that was dry I used a rubber handled brush to get up in there. I think it works better than painter’s tape as long as you’ve got a steady hand.

I also painted my fireplace using leftover white paint from my bedroom. I did this in my last house too and it made such a huge difference. This brick was not in amazing condition so I did fill in holes and gaps with both caulk and some spray foam.

All of my trim also got a fresh coat of white paint in a satin finish that I had on hand (Valspar Signature in Wedding Veil)
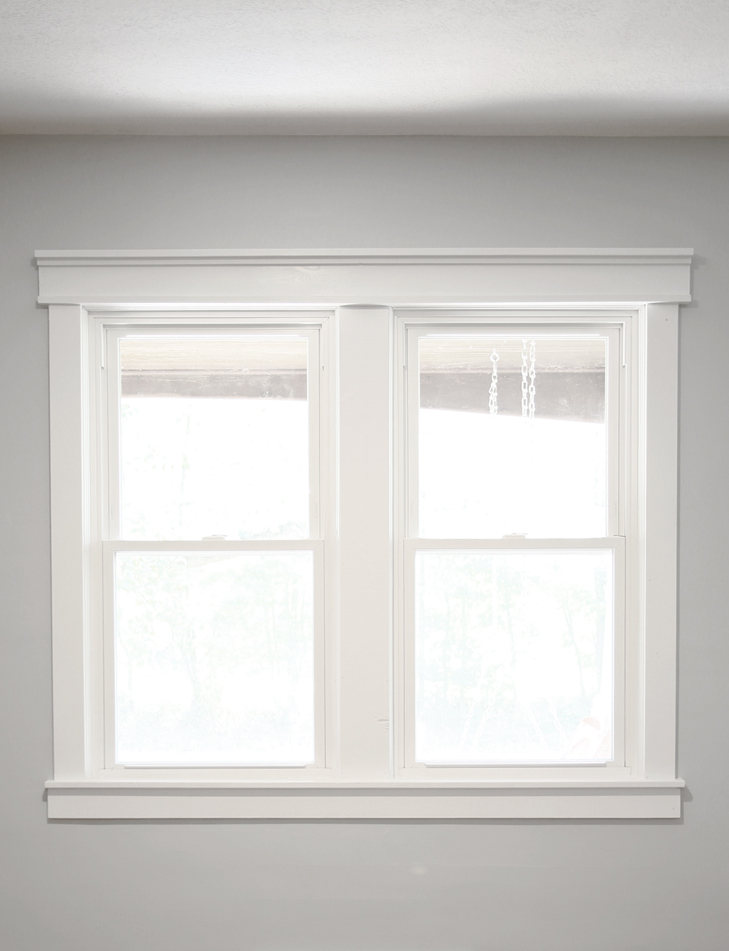
farmhouse+style+window+casing.jpg


WINDOW TRIM

It’s hard to pick a favorite update, but the new farmhouse style casing I installed on my window might be it. And I did it all by myself! Using inspiration I found on Pinterest, I purchased the following lumber: four 6′ 1x4s, two 6′ 1x2s and one 6′ 1x3. I used a nicer pine and double checked each piece to make sure there weren’t any big knots.

Once home, I made cuts for the piece below the sill (which looked original) and the two vertical side pieces. Luckily the size of the window was perfect to keep the top casing pieces all right at 72″.

I started at the bottom and worked my way up, being careful to nail into studs. One spot did need a screw, but I’m pretty pleased with how easily it came together! 

I then used a caulk gun to get into all of the gaps for a perfect finish. A couple coats of paint later and mama has a gorgeous window and a lot of confidence for more wood based projects.

LIGHTING

This room had two larger hanging light fixtures that I was always getting close to knocking my head into (especially the one closer to the kitchen). I felt like they visually muddled up the space as well and with no plans for any dining spaces in this room, I opted to take them down. My father in law (an electrical engineer) taught me what to do with the first one (which also had older wiring - I’m really glad he was here to help me there!) and then I installed the second myself. I used flush mount LED lights that have daylight style bulbs (some LEDs are so commercial looking). I’m so excited to have the confidence to do more electrical projects but people! Err on the safe side with this and hire an electrician or get someone who knows what he or she is doing before you attempt this kind of thing. Safety First! 

DECOR

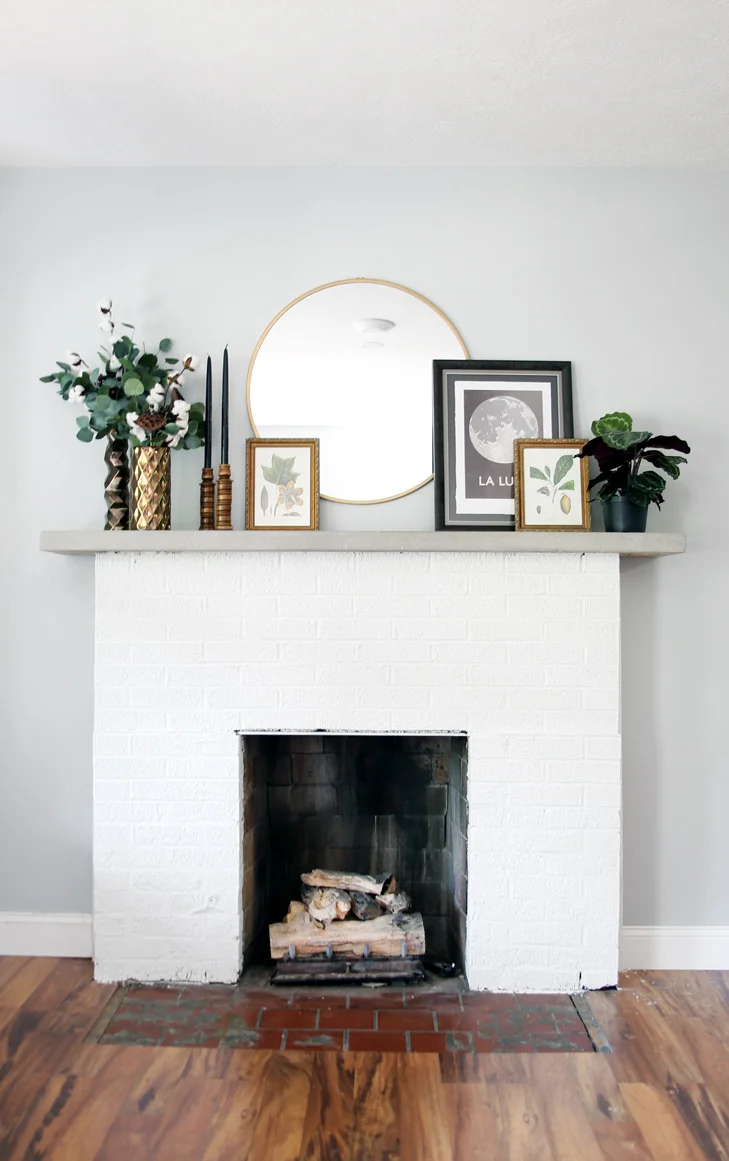
We’re not 100% sure what we want to use this room for right now so we’re holding off on how we’ll furnish it.  The fireplace is gas with a ceramic log so we’re looking forward to wintertime fires there and a pair of comfy chairs would be great. I also think I’ll put a desk on the opposite side of the room and if we ever got a piano it would be swell in there too. For now I just decorated my mantle with some faux leaves and cotton branches, candles and thrift store holders, a circular mirror (same as the one in my master!), art (more moon prints here) I had around the house and a plant (that needs a better pot - I know!). It’s a work in progress! 

We’re also going to uncover the original white oak hardwood floors (we have photos the previous owner shared with us - it needs some TLC but we are excited to take that on some day!) but for now, the current floor will do. After refinished we’ll also add new baseboards. For now I’m pleased that it’s a lot lighter and brighter and ready for whatever we decide to do next! 

Living+Room+landscape.jpg


Our Farmhouse | Master Bedroom

Master+Bedroom+1.jpg
Bedroom+1.JPG

I’m so excited to show you my master bedroom makeover using second hand, self made and pieces bought on sale. It took me a week to pull everything together, including three coats of new wall paint, repainted trim and the ceiling. Phew. It was a lot of work, but fun work. Come on over and have a look!

Bed+3.JPG
Bed+2.jpg
Bed+4.JPG

Bedding

I knew I needed to do this bedroom update on a budget, and that meant keeping our king sized quilt from our old home (still available at Target). To give the look of a headboard, I re-used the cushion backs from our old couch that I recovered last year (the sofa itself was trashed by the cats). I gave them a good steam clean using my handy Little Green Machine and tucked them in next to the wall. I treated myself to a new set of sheets (bought on sale) and fabric for the decorative pillows, which I made myself. The quatrefoil off white fabric was pricey, but I scored it at 50% off and was able to make two shams for around $30 (I used a plain fabric for the back). For the decorative throw pillow I bought ¾ of a yard which was plenty for a 20x20″ pillow. For the trim I used what I had on hand leftover from other projects (like the curtains… see more on those below). 

I tried making the bed without a bed skirt, but decided to return a few things so I could buy this one (same as Felix’s room but in a king size). I tucked in the sheets to give the bed a crisp final look and it made such a huge difference over the way I had made it before (here’s a comparison photo). Lastly, I laid a funky woven blanket with tassels over the end of the bed, which I picked up at Marshall’s for $17 a while back.

Bedroom+Dresser.jpg
Dresser+1.jpg
Bedside+1.jpg

Decor

On my table, I have a new lamp and alarm clock (trying to keep the phone out of the bedroom) along with some vintage homekeeping books I got at a garage sale. The little vase is from Goodwill and filled with faux billy balls. 

On Adam’s table is a matching lamp, another thrifted vase and a garage sale green catchall for his watch/change/cards at the end of the day.

On the high dresser is the Jasmine, two family photos and more of those encyclopedias. The mirror was found upstairs in another bedroom, so I borrowed it for our room!

For the low dresser, I used a lamp from our old living room, the snake plant and another photo. On the other end is a vintage fan (it works!) I got at a garage sale over some nice books. The circular mirror also used to be in our living room.

I used old rugs (blue here and cream here) on each side of the room to save a little money on buying a large rug or re-carpeting the room (which we may do someday!) This room will eventually become Bea’s when we renovate the upstairs, so we’ll hold off on that for now. 

Window+1.jpg

Window Treatments

While we’re on the topic of projects, I’m really proud of the way these curtains turned out. I bought the cheapest 84″ panels I could find at Target (they were $9 each) and used four. I sewed two together and then did navy pompom trim around the edge (it took about 14 yards, which I ordered online from Mood). I was able to get away with only three sheer panels, and picked a pretty swiss dot, also from Target.  The rod was repurposed from our living room and spray painted using my favorite Rustolieum Oil Rubbed Bronze. The ring clips were cheapies from Wal-Mart (which I kind of hate shopping at, but Target was out of this color/size and I didn’t want to wait!!)

Plant+1.jpg

Plants

I’ve really been drawn to houseplants since moving here! I created a macrame hanger out of clothesline for the Pothos in the corner and also have a snake plant on one dresser and a Jasmine on the other. Although north facing, we get a lot of light through our big windows!

Furniture

Both dressers and side tables are second hand. Mine (with the clock) was a hallway table in our old house and is an antique. Adam’s side table was a score from Goodwill a month or so ago. The tall dresser is MCM that we had in our old bedroom and the lower dresser was something I picked up off of craigslist during move out week at IU. Bea doesn’t use her crib much (we co-sleep) but sometimes it’s a great place for a nap or a safe place to put her while I do this or that. Both it and the sheet are from Felix’s old nursery. The blanket used to be in our living room and is from Target.

Paint

This room was originally a darker shade of brown so it took three coats of Wedding Veil by Benjamin Moore, filled in Valspar flat paint to cover it. It’s a very light gray that reads white in the room (and one shade lighter than my bathroom and hallway). The trim is Gray Shower, also by Benjamin Moore and filled at Lowes in Valspar satin. I love the way the new doors look repainted! I’ve never done a darker trim, but the end look is great!

So that’s my master bedroom! It took me a full week of working after bedtime and a bunch of nap times to complete it, but it feels like a fancy hotel to me! I love it! 

Bedroom+1-1.JPG


Our Farmhouse | Felix's Room

We’re on a roll updating the farmhouse and today I’m so excited to post photos of Felix’s room! While most of my decorating preferences lean towards neutrals, I just love color in kids’ rooms. I incorporated many of the items from Felix’s bright nursery (first here and updated here) from our old house but went bold with colorful walls, ceiling and door. Come on in and lemme show you around!

Felix's+Room+4.jpg
Felix's+Room+2.jpg

PAINT

Is it sacrilegious to use paint chips from one company and have them matched elsewhere? If so I’m going to decorating hell because that’s exactly what I did in this room. The pale blue walls are ‘Poolside’ from Benjamin Moore, but filled at Lowe’s using Valspar Signature in a matte finish. Ditto goes for the ceiling (China Blue) and darker walls (Blueberry). I’ve used a couple of brands of paint in the past month and I think the middle range paints are very comparable. But if you want the Cadillac of paint, Aura from Benjamin Moore is really superior (I used it on his door in Yosimite Blue and a satin finish) and the coverage and final look are incredible. It’s pricey and I only bought a quart, but it was worth it.

NOTE: I’ve edited these photos to reflect the paint colors I see in real life, but all screens will display them differently. I absolutely recommend taking home paint swatches before committing to a full gallon!


Felix's+Room+5.jpg

BED

As you can see, we’ve upgraded to a full sized bed, but we’ve actually had it for a while now. Adam did a ton of research and based on his findings, we bought a Casper mattress (not sponsored, but you can get $75 off if you use my promo code). We also have a foam mattress in our room and I think Felix’s is better. In fact, both parents regularly zonk out in there when we put him to bed and because it doesn’t have springs, it’s easier to Houdini out once he’s off in dreamland. 

Behind it, check out that amazing Jenny Lind headboard. Errr… footboard! I bought it last weekend at this amazing garage sale for… $4.50. The real headboard was falling apart so I asked if I could just take this end. I cleaned it and then painted it using Valspar Signature in Lovely Love Song with a satin finish. I SHOULD HAVE PRIMED IT because it took about five coats. I wanted to apply them thinly as to not get brush strokes (which are still kinda there) but I also came away from it thinking… I found this, I updated this, this is not a factory finish, and I’m ok with that

The sheets and quilt are what inspired the painting pallet at the start of this project. Big thanks to my mom who generously bought them for us! We chose the Pillowfort whale watching sheets, a navy bed skirt and a two toned navy quilt (it photographs more colbalt, but it’s a true navy IRL). Again, not sponsored but the quality of the quilt (which has been through the wash three times already) is really lovely and it would be great in an adult’s room too. The two other navy shams were from our linen closet. The rainbow pillow was from our previous nursery, the yellow one came with the Monte rocker and the teddy bear was a gift.

Felix's+Room+7.JPG

DESK

We found this little wooden desk in the garage and it was made by the original owner of the house! I brought it back to life with a coat of butcher’s block wax and I think it’s perfect for a child’s room! It serves the dual purpose of being a bedside table as well.  The lamp was either a garage or Goodwill find that’s been in the nursery all along. I covered the shade for Bea Bea’s nursery (which, sorry, I never got good photos of!) in the wide yellow stripe. The ABC print was also in her nursery and I updated it with a little washi tape.  I also updated the chair. You might remember it from my Instastories a while back. I found a set of four and at the time we were considering furnishing the old house as an Air BnB rental. These were going to be the dining room chairs.  Now that we’re set to close on that house, I had them here for a project. I spray painted it a bright yellow, which took about 4-5 coats to get in all of the nooks and cranies. I’m glad I did though! It’s a nice pop next to the wooden desk. The map print trashcan is a second hand vintage find from years ago.

Felix's+Room+11.jpg

THE ROCKER

Babies love being rocked to sleep and I have nursed both of my kids hundreds of times in this rocking chair. I bought it before I had a million other things to spend money on, and truth be told, it’s pricey. I justified it by thinking it would be a nice addition to any room in the house eventually and I think that’s still true. It’s on sale at Land of Nod if you’re so inclined to check it out.  I designed and made the rainbow quilt and the yellow and white blanket was a gift to my mom when she was pregnant with me. The little fox was also a gift (side note! I saw our little fox again this morning! I have such a huge crush on him!!!!)

CURTAINS

We’ve got mega wide (128″) windows, so it took four panels to span across. We bought navy and white striped blackout curtains (also Pillowfort from Target). The curtain rod was repurposed from our living room and I painted it the same dark blue as the back wall - it practically disappears! 

TOYS

You don’t see a lot of toys here… because they’ve all been in storage for a couple of months. It’s amazing how little kids need and how much they can imagine on their own. In addition to “my giraffey friend” (baby shower gift), the fire truck (from Nana, found at a garage sale) and some wooden stacking and bead toys (similar), we have blocks and trains in the family room. Eventually we’ll rotate in some of his old toys, but less is more with that one for us.


Felix's+Room+6.jpg

BOOKCASE

The bookcase was made by my dad and Adam before Felix was born. It’s filled with his books and stuffed animals that we’ve received as gifts. Honestly it’s usually a sort of mass collection of books and not well organized, so I just took everything out, stacked books into rainbow colors and placed them back in that way. I’m calling it clean/semi-styled. I promise you it will not look like this a week from now, but hey! if he’s grabbing books and “reading” them I’m not complaining!

The vintage pull down school map is something I’ve wanted in a kid’s room for a long time and I had seen it at an antique store a while back. After we painted the walls, I kept thinking about the map and luckily it was still available!! One thing I’ve realized is that if you see a second hand piece you love, get it then and there! Etsy also has some of these beauties if you don’t want to treasure hunt forever to find one! The colors on ours happen to match perfectly and it was a complete accident! I originally had it over the dresser/changing table, but both kids (especially Bea) played with it and while it’s not an old antique, it’s too nice to potential get poop on. Ha! It also matches the width of the book shelf better, and I love how it just pops off the wall!

DECORATIONS

I haven’t done much in the way of putting stuff on the walls besides the map and the kitty prints over the bed. Those are also from Felix’s nursery. I used bright poster board and cat treats to get these shots of our Raymond and Gizmo and are printed on canvas. We also kept the rainbow balloon Adam and I bought on our last solo vacation before kids and we still love it! 

I’m so in love with this room! It’s absolutely possible to make an update incorporating sentimental nursery items with practical pieces that will grow into boyhood. Thanks to my parents helping us out, I only bought paint, the vintage map and the new headboard specifically for this space! Everything else was brought along from the nursery or repurposed from elsewhere in the house!

Felix's+Room+Final.jpg

Our Farmhouse | Bathroom Update

Farmhouse+Bathroom+Update.jpg
Wreath+Close+Up.JPG
Vanity+Close+Up.jpg

We’ve official owned our little farmhouse in the country for an entire month!  We love living out here and we’ve had a lot of fun making updates to the property. We’ve dug over 1000 square feet of gardens, removed an entire 1970s addition to the house (a sunroom that will now be a patio) and have freshened up two rooms in the house. Today I’m excited to show you photos of my “new” bathroom.

We started off with a nice raw space. It had been enlarged, retiled, and drywalled by the second owner and outfitted with a new vanity and storage area. I kept almost all of the hardware and fixtures, like toilet, tub and surround, hooks and faucets too. Are you scratching your head and wondering what the heck I actually changed? Ok! It’s time for some before photos and a rundown of the sources!

Bathroom+BEFORE.jpg

VANITY

We kept the existing vanity, but I changed the knobs and pulls. I also swapped out the lighting for a trio of barn style goose neck lights and added Edison bulbs (all from Lowes). I also changed the mirror to a more industrial style with a shelf, perfect for a vase of my hydrangeas!

All of the glassware was thrifted at Goodwill, but the soap and lotion pumps are available at Target (I have two in my shower as well!) I also treated myself to a pretty white hand towel with pale yellow stripe to bring in the slightest hint of color (similar).

PAINT

Green is my favorite color, but I thought the space would look bright and fresh with a neutral light grey. To save myself time on cutting in the many edges, I did both ceiling and walls the same (Benjamin Moore ‘Marilyn’s Dress’) in a semi gloss finish. 

One of my favorite improvements - the painted (gasp!) grout!  I did a lot of research online and had seen success stories, so I decided to say buh bye to the creamish-brown existing grout with a medium toned grey. I was aiming for something lighter, but this is what Adam picked up for me, so I tried it and liked it (Pearl Grey MAPEI Grout Refresh) What a huge difference!

Around the tub I pulled out all of the stained silicone and re-applied it. I also did new caulk between the trim and walls. I LOVE THAT PART!

Finally I spray painted the floor grate (originally an orangish metal) to rubbed oil bronze. While I had that out, I also sprayed the pulled on the storage armoire as well. I love the spray paint I used! (Rustoleum in Metallic Paint and Primer in One - Rubbed Oil Bronze)


Tulip+Tree+Print.jpg

Between the nook for the storage cabinetry and the tub/shower was a spot I missed when I filled in the nail holes. Luckily, I scored this vintage print (with Tulip Trees and birds - we have so many of both on our property!) I kept it in it’s original frame and it was an awesome one buck finishing touch on the space. I also got a one dollar silver toned trash bucket/trash can that I love! (Possible to love a trash can? Why not!)

One of my favorite parts of pulling together a new space is the big trip to Target. You know what i mean, right? I picked out a new shower curtain and rug. I can’t put my finger on why I like them so much, but I think they have the right vibe for the room and for our farmhouse in general.

Over the toilet, I hung a window shaped mirror that was in Bea’s room at the old house. Over it, I used a white wreath hanger to display a new white, green and yellow wreath I made last week (here’s a tutorial if you want to make one yourself!). I felt like the space was incredibly neutral and some flowers would brighten things up. I am crazy obsessed with faux flowers in wreaths! 

Finally, we hung a toilet paper holder (which we never got around to in our old house!) and added some baskets we already  had here and there for storage/decoration.

I’m really pumped with the results. The bathroom is a much used part of the home and it feels great to start and end my day in that lovely space!