Time Traveling | 18th Century Dinner Party

18th Century Pink Gown .jpg
Back to Reality.jpg
Pink Gown Window Detail 2.jpg
Getting Ready 1.jpg

Over the weekend I felt like a straight up royal, all dressed up in a 1770s pink silk gown. Adam and I drove to Ohio’s oldest hotel, the Golden Lamb, for an intimate dinner party with guests dressed in their best 18th century ensembles. We had such a great time and loved meeting historical fashion enthusiasts! And seeing their gowns and suits close up was a thrill! Many thanks to our gracious hostess Amber, who organized our event!

Let me tell you about my look from head to toe! I loved every single step of this project - researching the history, finding inspiration, sewing and especially wearing it. If you’d asked me a year ago if dressing up in Georgian finery would be my favorite hobby… well, I probably would have believed you. I love it!

I started getting ready for the night by putting on my sleeveless shift and embroidered stays. These were the only items that went over my head and I wanted to have those on before I started my elaborate hair style. I worked with 3 day dirty hair which had already been powdered a couple times. I divided my hair into a front and back section and to create the height and used a skein of yarn (thanks for the tip Yunna!) and pinned my hair over it and directly behind it. Once I was happy with the coverage and height (covering all of the yarn can be a tad fiddly), I pulled my remaining hair into a low bun. Then, I clipped in a hairpiece that had been previously wet set into five curls. Adam helped me pin those curls over the edges so the base of the hairpiece was invisible.

After a vigorous spritz of hairspray, I lightly powdered all of my hair. The photos don’t quite capture the coverage, but it looked awesome! Some might wonder - why was grey/white hair a trend in the 18th century? From my research I believe it first started with the use of wigs by royalty in the 16th and 17th centuries. Many believe it was to cover the baldness brought about by STDs (seriously) and then evolved into a fashion trend. White wigs were the most expensive and thus the look of white hair became most fashionable. Pastels blue, pink and purple powders were also on trend. A tax levied on hair powder at the end of the 18th century helped it fall out of style. I really look forward to expanding my knowledge of historically accurate hair styles but I really loved what I came up with for this occasion!

For makeup I simply powdered my face, did a berry colored lip and used the same lipstick to dab onto my cheeks. I did a quick swipe of mascara and was done!

Gown BW 3.jpg
Pink Gown Window Detail 3.jpg

Before I put on my gown, I dressed in additional layers to add more volume under my gown and petticoat. First, a simple white quilted cotton petticoat worn with a false rump stuffed to add more fluff to the back of my dress. Then I tucked my sheer fichu into the top of my stays (which can also be tucked into your petticoat at the waist… but I needed my bodice to lay perfectly flat and didn’t want any of the fichu edges showing underneath!) At this time I also had on white stockings and my American Duchess Kensington buckled shoes.

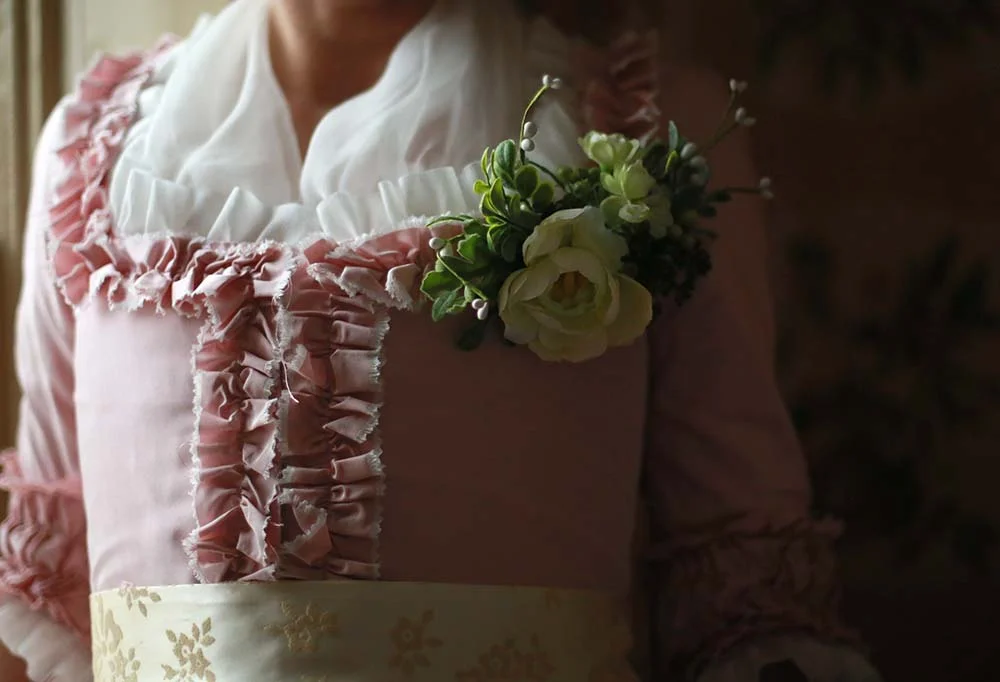
Next up - the gown! I used six yards of pink silk to make both the petticoat (underskirt) and gown. On the petticoat there is a 7” ruffle with scalloped and pinked edges sewn to the hem. The dress has ruched sleeve cuffs and trim around the neckline and center front opening. At the neck and sleeve edges I also placed a narrow sheer ruffle. The matching petticoat, also called a ditto, is intentionally short - those Georgians loved to show a little ankle!

At my waist I have a 2” wide band of brocade silk, which actually came from my grandmother’s wedding dress (see her wedding photos here). Me, my sister and all of my girl cousins have had a piece of her dress for our weddings (I wrapped mine around my bouquet). I was rushed on what to use and wanted silk so I asked my mom if there was enough of this fabric at home to make a simple belt. She stitched it up for me and handed it off as we headed out the door for our road trip. No, it’s not perfectly 1770s in motif but it looks great, it’s special and perfect to me!

Lastly I pinned on a corsage made of springy faux flowers. I’ve seen this in a lot of portraits and illustrations and I love the way it add dimension and color to my overall look.

And that’s it! We had such a wonderful time and I’m already on the hunt for a venue closer to home so I might host something similar in the future!

Muted Walls 4.jpg
Pink Gown Full Length .jpg
18th Century Pink Gown 2 .jpg

Inspired By | 18th Century Pink

#18thcentury #pink #marieantoinettestyle #pinkhair
Pink Gown Inspo 3.jpg

If we’re friends on Instagram, you may have seen some photos of my weekend journey time traveling to a historic hotel in Ohio with Adam for an 18th century dinner party (yes, it was amazing!) Before I share those photos, I wanted to break down my inspiration for the project and share some images that guided me through my most recent costume adventure!

18th century inspiration images

When I saw the photo above left, I knew I wanted to re-create a similar gown. My first historical project was for a daytime event and made from Red chintz and blue stripes, so for a dress of the same era, but for the evening, I wanted to go 180 in terms of materials. Both are Italian style gowns, but as you’ll see soon, the end look is quite different! So the photo on the left - that’s the main image I kept going back to when thinking out this costume. I love the lush sheen of the silk, the matching petticoat and trim, the soft sheer fichu (neck scarf) and the beautifully arranged floral accents. Six yards of a pink and cream shot silk (one color running each way) later and I was ready to make the 18th century evening gown of my dreams.

As I prepped for the event and tried to nail down styling, I decided to re-watch one of my favorite costume films of all time - Sophia Coppola’s 2006 Marie Antoinette starring Kirsten Dunst. Fun fact - I was very excited to see this film when it came out and was actually on a work trip to Paris when I saw it in theaters there! It was even a week or so before it debuted in the US. If you follow my stories you know I am the kind of person that gets a lot of JOY out of things I love, so just imagine what it was like to see this movie on my first trip to France! IT WAS AMAZING!

Marie Antoinette 2006 Pink Gown

But back to the film! I was rewatching and noticed the dress - my dress - or at least the dress I wanted to recreate. A little googling later and a very fun tumblr called Recycled Movie Costumes and I realized the original inspiration dress above was originally created for Coppola’s Marie Antoinette. The practical side of me loves that this gown got multiple lives in different movies (also worn in a Royal Affair). While my gown isn’t a screen copy of the one you see here, it definitely captures the feeling. It’s also pretty historically accurate while still letting me feel like I got to make some design decisions. Guys! This was a dream project and I’m already imagining how I might rework the dress for future occasions!

MA 2.png

For my hair I also turned to inspiration images - some modern (like the editorials at the top of this post) and some from portraits of the time like the image above and to the left. For my hairdo the main elements I knew I wanted to incorporate were feathers, flowers, shape and powder. Creating a somewhat similar look too a lot of trial and error, but was majorly worth it. I felt like it was pretty historically accurate but I still felt beautiful wearing it.

I also ended up buying a rose gold wig and styling it time and time again only to end up powdering and poofing my own hair instead - a last minute decision I’m really happy with in hindsight. I will say the wig I bought was amazing quality and not expensive, so I hope I have the chance to wear it another time.

So that’s a little about how I got inspired for this project and this week I’ll share some photos of myself all decked out at the event! It was raining cats and dogs, but Adam worked his magic and got some pretty shots - I can’t wait to edit them and show you!

Time Traveling | 18th Century Snow Day

Red Chintz Gown
Red Chintz Gown 7.jpg
Red Chintz Gown 3.jpg
Red Chintz Gown

It’s been a while since I’ve gotten gussied up in my 18th century gear! With a gorgeous snowy morning as my backdrop, I pulled out my red chintz Italian gown and styled it for a wintertime scene. I wore my dark red petticoat, a 1970s silk Dior scarf as a fichu, a black silk wired ribbon and pair of long black gloves. I powdered my hair and arranged two feathers in it. I went a little more dramatic with makeup (please tell me I don’t look like a badger?) and I felt so beautiful posing for these images!

Georgian Red Winter Gown
18th Century Snow Day Red Chintz Gown
Red Chintz Gown
Georgian Red Chintz Gown Snow Day

Time Traveling | Making My Blue Brain Hat

18th Century Brain Hat 1780

I love hats! Especially the fancy, floral, floofy numbers from bygone ears. For a large part of history, women wouldn’t leave the house without a chapeau!

Hat 3.jpg

For my 1780s look, I decided to work with a straw hat I had in my stash. Once upon a time I thought I might have a go as a milliner and thus collected a lot of straw hat bodies and blocks to make new hats of my own. This base was actually a modern hat, but the size was perfect for this project. Here’s what it looked like when I started.

After removing the inter and exterior bands I started steaming the hat out. Moisture allows the straw to relax and take a new shape (which is why you may have noticed if you get a straw hat wet at the beach, it will lack the definition it had when you bought it). I wanted it to have a very shallow crown, like a bergère hat that was popular in the 18th century. I knew I’d be covering the hat with fabric, so an identical shape wasn’t necessary - just the rough form. I also found that I could flip the back brim up and it would hold nicely, which I knew would be a good place to slip in some decorations. I gave the whole thing a good steam and let it dry.

Covering straw with fabric on 18th century hat

Next I started on my fabric covering. Around the brim I created half inch pleats using a cotton sateen, a bajillion pins and a ton of patience. I first pinned the pleats to the edge of the interior brim, as you can see at the right. As I brought them to the edge of the brim, I let them spread just a bit and then brought them back in on top where the brim meets the crown. This was an easy place to become too perfectionist and fiddle! One thing I like to remind myself about historical sewing is that imperfection is historically accurate. We’ve become so accustomed to huge racks and full size runs of identical garments it’s no wonder something handmade feels a bit foreign to the eye with a little jumping stitch here or a slightly bigger pleat there. I’ve started to really love what a handmade piece looks like - one of a kind!

So anyway, when I got the brim pleats to a place I liked with pins, I hand sewed it down to the straw.

With the whole brim complete, I moved onto the brainy bit at the top. I used the same fabric but in a darker shade of blue and I love the combination of the two. For this part I turned to The American Duchess Guide to 18th Dressmaking (which I highly recommend!) and used their tutorial in the 1780s section to create the texture. Once it was all pinned in place, it also got tacked down with heavier buttonhole thread.

Hat 8.jpg
Under Side 18th Century Hat

Now that the top of my little hat looked perfect, I set out to make the inside of the crown just as lovely. I made a very large and shallow tube (only a few inches deep) which I gathered at one side and created a drawstring channel at the other. The gathers were drawn in to match the circumference of the crown and sewn down. The drawstring channel was also draw up using a piece of string, tied, trimmed and tucked into the new crown covering. I also made two ties that were tacked down before the gathered interior crown bit went on. These let me to pull the hat down tightly and further emphasize the flipped up back!

Feathers on 18th century hat

Lastly was the question of feathers - how many and in what placement. After trying a bunch of different combinations, I settled on just one white feature layed horizontally in the back and tacked down.

In all I used 1 yard of light blue fabric and just a half yard of the darker blue. I had enough leftover to make a matching waist sash/belt to coordinate everything together. Because there are so many pieces to an 18th century kit (shift, stays, petticoats, bum rolls, socks, shoes, buckles, gown, fichu, apron and hat to name a few) I think I’ll keep my costumes from this era in the same general color story with this pretty blue as the common link.

I can’t decide if I should make one more gown (I do have the fabric on hand) as a birthday present to myself (it would photograph so beautifully in the snow!), do some modern sewing or start planning for the next era. I realized when I was sick for a day earlier this week that I cannot not have a project sitting around to pick up and play with. And as all of our outdoor chores are coming to an end for the season and it’s time to sit by the fire for the next few months, I do think another lap project is in order. Are you interested in progress shots or is a big reveal more fun? I’m not sure which way to take this one on. Let me know what you think!