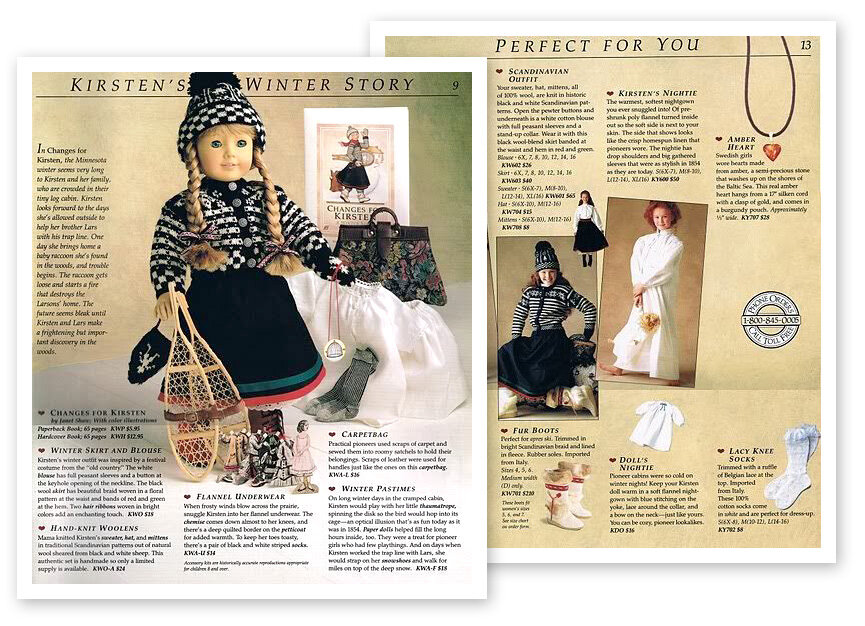
The Kirsten Project | Changes for Kirsten

Kirsten Lead CFK.jpg
Changes for Kirsten costume by Jessica Quirk

Ch-ch-changes! As we move into colder weather, it’s time for another look from The Kirsten Project - this time with her winter Scandinavian outfit from Changes for Kirsten. If you haven’t had a chance to see my background research on Kirsten’s skirt, sweater and knitted accessories or my original Kirsten Project post you’ll want to check those out. This look was practically plucked from the museum and was such a joy to recreate. Let’s jump in, shall we?

She wore all her flannel petticoats, her warmest skirt, and two pairs of wool socks, but still trembled with cold. - Changes for Kirsten

Kirsten’s winter story is set in 1850s Minnesota, but her old country outfit is distinctively Scandinavian - specifically Norwegian. Why not Swedish? As you know Norway and Sweden are neighbors and although there are regionally specific costumes, there are also a lot of similarities and overlaps between the bunad, or folk dress of the two nations. For example, both countries have bunads with red, green, black and white color schemes (just have a look at the famous artist Carl Larsson and his work “Kersti’s Birthday Party” featuring his daughter and her friends in their regional dress). So while not a Swedish folk costume to a T, Kirsten’s winter outfit absolutely captures a Scandinavian essence.

Political borders aside, my best guess is that pieces of Kirsten’s winter look, like the fana cardigan sweater and the Tecnica après ski boots were popular fashion trends of the 1980s when her character was developed. Maybe someone walked into the office one day wearing them and the design team turned to say now THAT’S what Kirsten’s winter look should be! Who can blame them? I love the high contrast black and white, punched with pops of red and green and think the entire look is one of the most memorable from the entire early Pleasant Company catalog (I’m still pining for a doll’s sized version but keep losing eBay auctions in the final minutes!)

Changes for Kirsten Pleasant Company Catalog
Divider2.png

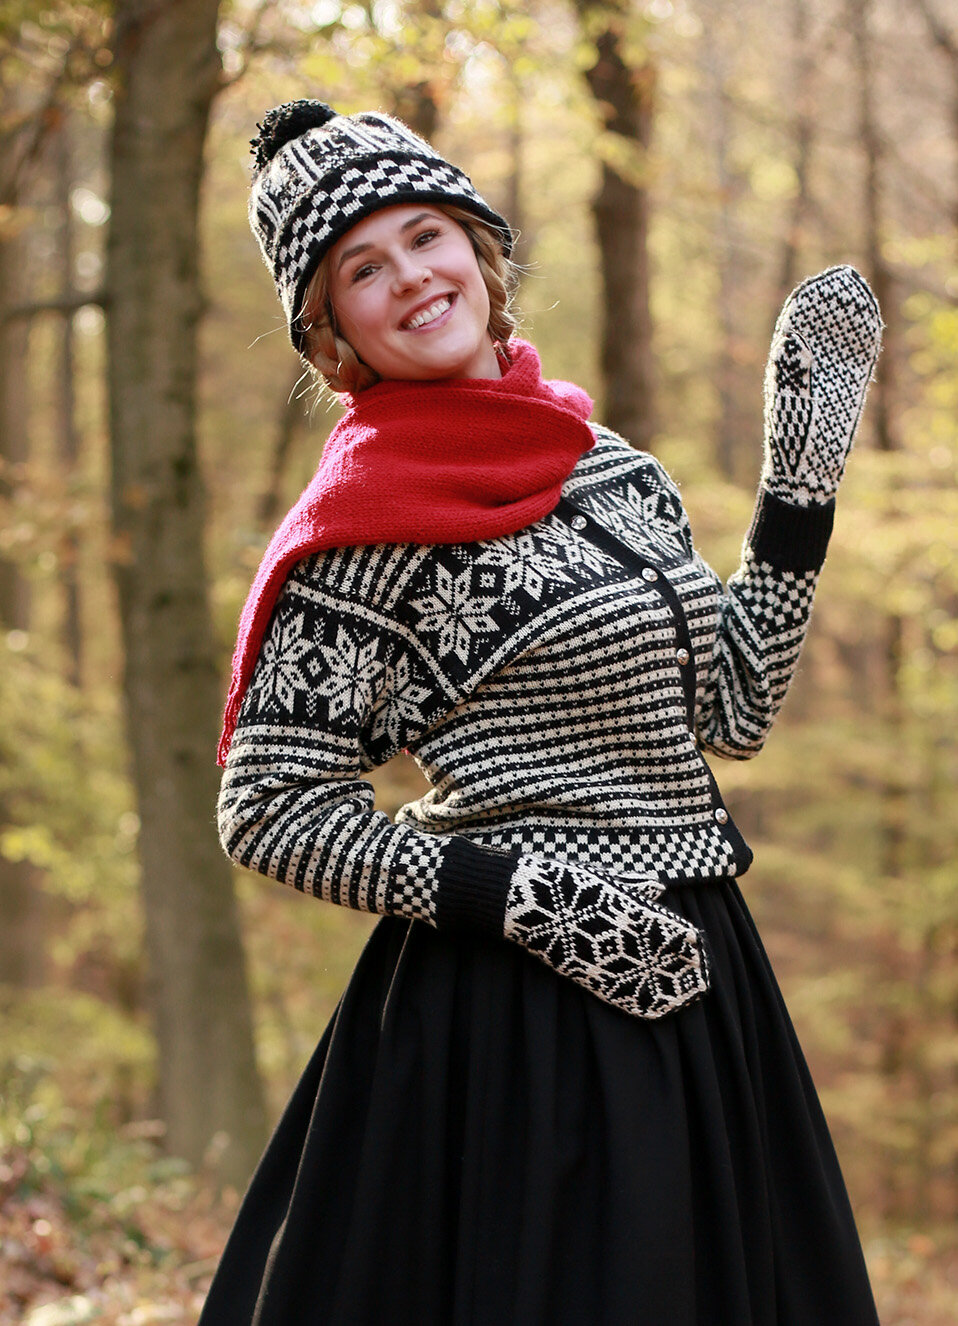
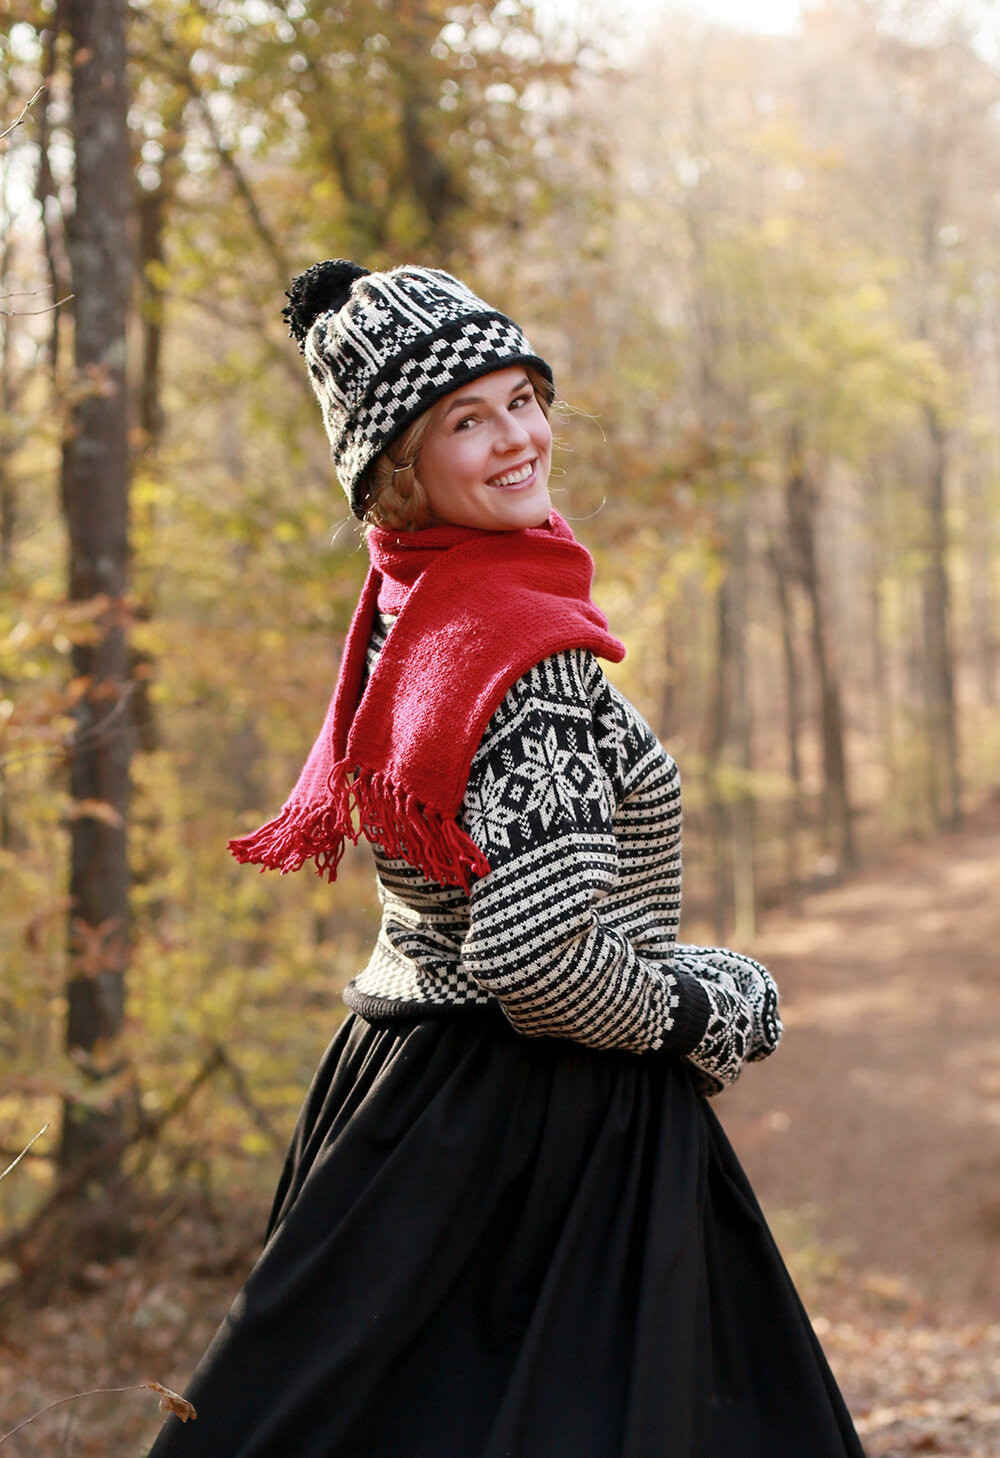
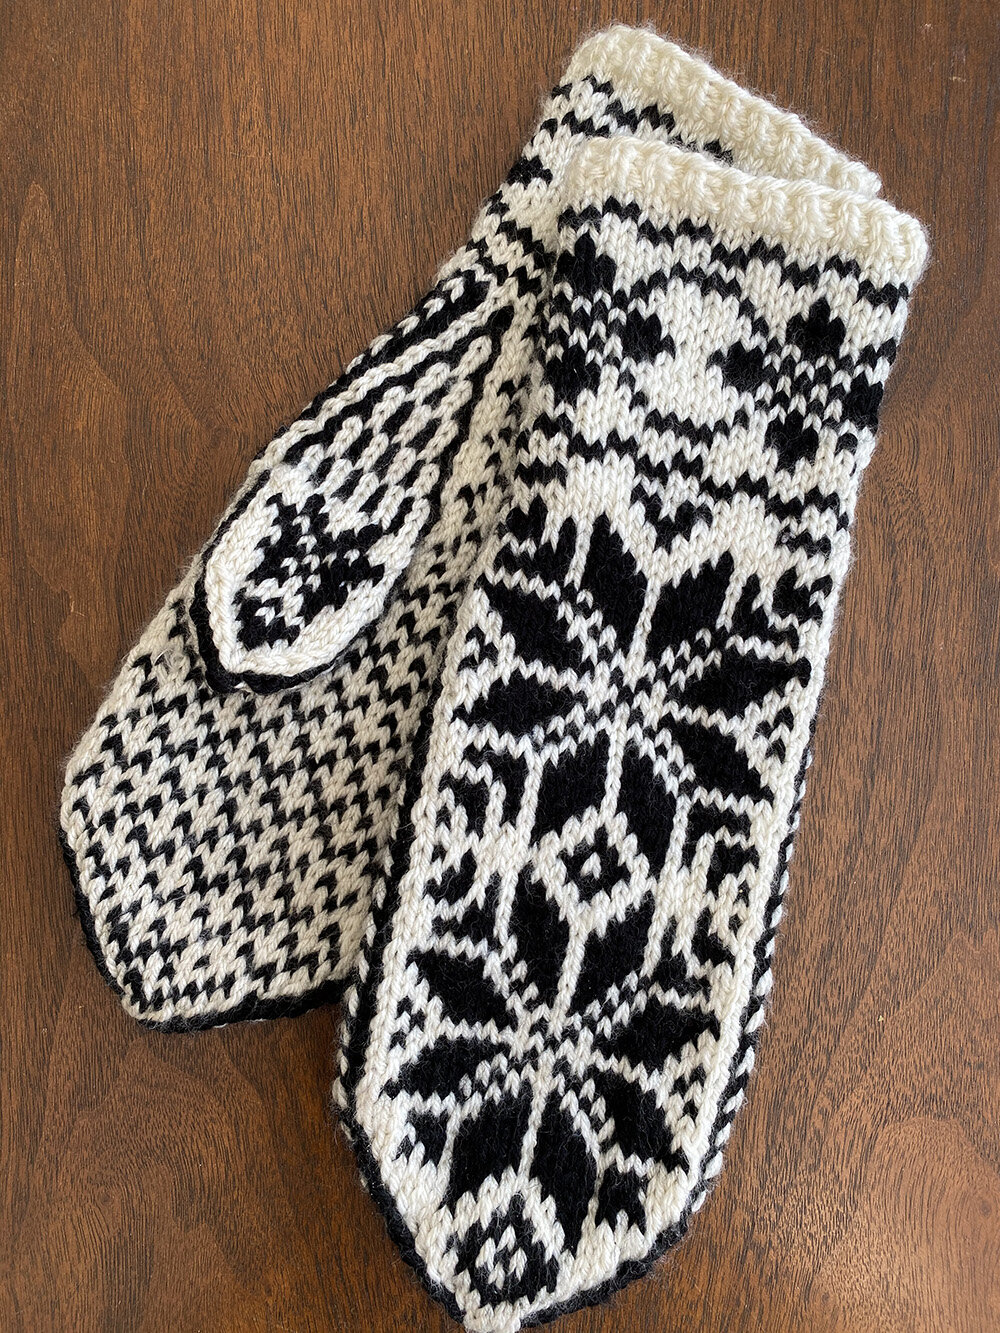
Hat, Scarf + Mittens

selbuvotten.jpg

Thanks to this project I’m back on a knitting kick again! I knit all of my winter accessories myself and really loved every second of it! The hat is a copy of the doll’s hat and I think it’s very close! I actually made three versions of this hat. On the first I asked for feedback (you guys suggested alternative male and female figures instead of just girls), the second was destroyed with a dying mishap and this is the third! I made it roomy enough to fit my big braids underneath but it still works for everyday wear! Speaking of, a huge plus to making this costume is the modern wearability of the pieces. I foresee myself getting a lot of use out of them!!

My scarf isn’t anything too fancy - just one very long tube of red stockinette knitting. I don’t like purling very much but in the round I can fly with a metal tipped circular needle. I used size 8 with worsted weight yarn and it took two skeins. No pattern! I found some original examples here and here!

These mittens were made using the Selbu pattern from Skeindeer Knits (read more on the history of the selbuvotter here). It’s really well written and fast to knit. Again I used worsted weight yarn and US size 4, 9” circular needles and matching DPNs for the fingertips and thumb. Magic loop just doesn’t work for me and I find the small circulars to be really fast! I’ve since finished four more pair of mittens!

Changes for Kirsten costume by Jessica Quirk

Sweater

My fana style sweater, with it’s selburose stars, checkerboard hem and cuffs and black and white stripes, is what kick started this project for me. I had a little money left over from my first round of backing when I saw this original Pleasant Company cardigan on eBay. The price was too good to let it go and the rest is history. It’s a girl’s XL and thanks to that 80s silhouette, roomy enough to fit me!
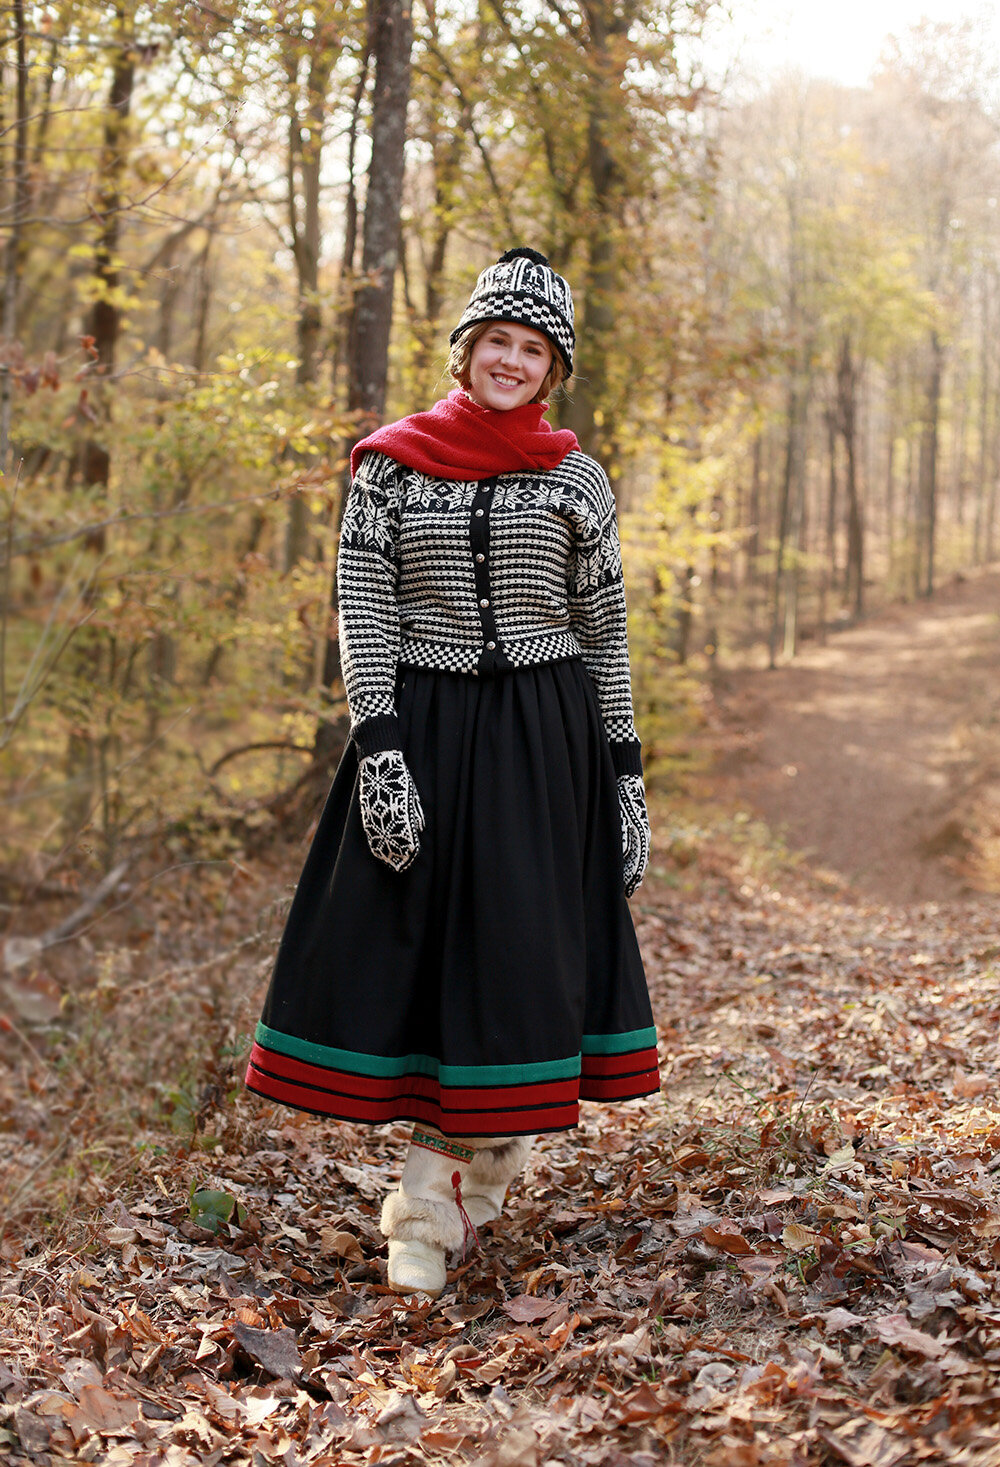
Skirt

As I referenced in my research post, Kirsten’s skirt is very similar to the overskirt of the Setesdalbunad. I chose to go with extant examples and historical photographs and do two red stripes instead of one for my version skirt.

The skirt is made from a lovely lightweight wool I bought from Burnley and Trowbridge. I cut a narrow strip for my waistband and then split the remaining yardage in half. I sewed up those side seams and then gauge pleated 10 feet worth of fabric into my waistband. At the hem I appliquéd stripes of red and green wool that I sourced from second hand pencil skirts bought at the thrift store. If you’re looking closely those are burrs decorating my hem… I walked around through the woods for a while to find the perfect spot to take these photos!

Hem2.jpg

Boots

While every other aspect of Kirsten’s costume can firmly be traced to Scandinavian cultural origins, these boots are one piece I couldn’t nail down other than the fact that they are definitely in the artwork for Changes for Kirsten (by the wonderful Renée Graef! Hi Renée!!)

I considered the fur boots worn by the Sami people of Northern Scandinavian, but those have a curled toe. I looked at Native American examples from the US, but I couldn’t find anything that was identical. I looked up mountain men (Kirsten and her family are trappers in this book), but nothing there either. One thing I’m sure of? The boots from the illustrations are Tecnica après ski boots, the very same sold in the catalog, and they were a big trend in the 80s. See the eighties theme happening here?!

I found my boots on eBay and then made some alterations so they more closely resembled the cover art. I painted one of the yellow leather ties red (with leather paint) and stitched on vintage green Scandinavian ribbon under the cuff. This is one bit of my costumes I wanted to save for the final reveal because I was SO PSYCHED when I figured out the brand and then found a pair in my size. They’ll be great snow boots for winter!

Divider2.png

I hope you’ve enjoyed this edition of The Kirsten Project! The more I research Scandinavian culture the more I want to visit and incorporate the designs into my own life. You better believe I have a St. Lucia Day breakfast planned in my home too! I’m so inspired by everything I learned during this project.

Thank you to everyone who has financially backed my costume work or cheered me on from the sidelines. It’s pretty amazing to work on something, put it out into social media ,and have nothing but positivity surrounding it. There’s something really joyful about sharing a childhood nostalgia with others. We all seem to remember how it felt to find the Pleasant Company catalog in the mail, turn the pages of the books and in cases like mine, dress up like my doll for so many happy days of my girlhood. So much of who I am was formed in those days - , a pioneer/homesteading spirit, a make do and mend attitude, a love for historical costumes and embracing anything and everything “old fashioned”.

The Kirsten Project - Changes for Kirsten - Costume by Jessica Quirk
Changes for Kirsten costume by Jessica Quirk
CFK 3D.jpg
Changes for Kirsten costume by Jessica Quirk
CFK 12.jpg
Divider2.png

Time Traveling | 18th Century Dinner Party

18th Century Pink Gown .jpg
Back to Reality.jpg
Pink Gown Window Detail 2.jpg
Getting Ready 1.jpg

Over the weekend I felt like a straight up royal, all dressed up in a 1770s pink silk gown. Adam and I drove to Ohio’s oldest hotel, the Golden Lamb, for an intimate dinner party with guests dressed in their best 18th century ensembles. We had such a great time and loved meeting historical fashion enthusiasts! And seeing their gowns and suits close up was a thrill! Many thanks to our gracious hostess Amber, who organized our event!

Let me tell you about my look from head to toe! I loved every single step of this project - researching the history, finding inspiration, sewing and especially wearing it. If you’d asked me a year ago if dressing up in Georgian finery would be my favorite hobby… well, I probably would have believed you. I love it!

I started getting ready for the night by putting on my sleeveless shift and embroidered stays. These were the only items that went over my head and I wanted to have those on before I started my elaborate hair style. I worked with 3 day dirty hair which had already been powdered a couple times. I divided my hair into a front and back section and to create the height and used a skein of yarn (thanks for the tip Yunna!) and pinned my hair over it and directly behind it. Once I was happy with the coverage and height (covering all of the yarn can be a tad fiddly), I pulled my remaining hair into a low bun. Then, I clipped in a hairpiece that had been previously wet set into five curls. Adam helped me pin those curls over the edges so the base of the hairpiece was invisible.

After a vigorous spritz of hairspray, I lightly powdered all of my hair. The photos don’t quite capture the coverage, but it looked awesome! Some might wonder - why was grey/white hair a trend in the 18th century? From my research I believe it first started with the use of wigs by royalty in the 16th and 17th centuries. Many believe it was to cover the baldness brought about by STDs (seriously) and then evolved into a fashion trend. White wigs were the most expensive and thus the look of white hair became most fashionable. Pastels blue, pink and purple powders were also on trend. A tax levied on hair powder at the end of the 18th century helped it fall out of style. I really look forward to expanding my knowledge of historically accurate hair styles but I really loved what I came up with for this occasion!

For makeup I simply powdered my face, did a berry colored lip and used the same lipstick to dab onto my cheeks. I did a quick swipe of mascara and was done!

Gown BW 3.jpg
Pink Gown Window Detail 3.jpg

Before I put on my gown, I dressed in additional layers to add more volume under my gown and petticoat. First, a simple white quilted cotton petticoat worn with a false rump stuffed to add more fluff to the back of my dress. Then I tucked my sheer fichu into the top of my stays (which can also be tucked into your petticoat at the waist… but I needed my bodice to lay perfectly flat and didn’t want any of the fichu edges showing underneath!) At this time I also had on white stockings and my American Duchess Kensington buckled shoes.

Next up - the gown! I used six yards of pink silk to make both the petticoat (underskirt) and gown. On the petticoat there is a 7” ruffle with scalloped and pinked edges sewn to the hem. The dress has ruched sleeve cuffs and trim around the neckline and center front opening. At the neck and sleeve edges I also placed a narrow sheer ruffle. The matching petticoat, also called a ditto, is intentionally short - those Georgians loved to show a little ankle!

At my waist I have a 2” wide band of brocade silk, which actually came from my grandmother’s wedding dress (see her wedding photos here). Me, my sister and all of my girl cousins have had a piece of her dress for our weddings (I wrapped mine around my bouquet). I was rushed on what to use and wanted silk so I asked my mom if there was enough of this fabric at home to make a simple belt. She stitched it up for me and handed it off as we headed out the door for our road trip. No, it’s not perfectly 1770s in motif but it looks great, it’s special and perfect to me!

Lastly I pinned on a corsage made of springy faux flowers. I’ve seen this in a lot of portraits and illustrations and I love the way it add dimension and color to my overall look.

And that’s it! We had such a wonderful time and I’m already on the hunt for a venue closer to home so I might host something similar in the future!

Muted Walls 4.jpg
Pink Gown Full Length .jpg
18th Century Pink Gown 2 .jpg

Time Traveling | Making My Blue Brain Hat

18th Century Brain Hat 1780

I love hats! Especially the fancy, floral, floofy numbers from bygone ears. For a large part of history, women wouldn’t leave the house without a chapeau!

Hat 3.jpg

For my 1780s look, I decided to work with a straw hat I had in my stash. Once upon a time I thought I might have a go as a milliner and thus collected a lot of straw hat bodies and blocks to make new hats of my own. This base was actually a modern hat, but the size was perfect for this project. Here’s what it looked like when I started.

After removing the inter and exterior bands I started steaming the hat out. Moisture allows the straw to relax and take a new shape (which is why you may have noticed if you get a straw hat wet at the beach, it will lack the definition it had when you bought it). I wanted it to have a very shallow crown, like a bergère hat that was popular in the 18th century. I knew I’d be covering the hat with fabric, so an identical shape wasn’t necessary - just the rough form. I also found that I could flip the back brim up and it would hold nicely, which I knew would be a good place to slip in some decorations. I gave the whole thing a good steam and let it dry.

Covering straw with fabric on 18th century hat

Next I started on my fabric covering. Around the brim I created half inch pleats using a cotton sateen, a bajillion pins and a ton of patience. I first pinned the pleats to the edge of the interior brim, as you can see at the right. As I brought them to the edge of the brim, I let them spread just a bit and then brought them back in on top where the brim meets the crown. This was an easy place to become too perfectionist and fiddle! One thing I like to remind myself about historical sewing is that imperfection is historically accurate. We’ve become so accustomed to huge racks and full size runs of identical garments it’s no wonder something handmade feels a bit foreign to the eye with a little jumping stitch here or a slightly bigger pleat there. I’ve started to really love what a handmade piece looks like - one of a kind!

So anyway, when I got the brim pleats to a place I liked with pins, I hand sewed it down to the straw.

With the whole brim complete, I moved onto the brainy bit at the top. I used the same fabric but in a darker shade of blue and I love the combination of the two. For this part I turned to The American Duchess Guide to 18th Dressmaking (which I highly recommend!) and used their tutorial in the 1780s section to create the texture. Once it was all pinned in place, it also got tacked down with heavier buttonhole thread.

Hat 8.jpg
Under Side 18th Century Hat

Now that the top of my little hat looked perfect, I set out to make the inside of the crown just as lovely. I made a very large and shallow tube (only a few inches deep) which I gathered at one side and created a drawstring channel at the other. The gathers were drawn in to match the circumference of the crown and sewn down. The drawstring channel was also draw up using a piece of string, tied, trimmed and tucked into the new crown covering. I also made two ties that were tacked down before the gathered interior crown bit went on. These let me to pull the hat down tightly and further emphasize the flipped up back!

Feathers on 18th century hat

Lastly was the question of feathers - how many and in what placement. After trying a bunch of different combinations, I settled on just one white feature layed horizontally in the back and tacked down.

In all I used 1 yard of light blue fabric and just a half yard of the darker blue. I had enough leftover to make a matching waist sash/belt to coordinate everything together. Because there are so many pieces to an 18th century kit (shift, stays, petticoats, bum rolls, socks, shoes, buckles, gown, fichu, apron and hat to name a few) I think I’ll keep my costumes from this era in the same general color story with this pretty blue as the common link.

I can’t decide if I should make one more gown (I do have the fabric on hand) as a birthday present to myself (it would photograph so beautifully in the snow!), do some modern sewing or start planning for the next era. I realized when I was sick for a day earlier this week that I cannot not have a project sitting around to pick up and play with. And as all of our outdoor chores are coming to an end for the season and it’s time to sit by the fire for the next few months, I do think another lap project is in order. Are you interested in progress shots or is a big reveal more fun? I’m not sure which way to take this one on. Let me know what you think!

Inspired by | Red Chintz

Red Chintz Inspiration 3.jpg

In the past few weeks i have been sewing up a storm and am in the process of putting the finishing touches on my 1780s Italian gown. Before the big reveal, I wanted to pull together my inspiration images and tell you a little more about my fabric choice.

Usually when I set out to sew something, I have an idea in my head of what the finished piece will look like before I even begin. It’s been very different this time around! I had my pattern (Fig Leaf Patterns 101) ordered and I knew I wanted to do a print, but I kept getting tripped up on what combination of fabrics to use. As you can imagine these 18th century dresses take a lot of yardage so there’s the question of cost. I also want to be appropriate for the event we’re attending, so this wouldn’t be a grand courtly number (ie, not silk) either.

Red Chintz Side by Side.jpg
Fries Museum Chintz.jpg

Then one day I bit the bullet when I saw PennyRiver on Instagram doing a little flash sale on some of her stash. She had a Colonial Williamsburg chintz I’d had my eye on and at a discount - so I snapped it up. At just three yards I knew I’d have to be extra careful with my pattern layout and cutting, but at worst I could make it up into a jacket to be worn with a petticoat.

All this long story is to say that after I’d bought the fabric I realized every costumer under the sun seemed to be making white chintz Italian gowns. For good reason too - chintz patterns were all the rage during the 1700s, especially the latter half of the century. But you know me - I can’t look like everyone else! Which finally landed me on the idea of overdying the fabric and repainting in the print by hand.

So that’s exactly what I did.

It took roughly 30 hours after my kids went to bed each night over my dining room table, four white gel pens, three boxes of chalk paint markers and five true crime podcast series. And I am so in love with the final result!

I’d like to have my entire look complete before sharing too much, but there is a little back view of the dress on my instagram. I’ve also realized it’s really tricky to photograph these colors in a way that reflects their real life hues, but hopefully when I have my real photographer (Adam!) he’ll be able to do them justice.

If you’d like to see all of my inspiration, including some images that I didn’t post here, check out my Pinterest board! Can I just time travel back to the 18th century please (for a limited time, I know life was not easy back them for a multitude of reasons, but let’s just embrace the fantasy aspect and ignore the realities!)

Red Chintz Inspiration 5.jpg