The Kirsten Project | 1854
/


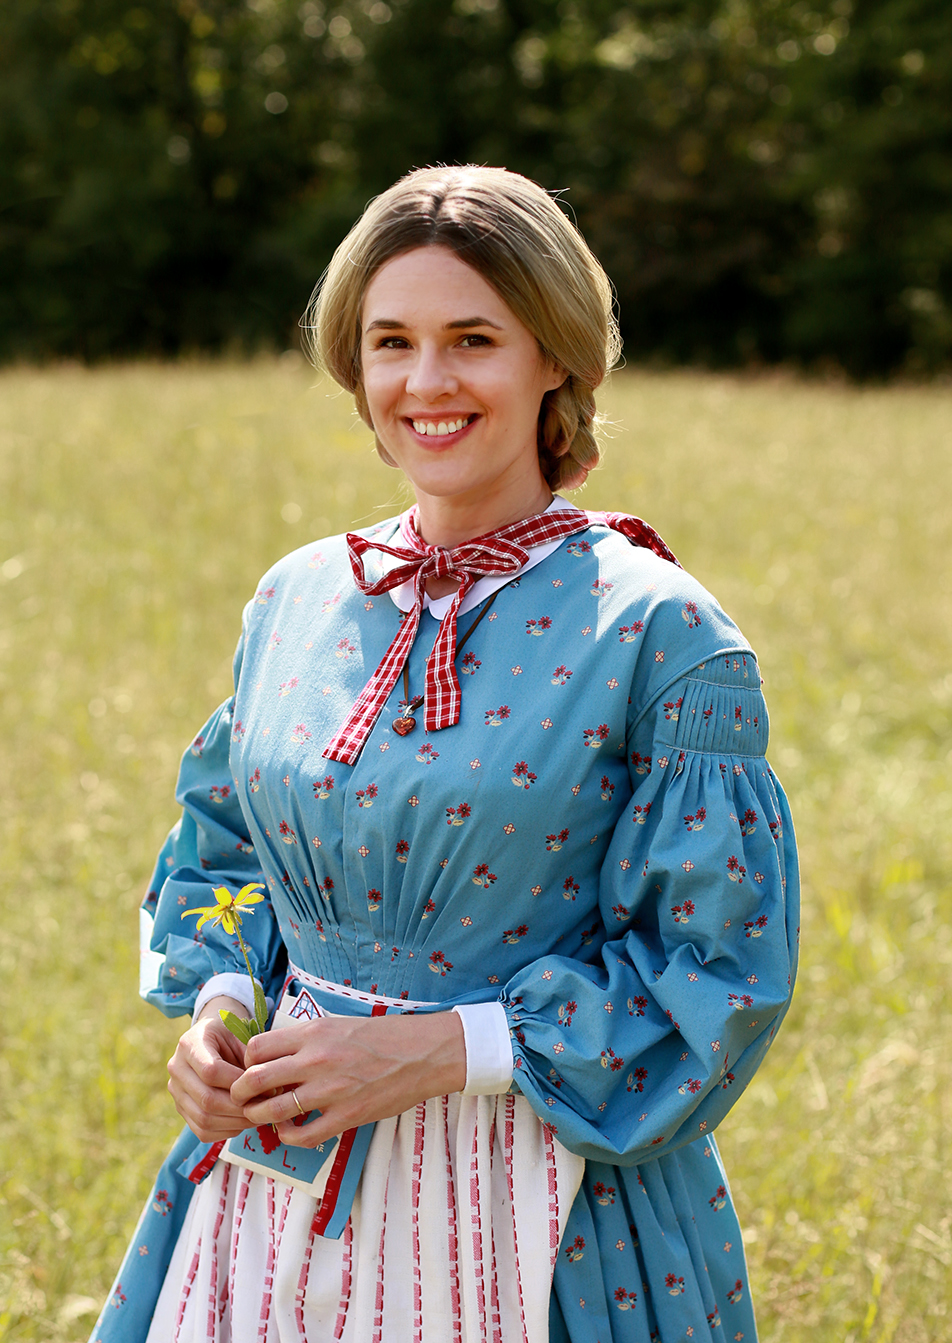
After months of planning and research, designing and sewing, I am so excited to finally share my finished costume for The Kirsten Project! The goal of this project was to take one of my childhood passions - the pioneer life of my favorite character, Kirsten Larson - and interpret her through a historical lens. I’ve done a deep dive into every aspect of her costume - from her hair and bonnet to her traditional Swedish apron to the printed fabric of her dress and incorporated that research into this look. I’ll link back throughout this post to the background information pertaining to each category or you can click here to read it all now.
Let’s step back in time to 1854!


Underpinnings

Although not visible in these images, I’m wearing historical undergarments including drawers and chemise (both pictured at right), a corset and a quilted petticoat. The first layer is a pair of open drawers that tie at the waist made out of white cotton. The center front and back seams are left open so using the out house is less of an ordeal (Because of the way the corset falls over the waist and hips, lowering and raising a base layer would have meant removing all of the day’s layers for each visit to the privy.) Busy women didn’t have time for that! Drawers were worn primarily for warmth on the legs and sometimes modesty and are roomy in their cut so nothing feels like it’s out in the open! They have decorative tucks at the hem along with scalloped eyelet trim, just like Kirsten’s.
Over the drawers is a chemise, which looks kind of like a nightgown. Also made of white cotton, It extends to the knee and has some decorative pin tucks at the hem. All women, regardless of social class, would have worn base layers to protect more valuable corsets and outer layers from the sweat and oils of their skin. Like modern undies, most women would have multiple sets to rotate while they may have worn the same dress day in and out. White cotton (or linen) was also able to take a literal beating in the boiling wash water without worry of fading color or making a print dull.
Next is a corset, cut out of lightweight but strong coutil or French Twill. I used the Laughing Moon 100 pattern for all of these pieces and they came together quickly and easily! I always start with my base layers of my costumes first as they can change your measurements by pulling in your waist, lifting your bust and generally smoothing everything out. There’s a huge misconception that wearing a corset is a painful ordeal - it’s not! For me it feels much more comfortable than a bra and gives the support of a back brace. All that said, I don’t do extreme tight lacing - just enough so that my laces are even in back, which only takes in an inch or two.
The last foundation garment is a quilted petticoat which is actually from my 18th century kit. Some things can transverse centuries, others cannot (like stays or corsets!) This petticoat does the job (there are even written mentions of quilted petticoats in the Kirsten series) but if I were to revisit the early Victorian era I’d do a corded petticoat. Caged crinolines and hoop skirts that many associate with the middle of the 19th century begin to appear at the tail end of the 1850s, but primarily in the upper echelons of society before extending to other classes.
If you’d like to see any of these underpinnings in action, you can view them here.

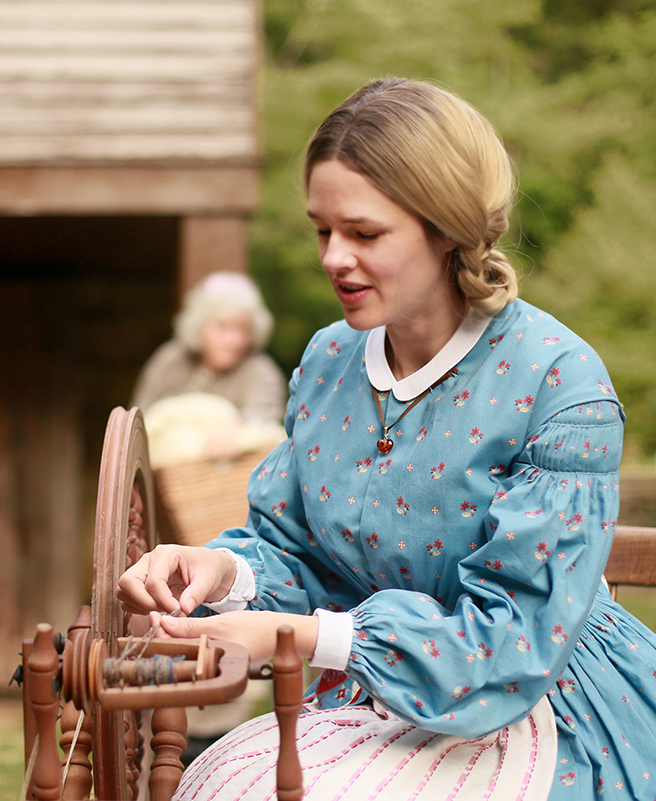
Dress
After completing the base layers of my look, I normally move to the dress next. However for this costume, I had more to do than just test fit the pattern and cut my material - I actually designed the fabric and had it printed to resemble Kirsten’s dress!
Using my doll as my inspiration, I looked at historical prints from the 1850s until I found something that reminded me of the small red flowers. You’ll see a key difference is the color palette of the background - most come in shades of ecru and brown - but there are some examples of blue from the era. Check out my research post to see what I mean! From my inspiration pieces, I sketched out the floral motif, scanned it in, digitalized it and then added the small red and pale gold cross into the design.
Once I had a repeat I was happy with, I used my color map from Spoonflower to pick colors that were close to the original dress. A week later, with the printed fabric swatches in front of me I saw that the colors were close, but the scale was WAY too large. My goal was to have the same number of repeating floral motifs across the upper chest for my dress as the doll’s dress (there are six!) so I went back to my laptop and made three more smaller scales of the print along with switching up a color or two. I am so glad I took the extra time to do a few test rounds! Another update I made after my first round of swatches was to add a dotted background in a shade of blue slight darker than the ground. I wanted to get the Kirsten look, but almost all of the 1850s prints I found were very busy with not a lot of plain ground showing through. It took quite a bit longer for these swatches to arrive but when they did I had the perfect sample and I knew I was ready to make the larger investment in six yards of fabric.

Speaking of investing, let me take a moment to thank to the many people who chipped in to support this project to get early access via instagram. Because of your contributions I was able to go the extra distance with the dress fabric to really capture Kirsten’s spirit. Those funds also went towards supporting many other small and female owned businesses in the form of buying indie patterns, trims and accessories! And it wasn’t just the dollars and cents, it was the encouragement and enthusiasm of my patrons that I’m really grateful for! Thanks for validating this idea and rallying behind it!
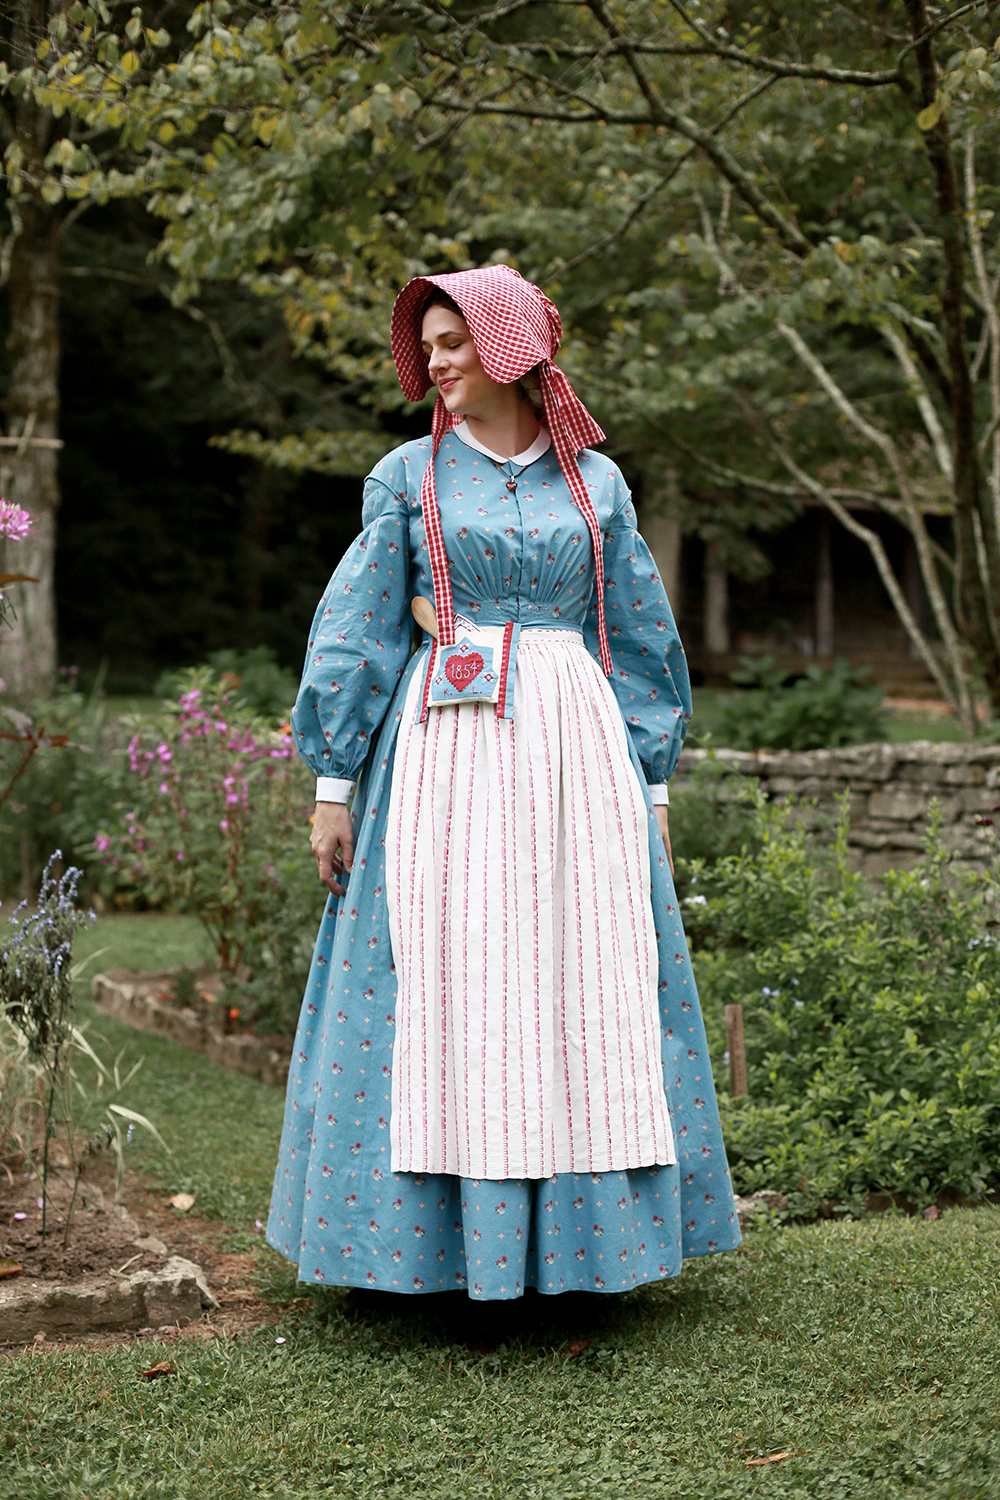
Now back to the dress! I used Fig Leaf Patterns 201 based on an extant dress in the Sumter County Historical Museum collection, dating between 1956-1962. I loved making this dress, especially the pleating throughout! Like Kirsten’s dress there is a high round neckline, dropped shoulders with piping at the sleeve head, full sleeves and a fitted cuff, a slightly raised waistline, full skirt and contrast hem facing.
I also did something new to me for the hemline - Instead of just turning the bottom of the skirt up to be level with the ground, I folded back the top waistline edge of the skirt before I did my running stitches for the cartridge pleats. To determine how deep to fold it, I found the the shortest part of my bodice and measured the difference at center front (a little over two inches long). This told me the back of my skirt would be turned just a half inch, while the front would be much deeper. This wasn’t as complicated as it sounds and allowed me to have an even row of the print all the way around the hem. I love how well it all turned out!
One final note on my colors! The blue of my print was beautiful, but a little more vibrant than I wanted. I did a few dips in a tea bath to get the shade to come down a little and the end result was exactly right. And if you’re wondering, I was able to use my swatch yardage for my piping as well as my pocket bag. I’m even considering ordering a little more to make Bea a tiny version of Kirsten’s new country dress!


Accessories
I’m a strong believer that the accessories make the look when it comes to any historic ensemble. I’ve posted my research on Kirsten’s bonnet and hairstyle, apron and pocket. Now let me tell you a little more about how I made them!

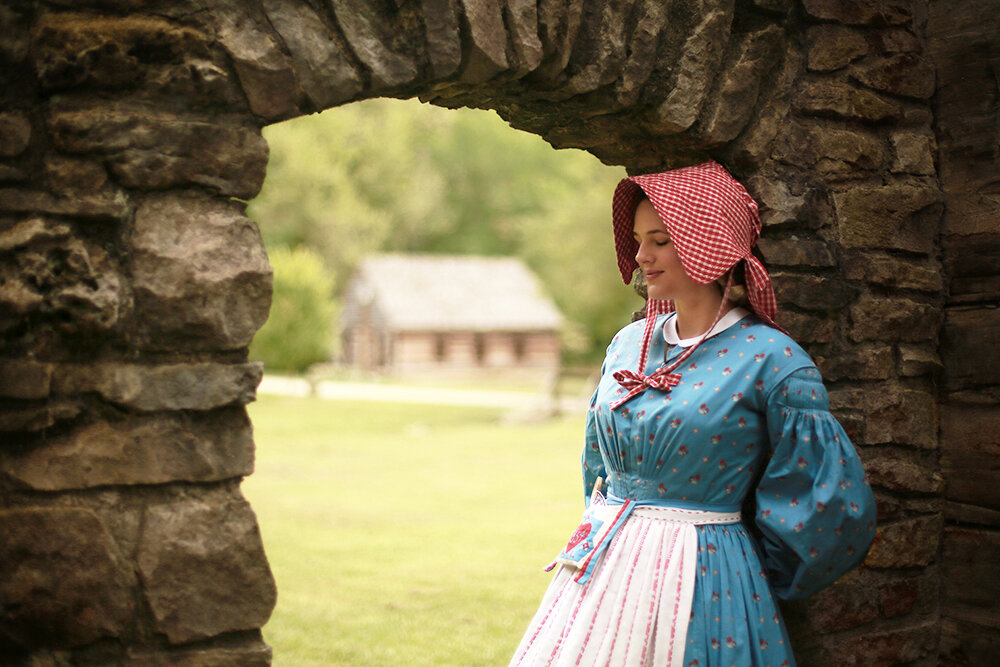
Bonnet
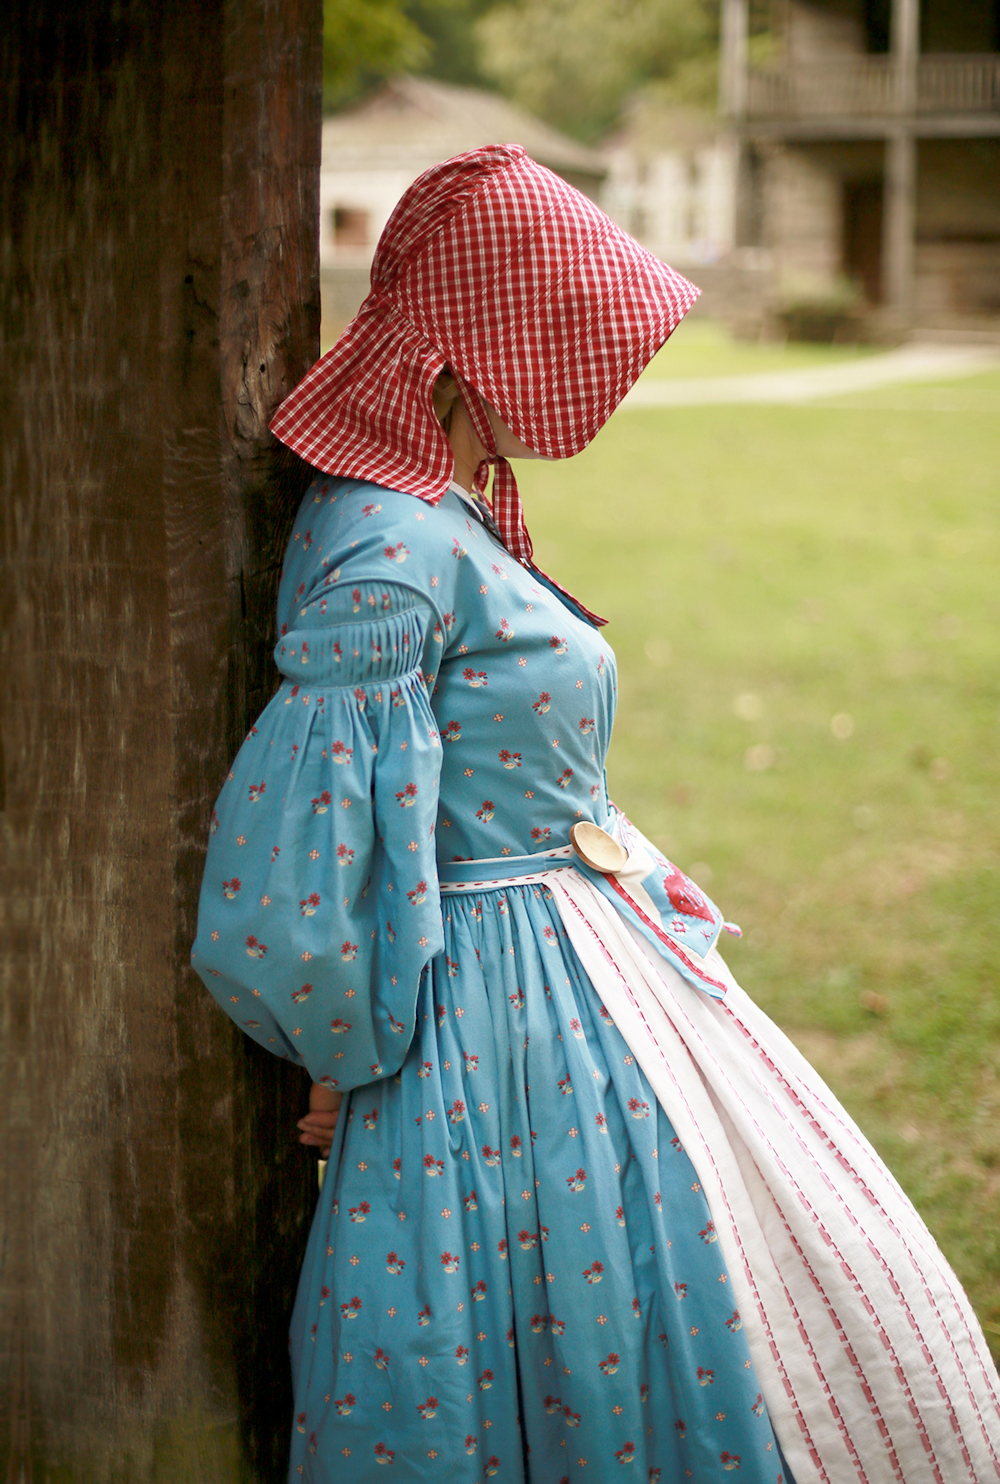
For my bonnet, I kept the red and white check like Kirsten’s in mind, but veered towards a different plaid than the doll or the book illustrations. The kind of check I ultimately used was a common weave during the 19th century - see how similar it is to the example I posted in my research?
My plaid came from a second hand men’s button down that I picked up for a couple dollars. I made my own simple pattern, working from a poster board brim that I mocked up. I also chose to make a corded bonnet, using stitched channels filled with cotton cording to give the bonnet brim more stability. Sewing them in place made me so dizzy!! I love the way my final bonnet so closely mirrors the extant versions, but the style in general feels a little matronly to me, which is why I opted not to wear it in all of my photos.
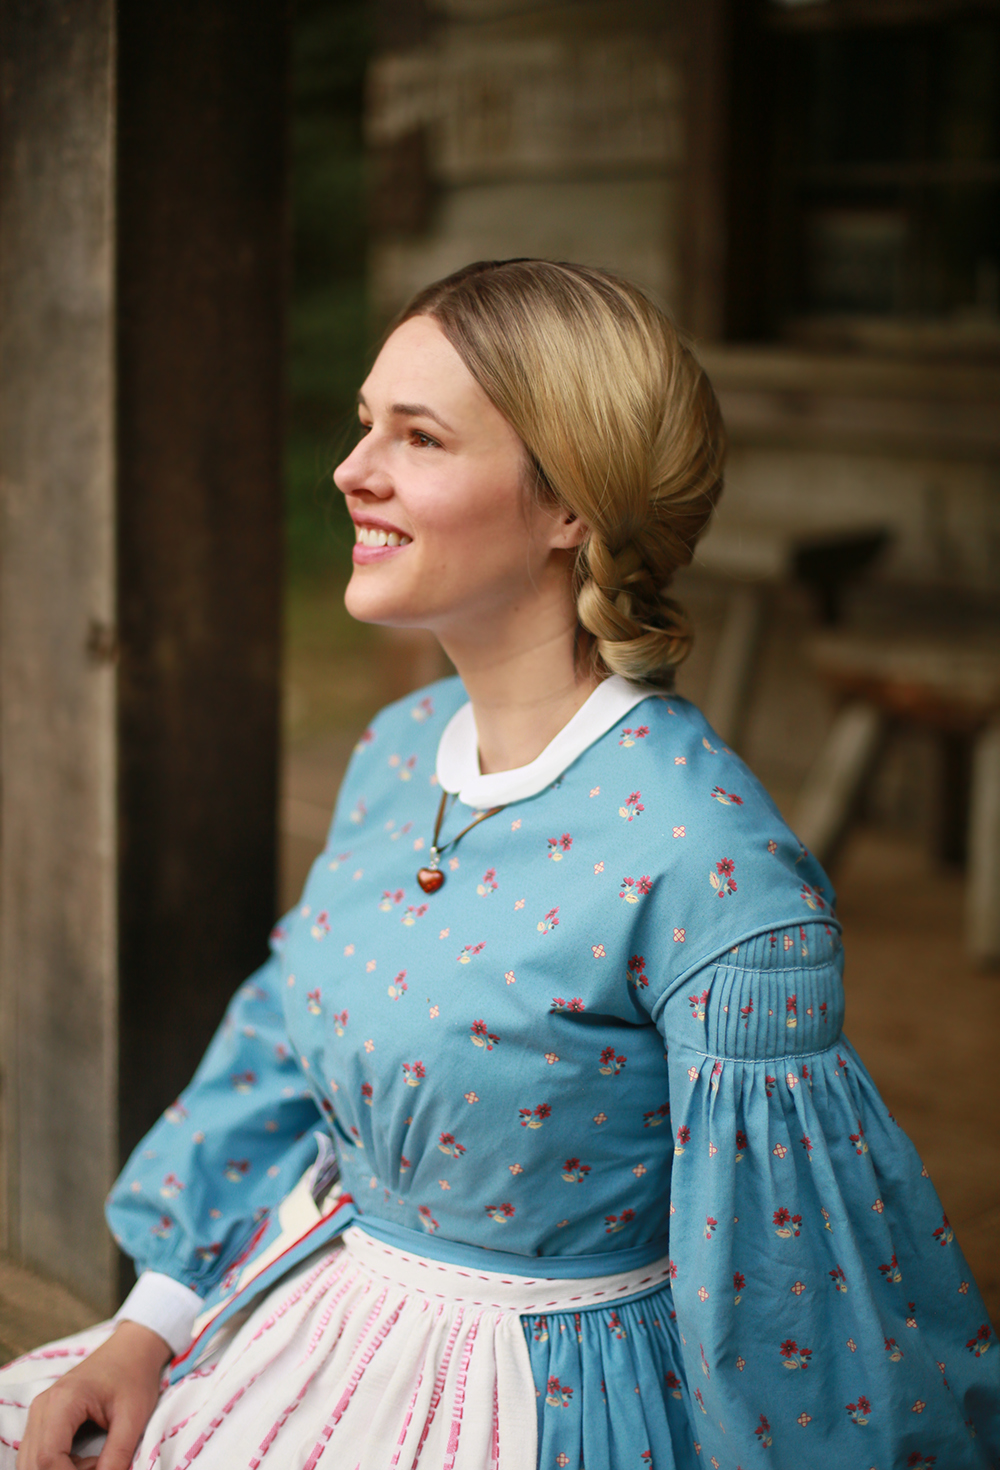
Hair
As I mentioned in my research post, one of the elements of Kirsten’s character that doesn’t vibe very will with historical research are her thick blunt bangs. The look of the time was a center part with hair covering the ears. You can read more about where the inspiration for Kirsten’s looped braids probably came from here, but for my style I wanted to capture something historically accurate. My long braids are plaited right beneath my ears and then each side is tucked up under the base of the opposite side. I feel like I’ve achieved how an adult Kirsten may have styled her blond locks!
Amber Necklace
I wasn’t able to get any historical research to back up the amber necklace Kirsten wears throughout her series, but it’s my best guess that each girl/doll had a heart shaped accessory so this was the best fit for Kirsten. I bought my small amber pendant on eBay and wore it from a narrow silk ribbon. To get the perfect shade of brown, I dyed 1/8” white silk ribbon using black walnuts from my own front yard! It’s my experience that the flesh of the green walnuts oxidizes to make the best dye but I used some dried husks too! I dyed the ribbon by submersing it along with the walnuts in boiling water for about 2 hours.

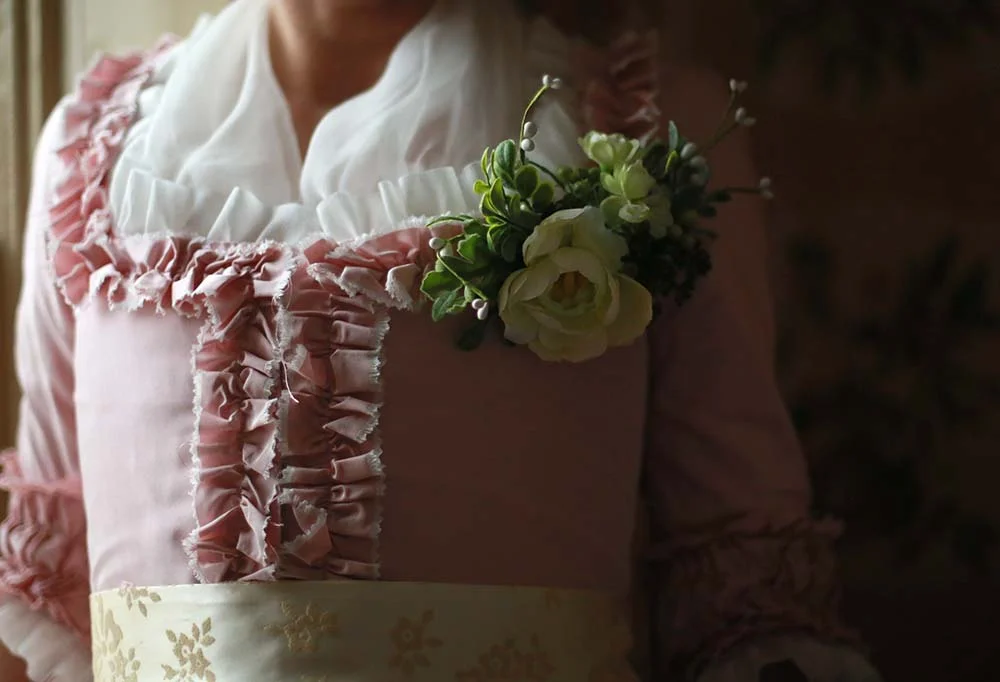
Loose Pocket
This is one portion of my project that brings together the doll’s accessory with a lot of research and a little creativity. Loose pockets, or kjolsäk, vary in shape but many of them are rounded, some look like 18th century pockets and a few others are square. Almost all extant pockets have red elements (usually on a black ground) but my assumption is that Kirsten’s pocket palette is strongly influenced by her American red, white and blue color scheme.
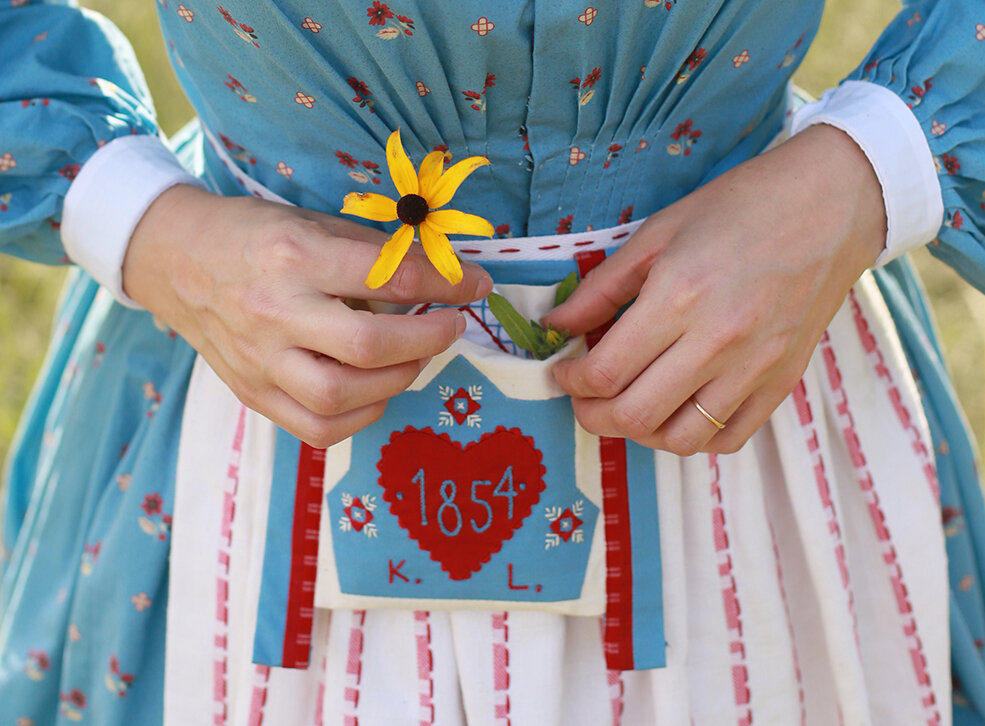
I thought about the many ways I could approach this piece - Should I make it more similar to an extant pocket? Should I copy Kirsten’s spoon bag identically? In the end, I scaled up my doll’s pocket to get the perfect proportions, but made my embroidery a little more intricate and special. You can imagine that the doll’s pocket was mass produced and thus rather simple. In place of the little stars on her pocket I did Scandinavian inspired embroidery instead. I also did the date with a little more of a flourish similar to what I saw on existing examples. Around the appliquéd red heart I added embroidered scallops. I kept Kirsten’s simple initials, which was very common on the historical examples I found in my research.
Inside the pocket is a small wooden spoon (in some of the photos) and a hankie. Pleasant Company/American girl says pioneers had limited cutlery and took it with them when visiting (probably true) but I didn’t find any of my own research saying as much. Some sources mentioned carrying money or candy in the bag or even bread for extra long church services.
I also folded up a hankie that I embroidered to look similar to Kirsten’s, which we learn in book two is an example of her own sewing work. Mine was a quick project I took on while I was waiting for other materials to arrive in the mail and was also done using scraps of both fabric and leftover embroidery floss from the pocket.

Apron
Kirsten’s red and white striped apron, or förkläde, was one piece I thought would be pretty straight forward, but ended up being a topic I researched in depth! This is one element of Kirsten’s look that is very Swedish with loads of examples in existing museum pieces, Swedish art and photography. Check out my research post if you want to learn more!
Knowing that this piece was homespun, woven and passed through generations, I didn’t want my apron to be made of a print or lightweight fabric weave - I wanted it to feel thicker and have more substance. I spent hours on Etsy looking through pages and pages until I finally found this vintage Swedish textile, which looks very similar to the cover of Meet Kirsten! It was the perfect size to gauge pleat and sew into a simple 1” wide twill ribbon waistband. I added a simple chunky running stitch alongside each red stripe to enhance it and also sewed additional running stitches on the waistband.
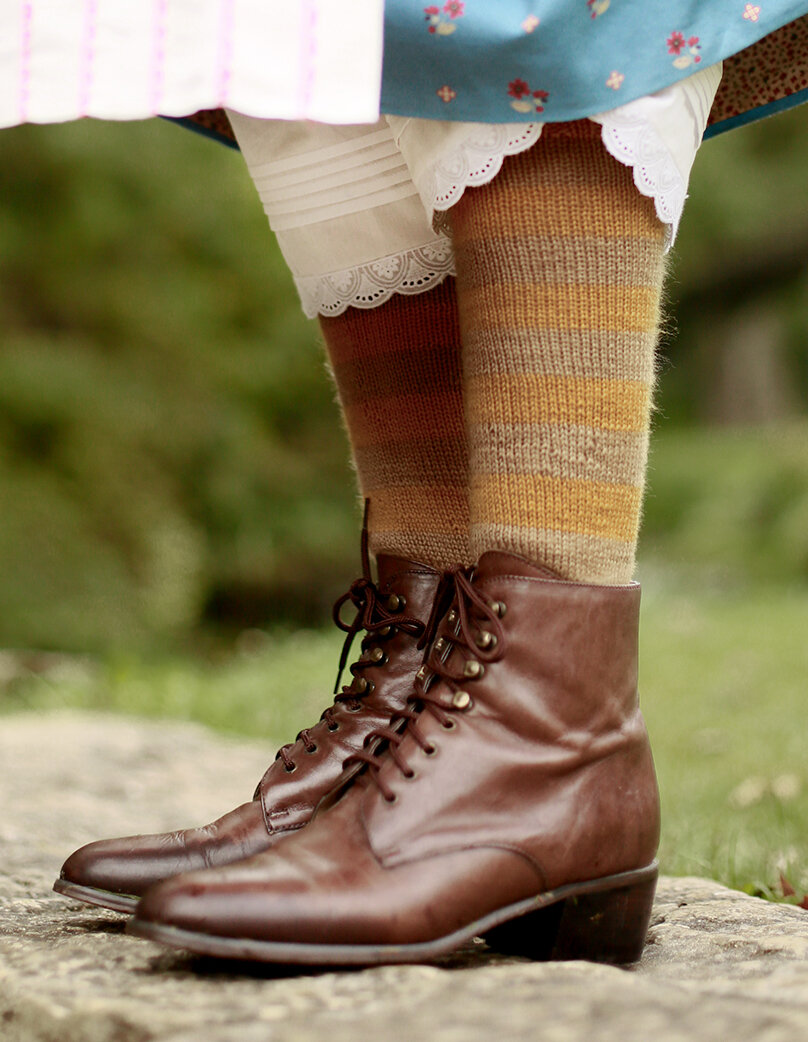
Socks
After spending so much time on all of the above accessories, I knew I couldn’t go the easy route with some school spirit striped socks from the craft store, so I commissioned these from the Pointed Needle via Etsy. Once I saw Ralyne’s work, I asked her for a bid and we agreed on a price plus the cost of materials. Even though I knit, I knew I’d rather have someone who specialized in socks to make these. They turned out amazingly and look so similar to the doll’s socks! I did give them a light tea bath to give the gold even more age and the end result looks great!
Boots
I really lucked out by finding these secondhand but seemingly unworn boots on Poshmark! I initially wanted to dye some boots I bought years ago until I realized they had a three inch heel and wouldn’t enhance the costume. They look so similar to an antique pair displayed at Spring Mill too! I called this style ‘granny boots’ as a girl and wore a black pair similar to these with everything in my closet. History repeats itself, people! This pair fit perfectly and were a really reasonable $30, including shipping!


You can probably see it written all over my face - I am so thrilled with how this entire project unfolded. I never thought I could do such a historical and cultural deep dive into the outfit of my favorite childhood character. This was a dream project in every way. The Kirsten Project ticked off so many boxes for me - research, planning, history, design, sewing and creativity. I’m so happy I did this!!
And now, as I look through all of these photos and write all of these words, it occurs to me that almost every single part of this plan just felt right. From designing the fabric to finding the perfect boots online everything came together as if it were meant to be.
When we shot the first half of these photos at Spring Mill State Park, we had the Pioneer Village to ourselves until the costumed volunteers showed up and graciously offered us props and cheerful hellos (you really never know how people will react when you’re in costume!) For the second part of the shoot we wanted a prairie field setting with long grasses and wild flowers and a sunny day for back lighting. Because of schedules, we had a tight window to shoot (never mind the grass being mowed down for fall any day now). We could have the location but we couldn’t control the light. It was pretty overcast when we headed out, but as Adam started testing camera settings, the skies cleared to blue and the sun came shining down. I could not believe our luck!!
Thanks to my husband Adam for all of the love and encouragement on my costume projects, which mean a messier house, more cooking for him, straight pins covering the floors in every room and a general mess of our dining room table for a couple of months. He took all of these incredible photos and captured my vision for this project so perfectly, and I am so grateful for all of it and more.
And with that, the Kirsten Project is complete! I hope you’ve enjoyed this series and I look forward to my next big project, whatever that may be.