Jessica Makes: Blue Suede Shoes

Blue Suede Shoes 2.jpg
Blue Suede Shoes 3.jpg

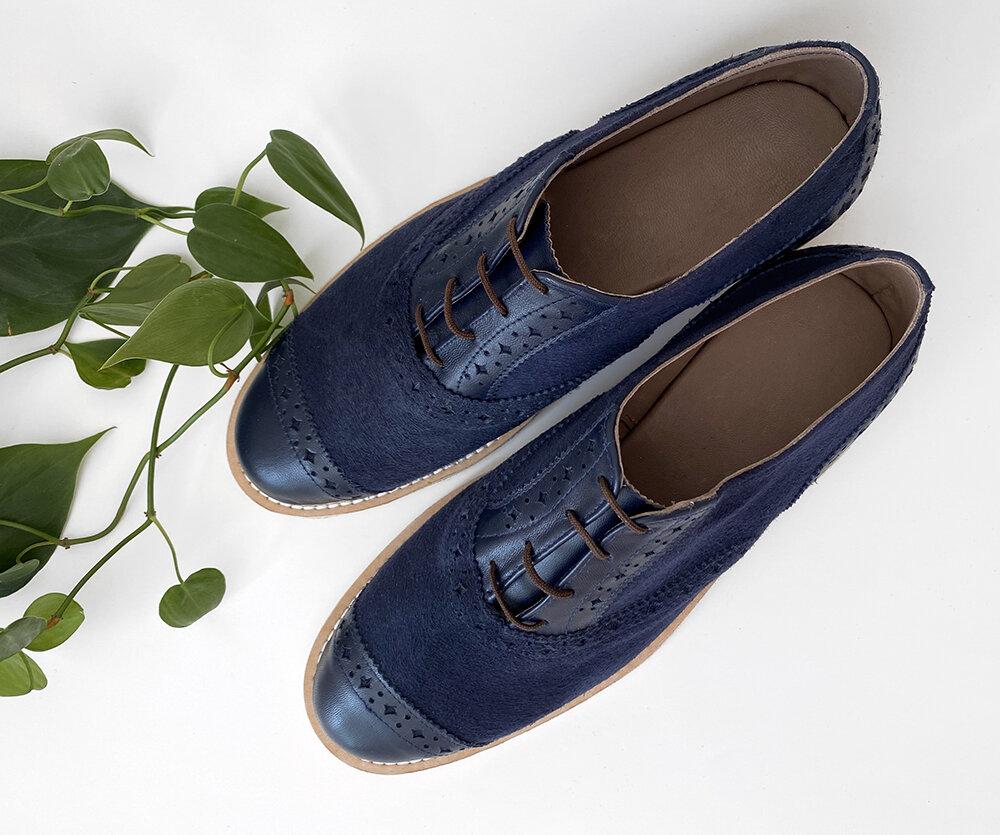
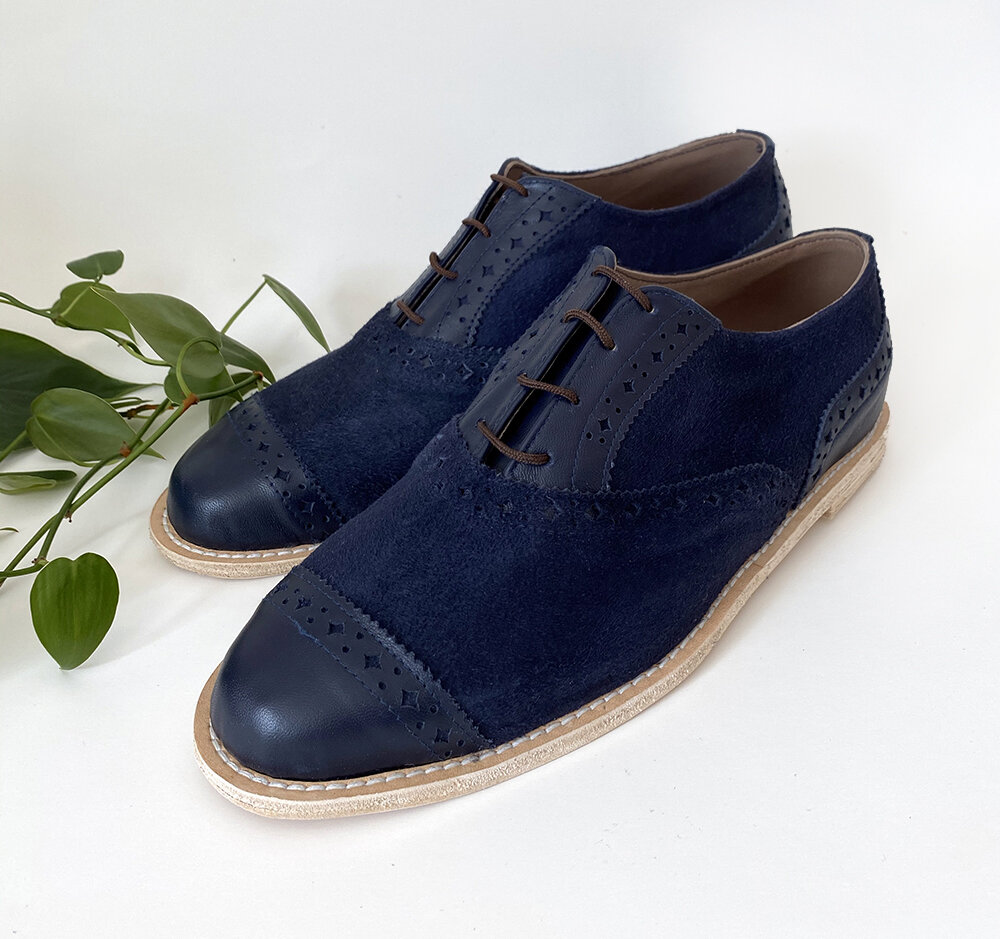
Until up to about a month ago, I never, in my wildest dreams, thought I’d be able to make a pair of shoes at home with my regular sewing machine and that they would be cute and wearable. I always thought home shoemaking was limited to espadrilles and moccasins sewn by hand. Fast forward to now and I’ve just finished my first pair of Brogue Oxfords out of leather and I’m really chuffed with the final result.

Whenever I try something new I like to take a class (like I did with knitting and millinery), so after following I Can Make Shoes on Instagram for a while, I signed up to take the Boot Making online class. I went through the curriculum a couple of times while I waited for my supplies to arrive from overseas, while also knowing that I’d also need to make a trip to Indianapolis to pick up leather. Me and my parents were in Indy for a while this January, so my mom and I went to Landwerlen’s Leather Supply together and it was amazing. We had such a good time picking out leathers and one of the hides I found was this lovely navy lambskin.

I’d been sketching out a lot of boot ideas when I mentioned the idea of making this style of shoe to my dad. I remember watching him shine is own shoes when I was a kid and the Oxford style always reminds me of him. I just kept thinking about it in navy, so instead of forcing myself to carry on with my boot plans, I went back to YouTube and watched as many videos of Oxford shoemaking as I could find. Granted, they’re all professionals or factory settings, but combining those videos with the ICMS course, I felt confident enough to get started. (I filmed a little bit of this and posted it on my Instagram)

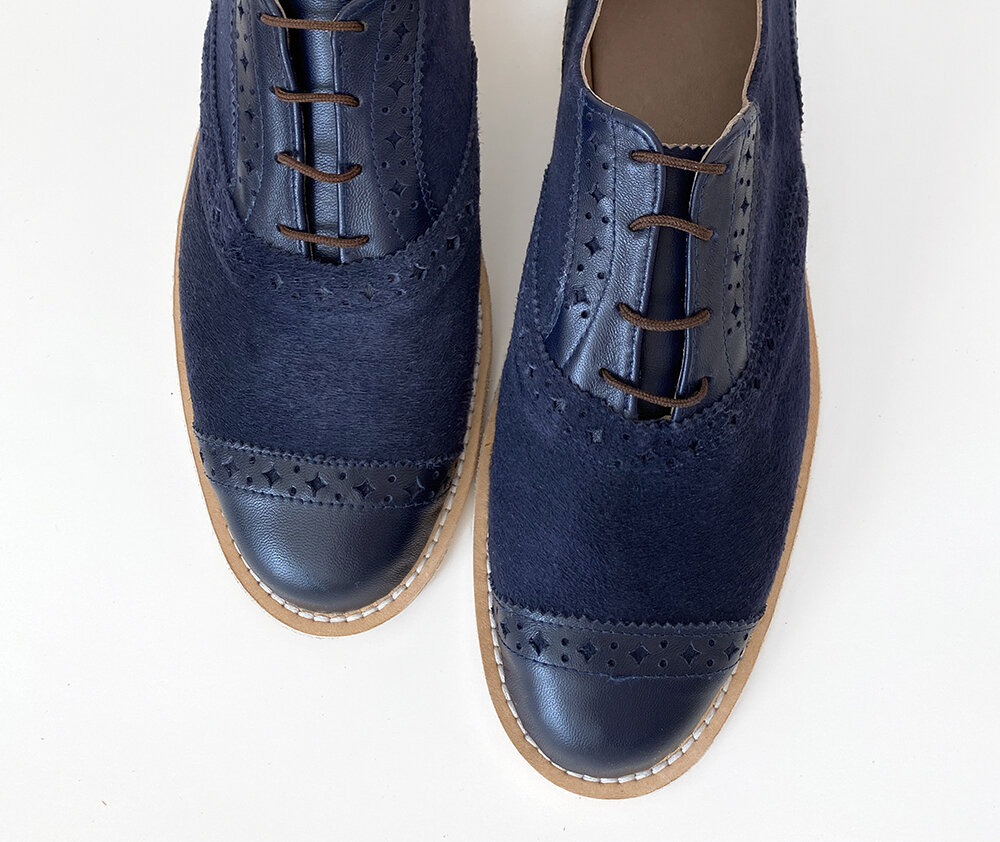
First I made my own pattern by taping up my last (shoe mold) and drawing up the design. From there I made a mock up out of felt just to get a grip on the underlaps and proportions. One thing about leather is that you’ve only got one shot at sewing it properly, so it’s good to have your fitting and planning squared away before you begin. But I’m getting a little ahead of myself because I also did my broguing (hole punching… and don’t quote me on that because I’m not sure it’s the technical term) before I sewed anything together. So it was a lot of measuring and a couple re-dos until I had my uppers stitched together.

I then made a lining pattern, stitched it together and sewed it to my upper. For those of you interested in further detail, I really suggest signing up for a class or doing some research/reading. If you’re the kind of person that likes to be very meticulous and has a grip on the engineering of garment construction, you’d definitely be able to make shoes. I wouldn’t call it hard, but definitely a challenge…the process humbled me quite a bit!

Once the upper and lining of the shoe are connected, the tongue sewn in and the lacing holes cut, the shoe now gets attached to the insole and sole. This involves a lot of glue and patience. I found cutting the thick leather for the sole and the heels and then smoothing it out, to be the most difficult part of the process. I felt good when I got the sole edges even, but professionals take it even further using hot tools, wax, even broken glass and dye to complete soles. I like the way these look now, but I’d love to continue learning so I can take my future pairs up a notch.

I made one shoe at a time, from start to finish. I learned a lot on my first shoe and made some improvements on the second. And next time, I’ll get even better!

I haven’t worn these out of the house yet (read: Midwestern winter) but when the sidewalks are clear and dry I’ll be giving these a spin. They’re very comfortable. Now I just need to decide what I’ll wear with them!

Blue Suede Shoes 4.jpg
Blue Suede Shoes 5.jpg

Me Made Everyday | Fall 2020 Closet Tour

2020 CLOSET.jpg

Here are the patterns featured in my Fall 2020 #memade Closet Tour:

Jessica Sews | Buffalo Gal

M7977

This season I’ve been all about ruffles and puffs and big, statement sleeves. One pattern in my stash that checks all those boxes (and is a joy to sew) is McCalls 7977. I’ve made it up a bunch of different ways - short sleeves, no sleeves and in both upcycled and new fabrics. My latest shown here, is one of my favorites (who am I kidding? I love them all!)

I did make a few modifications as follows: I cut the neckline slightly higher than the pattern pieces and drafted facings to fit. Then I gathered a short ruffle and sewed it between the bodice and facing (plus understitching on the facing side).

On the sleeves, I cut them long (27” from the sleeve head) and made a bias casing, which I sewed 1.5” up from the hem of the sleeve. This is a lot quicker than a full cuff with three buttons on each side.

The bit that makes me most proud of this piece is the plaid matching. It adds another level of attention to detail and engineering to get it to work out and there’s no where to hide with 1” plaid. In fact, when I was learning proper techniques in college we always worked in 1 or 1/4” gingham. I’ve had some requests for a tutorial on this and it’s on my list! Stay tuned!

D5200838-6AC8-4743-94C2-0D579AA5E096.JPG
IMG_8615.jpg

Studio Quirk | FREE Cloth Mask Pattern + Tutorial

Free Double Layer Cotton Face Mask Pattern.jpg

2020. The year of sewing a thousand masks. I actually have no idea how many I’ve made this year, but I DO know which style I like wearing most. This version is a hybrid between a fitted duck bill style and a pleated rectangle. I like using elastic because it’s easy on/off. Today I’m going to show you how I make this mask and share the pattern I’ve developed that’s free for your personal use. This is a non-medical face covering and should be used alongside physical distancing and frequent hand washing. See the CDC’s guidelines on masks here. Ok! Let’s sew a cloth mask!

Line Break.jpg

SUPPLIES

  • 1/4 yard (or fat quarter) tightly woven cotton fabric (quilting cotton is great!)

  • Optional contrast fabric for bias binding

  • 13” soft 1/4” elastic

  • Scissors

  • Thread

  • Pins

  • Sewing Machine

  • Mask Pattern (free to print at home)

Enjoy the videos and music you love, upload original content, and share it all with friends, family, and the world on YouTube.

INSTRUCTIONS

Mask ON.jpg

Download and print my free mask pattern at 100%. You can double check you have the correct size by measuring the 1” square at the top of the pattern. This has been sized for an average adult woman. If you have a larger face, cut a little outside the pattern to make it bigger. The pleating will help customize the mask further (you may choose to omit it all together)

(For the body of my mask I used ‘Fleuron’ in Sanctuary from the Kismet collection designed by Sharon Holland for Art Gallery Fabrics.)

Cut FOUR of your main pattern piece (be sure you cut 2 lefts and 2 rights). Cut elastic into TWO 6.5” lengths. Cut TWO 2” wide bias strips, 9” long.

Sew center seam with 1/4” seam allowance to create FRONT and BACK. Press, trim and notch.

Lay elastic on RIGHT side of FRONT. Pin in place.

Place FRONT and BACK with RIGHT sides together and stitch 1/4” from edge. Turn RIGHT side out and press.

Fold bias WRONG sides together and press.

Lay bias RIGHT SIDES TOGETHER on the top of the FRONT side of your mask (if you’re using the same fabric for FRONT and BACK, it won’t matter which side you apply your bodice to). You should have bias extend over side edges so we can turn under and create clean edge.

Stitch 1/4” from edge. Press open.

Trim sides to 1/2” and turn under. Now turn bias over the seam and under. Press.

Stitch in the ditch (the area between bias and FRONT).

Repeat bias application on bottom of mask.

Now we’ll make small pleats on each side of the mask. Try on and create a small pleat with the fold pointing down, like this. Pin in place and top stitch to secure.

Optional: Insert a small wire over the bridge of your nose. I rip these out of disposable masks but you can also use the wire twist tie from a load of bread. Because they’re coated, I still throw my mask in the wash (daily!) without issue.

If you’ve enjoyed this tutorial or know someone who might, please share!

Mask Tutorial Thumbnail.jpg