Jessica Sews | Peplum Eyelet Refashion + Wide Leg Dawn Jeans

Peplum Top and Wide Leg Dawn Jeans.jpg
Peplum Top and Wide Leg Dawn Jeans 5.jpg
Peplum Top and Wide Leg Dawn Jeans 4.jpg

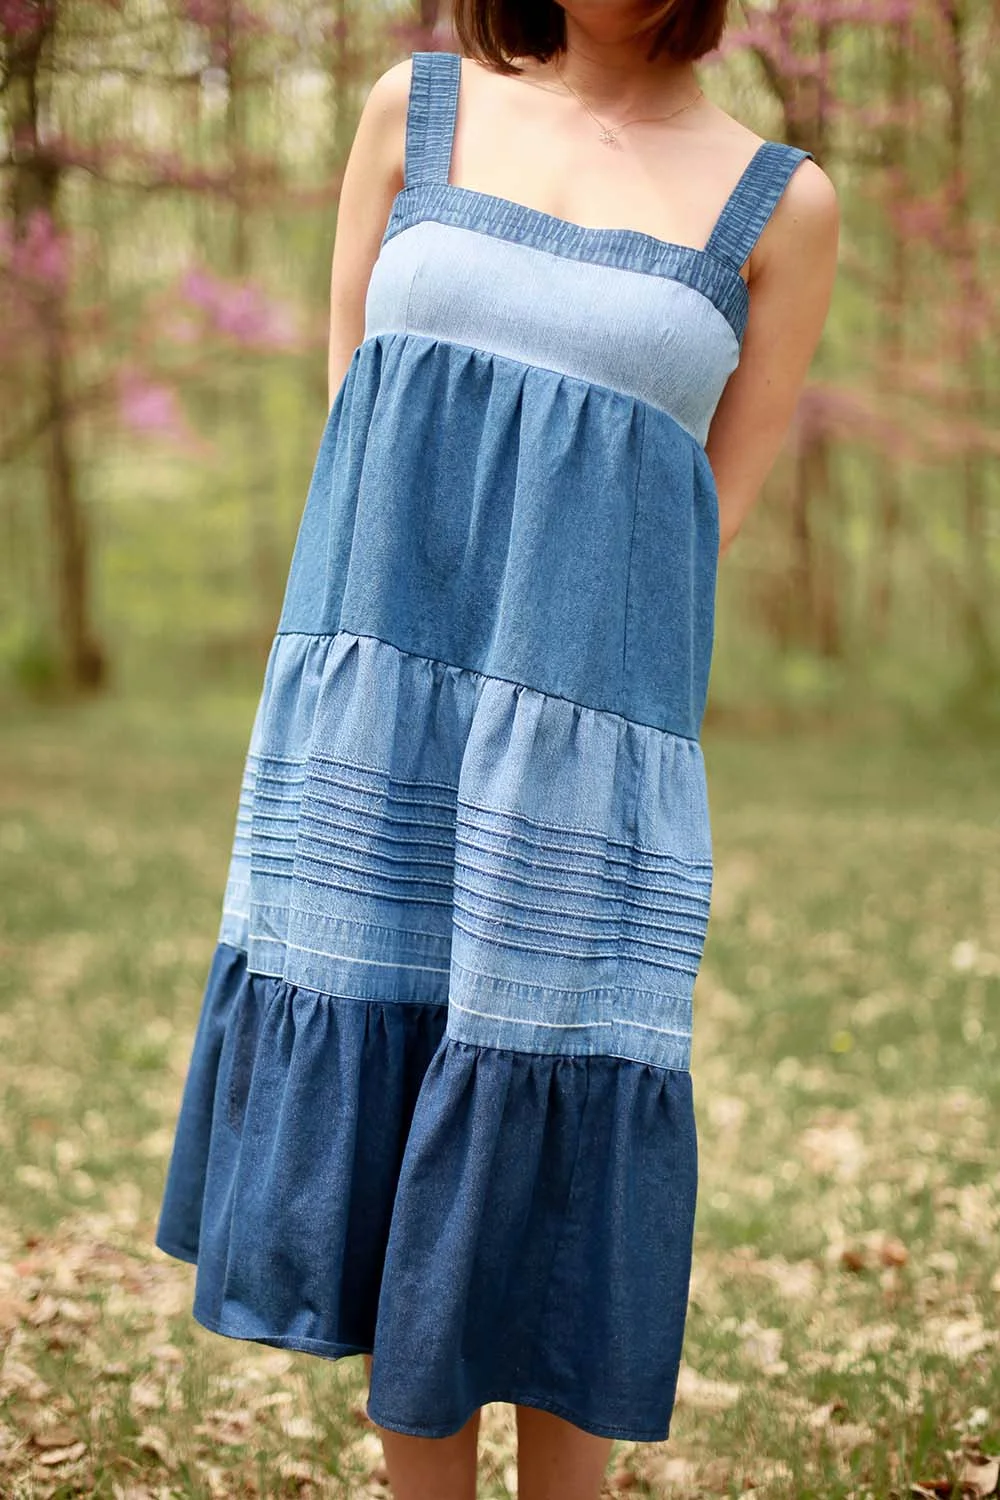
There are a couple fabrics that instantly draw me in when I’m shopping for fabric at the thrift store - eyelet and chambray. You saw my chambray refashion earlier this week, so here’s one example of how I’ve harvested eyelet fabric and remade it into a different silhouette.

Before.jpg

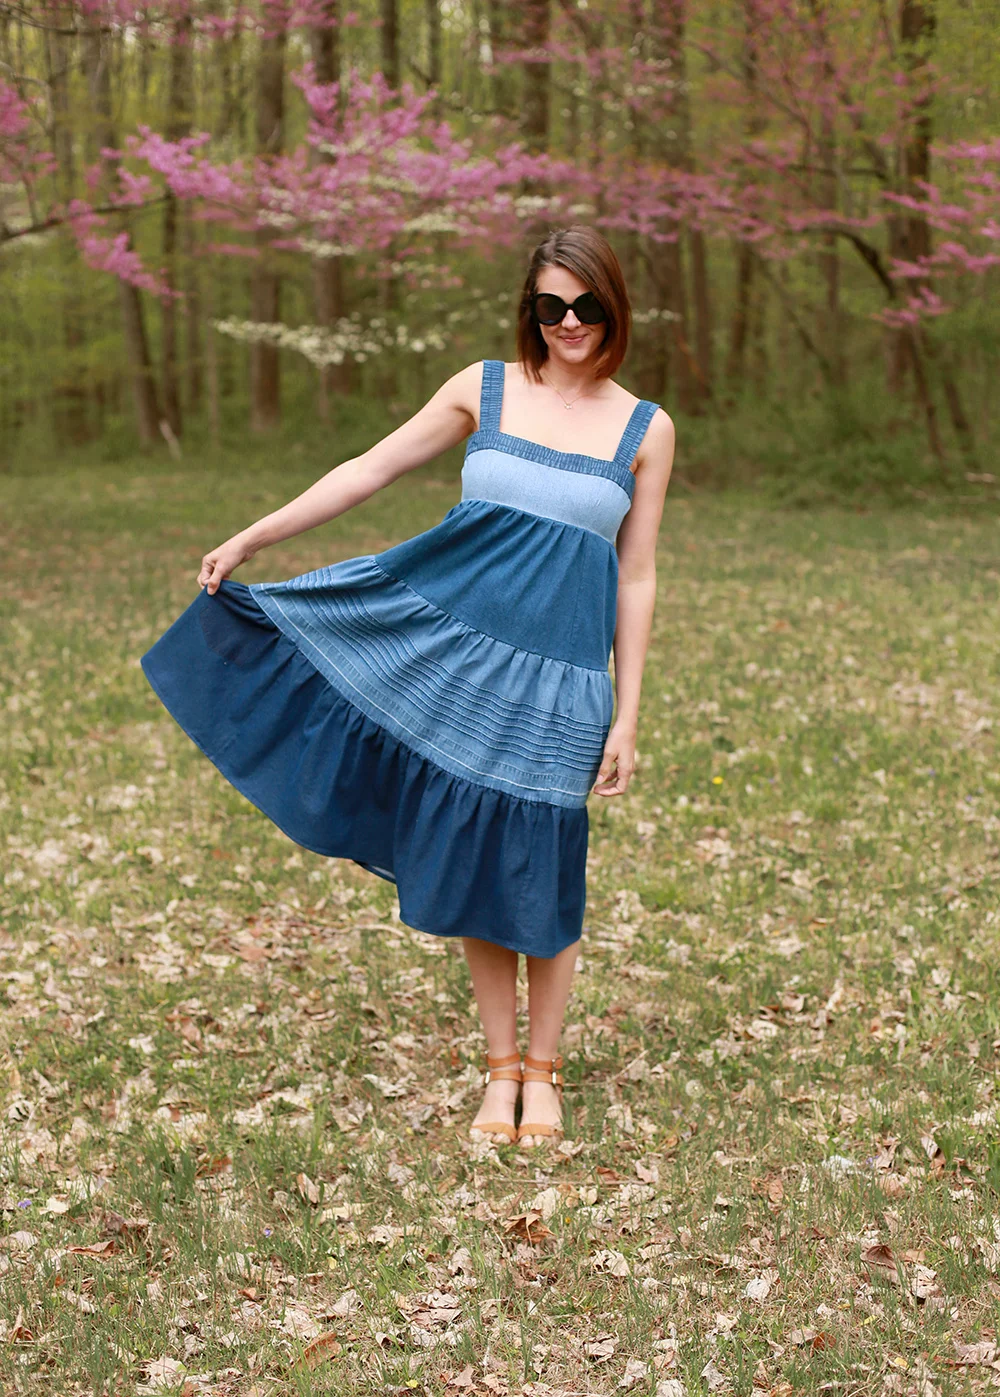
I was instantly drawn to this navy eyelet dress, but it was a couple sizes too big for me. Sure, I could have tried to alter it down to fit, but I’ve been in more of a chop chop mood lately plus I had a pattern (Simplicity 1425) that I wanted to try out. After a wash, I went to town cutting along the seam lines to see what kind of yardage I would be left with. I’ve had some questions about how I disassemble garments and it varies from piece to piece. Something like eyelet can be a beast with all of the thread used to create the actual eyelet, so in this case I just cut along the seam edges.

From there I laid out my pattern and realized I’d need to make some changes to have enough fabric. I omitted the pleats in the peplum by folding them up on the paper pattern and cutting that smaller shape out. I also decided not to do a collar stand and have a flat Peter Pan style collar instead.

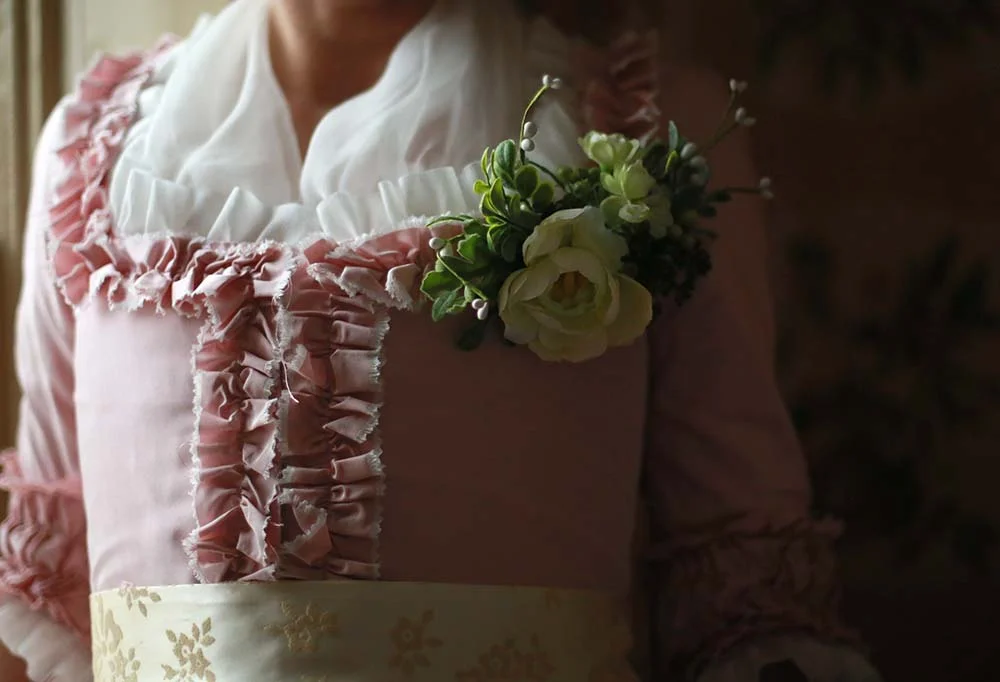
I lined both the lower portion of the bodice front and the whole back so I could wear a bra underneath. The fabric I used was left over from Bea’s 18th century dress.

On bottom I’m wearing my wide leg Dawn jeans again. I’ve only worn them a couple of times (I usually save true white for later spring and summer or vacation) and I absolutely love this style. I’m even thinking I need to go check my stash to see what fabrics I have to make a second pair! If you want to see the first way I wore them, check out this post.

Peplum Top and Wide Leg Dawn Jeans 2.jpg
Peplum Top and Wide Leg Dawn Jeans 3.jpg

Jessica Sews | Bishop Sleeve Bodysuit and Dawn Jean Flare Hack

Bishop Blouse and Dawn Flare Hack 4.jpg
Bishop Blouse and Dawn Flare Hack 3.jpg
Bishop Blouse and Dawn Flare Hack.jpg

Next up in newly stitched goodies - a bishop sleeve body suit paired with my sixth version of Megan Nielsen’s Dawn Jean pattern (altered into flares with seventies style patch pockets). Both of these were fun experiments, so let me tell you more about them!

The blouse is made from a large scarf I found at my local Goodwill. I loved the pattern (it’s woven, not printed) and I thought I might have enough yardage for the wide bishop sleeves from Simplicity 8789. I used the sleeves from view C paired with the bodice from view A and just barely eeked out my pattern pieces. The bodice itself was super straight forward, but once complete it’s attached to knit undies to form a body suit. For that fabric I cut up one of Adam’s old tee shirts. I really haven’t jumped into the world of knits, but I have to admit - these came out really great. I bought a double ball point needle to attach the elastic and it was so straight forward and simple. So I’m asking myself - have I been majorly missing out by not sewing knits? Maybe! Next time I will add just a little more length to the woven portion of the garment because even though I am shorter waisted, it could use a little more vertical space. I have an instagram story of this entire process (or at least some of it!) here if you’d like to take a look!

The jeans were made on a whim because…. well, just because I wanted some flare jeans I guess? I used the tapered leg as a base and drew straight onto my denim in tailor’s chalk. I measured 14” up from the hem to start my flare and drew down to a 21” leg opening. Instead of a traditional scoop pocket shape I did a shortened version of the patch pockets I drafted for my overalls. Again, if you’d like to see some action shots, check out my instagram story on making this pair of jeans.

After wearing the jeans a few times I felt they’d have a better fit by taking in some additional space at my hips. The end result is great! I would like to do these again in a nicer quality denim but I have a lot of projects on my list before that.

Listen - if you’ve been on the fence about making a pair of jeans I cannot recommend this pattern enough. I’ve made it seven times now (after these jeans I made a second pair of shorts that I LOVE). It really is that amazing of a pattern.

And something else I’ve mentioned on social media but not on here… those silver strands you see? Expect more of them as time goes on! I’ve decided to let my natural greying color come through and while it’s taking a little time to adjust to editing photos with all that white hair, IRL, I love it. Maybe because I rarely look at mysefl in a mirror and only in good lighting with a filter via my phone? If you’re also considering it, take a look at the #grombre movement on Instagram. It really helped confirm for me that this is a beautiful look and women with grey hair have this air of badassery about them. Now I just wish MORE white would come in and it would grow out faster!

Bishop Blouse and Dawn Flare Hack 6.jpg
Bishop Blouse and Dawn Flare Hack 2.jpg

Jessica Sews | Chambray Refashion Dress

Refashioned Chambray Dress B.jpg
Refashioned Chambray Dress D.jpg

Guys, this is one of my favorite sewing projects of the year and I’m so excited to tell you all about it. A couple weekends ago I was revisiting my spring outfit ideas page on Pinterest and on a whim did a search to see if one particular vintage sewing pattern (Butterick 6079) may be floating around on ebay or etsy. In a stroke of amazing luck, I tracked down the exact pattern I wanted in my size! Plus it was uncut and never used, so for six bucks I placed my order and waited patiently for it to arrive.

In the meantime I did some sketching and brainstormed ideas for fabric to use on the project. I’ve been wanting to do some seventies stye prairie dresses a la Gunne Sax, so the idea of using little ditty print cottons was one that would have definitely vibed with the pattern cover illustrations. As I jotted down ideas I started to think that chambray could be pretty, maybe in various shades. Since I’ve been thrifting multiple times a week lately, I also knew there were a lot of plus sized skirts just waiting to be used for fabric.

Sketch and Swatch.jpg

I visited both Goodwill stores in my town and bought four different skirts, all size 18 or larger. I didn’t even realize it at the time, but I picked up two of the same skirt (one slightly more faded than the other)- one at the east side location and the other across town.

Skirts Before 1.jpg
Untucked Pleats.jpg

While I waiting for my mail carrier to deliver the pattern, I started picking apart the skirts. The elastic waistband on one had amazing depth from color loss after washing (that’s what I used for the top band and straps!) The pair of matching skirts had these tiny eighth inch pin tucks and a nice one inch hem that I picked out. Although I didn’t have any full yards of fabric, by sewing panels back together in an alternating triangle pattern (hem up, hem down, hem up) I was able to get plenty of usable fabric with the grain running straight. I even picked off the back pockets of the darkest chambray which you can see closely if you look! I love this detail!

Once I was able to open my pattern and start cutting I ended up finishing the dress in the same day. I mean, as I saw it coming together I just couldn’t put it down! This turned out even better than my greatest expectations. I love that I refashioned and upcycled second hand pieces, used thread and notions I already had and got use from a vintage pattern that would have otherwise sat in someone’s attic for years. I am so proud that my self made wardrobe is at least half made from repurposed fabric and truth be told, it’s the only way for me to get really unique and high quality fabric where I live.

Refashioned Chambray Dress A.jpg
Refashioned Chambray Dress C.jpg


Time Traveling | 18th Century Dinner Party

18th Century Pink Gown .jpg
Back to Reality.jpg
Pink Gown Window Detail 2.jpg
Getting Ready 1.jpg

Over the weekend I felt like a straight up royal, all dressed up in a 1770s pink silk gown. Adam and I drove to Ohio’s oldest hotel, the Golden Lamb, for an intimate dinner party with guests dressed in their best 18th century ensembles. We had such a great time and loved meeting historical fashion enthusiasts! And seeing their gowns and suits close up was a thrill! Many thanks to our gracious hostess Amber, who organized our event!

Let me tell you about my look from head to toe! I loved every single step of this project - researching the history, finding inspiration, sewing and especially wearing it. If you’d asked me a year ago if dressing up in Georgian finery would be my favorite hobby… well, I probably would have believed you. I love it!

I started getting ready for the night by putting on my sleeveless shift and embroidered stays. These were the only items that went over my head and I wanted to have those on before I started my elaborate hair style. I worked with 3 day dirty hair which had already been powdered a couple times. I divided my hair into a front and back section and to create the height and used a skein of yarn (thanks for the tip Yunna!) and pinned my hair over it and directly behind it. Once I was happy with the coverage and height (covering all of the yarn can be a tad fiddly), I pulled my remaining hair into a low bun. Then, I clipped in a hairpiece that had been previously wet set into five curls. Adam helped me pin those curls over the edges so the base of the hairpiece was invisible.

After a vigorous spritz of hairspray, I lightly powdered all of my hair. The photos don’t quite capture the coverage, but it looked awesome! Some might wonder - why was grey/white hair a trend in the 18th century? From my research I believe it first started with the use of wigs by royalty in the 16th and 17th centuries. Many believe it was to cover the baldness brought about by STDs (seriously) and then evolved into a fashion trend. White wigs were the most expensive and thus the look of white hair became most fashionable. Pastels blue, pink and purple powders were also on trend. A tax levied on hair powder at the end of the 18th century helped it fall out of style. I really look forward to expanding my knowledge of historically accurate hair styles but I really loved what I came up with for this occasion!

For makeup I simply powdered my face, did a berry colored lip and used the same lipstick to dab onto my cheeks. I did a quick swipe of mascara and was done!

Gown BW 3.jpg
Pink Gown Window Detail 3.jpg

Before I put on my gown, I dressed in additional layers to add more volume under my gown and petticoat. First, a simple white quilted cotton petticoat worn with a false rump stuffed to add more fluff to the back of my dress. Then I tucked my sheer fichu into the top of my stays (which can also be tucked into your petticoat at the waist… but I needed my bodice to lay perfectly flat and didn’t want any of the fichu edges showing underneath!) At this time I also had on white stockings and my American Duchess Kensington buckled shoes.

Next up - the gown! I used six yards of pink silk to make both the petticoat (underskirt) and gown. On the petticoat there is a 7” ruffle with scalloped and pinked edges sewn to the hem. The dress has ruched sleeve cuffs and trim around the neckline and center front opening. At the neck and sleeve edges I also placed a narrow sheer ruffle. The matching petticoat, also called a ditto, is intentionally short - those Georgians loved to show a little ankle!

At my waist I have a 2” wide band of brocade silk, which actually came from my grandmother’s wedding dress (see her wedding photos here). Me, my sister and all of my girl cousins have had a piece of her dress for our weddings (I wrapped mine around my bouquet). I was rushed on what to use and wanted silk so I asked my mom if there was enough of this fabric at home to make a simple belt. She stitched it up for me and handed it off as we headed out the door for our road trip. No, it’s not perfectly 1770s in motif but it looks great, it’s special and perfect to me!

Lastly I pinned on a corsage made of springy faux flowers. I’ve seen this in a lot of portraits and illustrations and I love the way it add dimension and color to my overall look.

And that’s it! We had such a wonderful time and I’m already on the hunt for a venue closer to home so I might host something similar in the future!

Muted Walls 4.jpg
Pink Gown Full Length .jpg
18th Century Pink Gown 2 .jpg