Inspired by | Red Chintz

Red Chintz Inspiration 3.jpg

In the past few weeks i have been sewing up a storm and am in the process of putting the finishing touches on my 1780s Italian gown. Before the big reveal, I wanted to pull together my inspiration images and tell you a little more about my fabric choice.

Usually when I set out to sew something, I have an idea in my head of what the finished piece will look like before I even begin. It’s been very different this time around! I had my pattern (Fig Leaf Patterns 101) ordered and I knew I wanted to do a print, but I kept getting tripped up on what combination of fabrics to use. As you can imagine these 18th century dresses take a lot of yardage so there’s the question of cost. I also want to be appropriate for the event we’re attending, so this wouldn’t be a grand courtly number (ie, not silk) either.

Red Chintz Side by Side.jpg
Fries Museum Chintz.jpg

Then one day I bit the bullet when I saw PennyRiver on Instagram doing a little flash sale on some of her stash. She had a Colonial Williamsburg chintz I’d had my eye on and at a discount - so I snapped it up. At just three yards I knew I’d have to be extra careful with my pattern layout and cutting, but at worst I could make it up into a jacket to be worn with a petticoat.

All this long story is to say that after I’d bought the fabric I realized every costumer under the sun seemed to be making white chintz Italian gowns. For good reason too - chintz patterns were all the rage during the 1700s, especially the latter half of the century. But you know me - I can’t look like everyone else! Which finally landed me on the idea of overdying the fabric and repainting in the print by hand.

So that’s exactly what I did.

It took roughly 30 hours after my kids went to bed each night over my dining room table, four white gel pens, three boxes of chalk paint markers and five true crime podcast series. And I am so in love with the final result!

I’d like to have my entire look complete before sharing too much, but there is a little back view of the dress on my instagram. I’ve also realized it’s really tricky to photograph these colors in a way that reflects their real life hues, but hopefully when I have my real photographer (Adam!) he’ll be able to do them justice.

If you’d like to see all of my inspiration, including some images that I didn’t post here, check out my Pinterest board! Can I just time travel back to the 18th century please (for a limited time, I know life was not easy back them for a multitude of reasons, but let’s just embrace the fantasy aspect and ignore the realities!)


Red Chintz Inspiration 5.jpg

Notes from the Field | 013

Where to begin? How about this? It’s so nice not to have to worry about posting on a blog routinely and just to enjoy it when I want to as a hobby. I can go days without opening my laptop and it just feels good. It’s been nine months since I quit What I Wore and the changes have been, quite frankly, life changing!

In that time I’ve also honored my promise not to buy anything first hand, at least for myself, and haven’t bought any new clothes at all this year. I already have nice clothes! And I rarely get dressed up so when I do, I wear the same few dresses over and over. I probably should care more about my appearance, but now I get to spend that energy in other places and it’s a nice change. I do still believe in the power of clothing to be your best self but I know my best self doesn’t need a blog to document it anymore.

Another change from the past year? I’ve come to really enjoy social media a whole lot more as I’ve redefined what I read/see and who I listen to. I used to get so jealous! But guess what I did? Stopped following those people! If social media is making you feel bad about your life, it’s time to do yourself the favor and stop consuming in those places. It’s. On. You. Or me in this situation. I also stopped using twitter and facebook, aside from the occasional Happy Birthday check in and life is so much better without the drama. No TV either, minus my only vice #bachelornation.

What else? Well… I’ve had some family needs to care for which don’t want broadcast to the world. I’m ok with saying that much but it’s not my story to tell. And it feels right. Maybe it’s age or maturity or just haven’t already been through a decade of sharing EVERYTHING but I just don’t feel compelled to do it anymore.

Lastly, I’ve really been thinking about going back to work at a more formalized job. Like so many people in their 30s, I’m wanting a career change. I certainly don’t want to be a blogger or influencer (ughhhh I hate that word so much!) but I haven’t narrowed down what skills to use or where. I just don’t know yet.

Jessica Bakes | Rainbow Cake

Cake Stand.jpg
Rainbow Cake Layers
Rainbow Cake

A few weeks ago our little Felix turned four and requested a rainbow birthday cake. The end result was really pretty easy and incredibly delicious! This isn't a really a recipe (I used a box mix!) but here's how we got the effect.

We used one box of white cake mix and divided it into six bowls (a heaping 1/2 C). I've seen them done with traditional thick layers, but that ends up being like 3 full cakes and this normal sized guy was enough sugar for this family over the course of a weekend!

Next we added food coloring (nothing fancy - just the standard kind you get in the baking aisle) and dolloped each batch out into a very thin layer in a 9" cake pan. Bake at 350 for about 10 minutes. I did three at a time. 

Once cool (that happens pretty quickly!), layer them up! I frosted this cake with my favorite icing - approximately two packages of cream cheese and 5 C of powdered sugar and a little squeeze of almond flavoring. 

As you can see, the cakes aren't the exact same size, but I don't think that takes away from the effect once the cake is cut into! In fact, I almost always do my cakes "naked' and only use frosting between layers (here's Beatrix's first birthday cake, and Felix's first birthday cake - OMG look at how tiny he was! Time flies (and drags on. The days are long and the years are short)

To top it off we did a generous topping of rainbow sprinkles and a few decorative stars with the remaining icing. 

Rainbow Cake Slice.jpg
Box Mix Rainbow Cake DIY

Our Farmhouse | White Washing a Stone Fireplace

Stone Fireplace Makeover

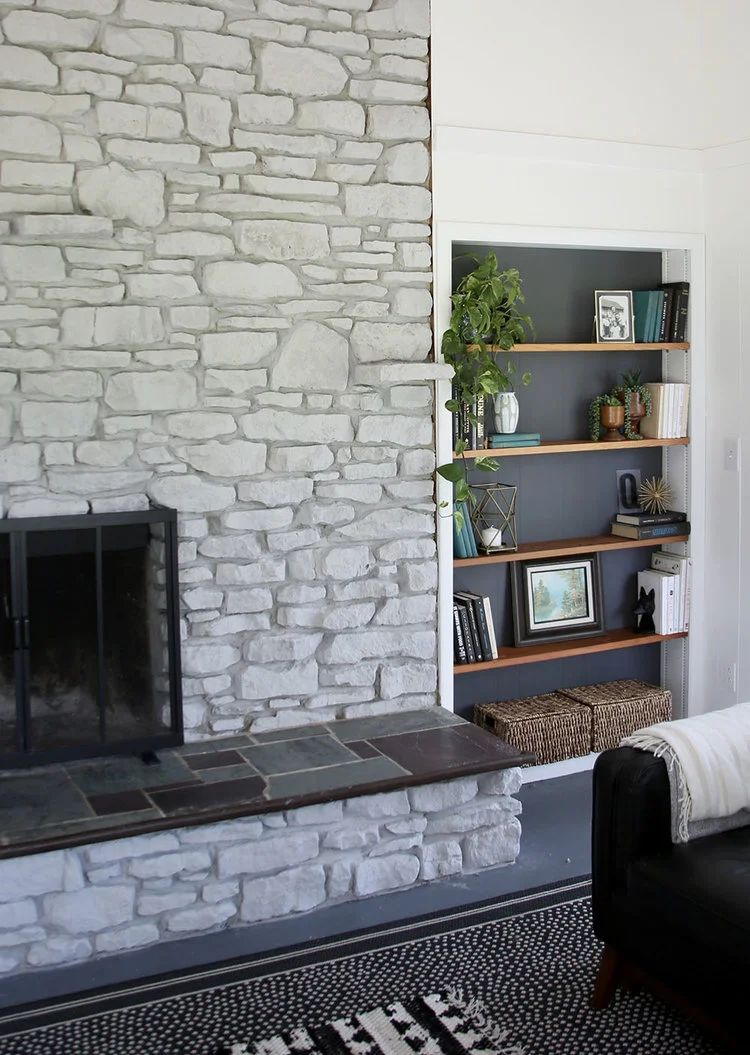
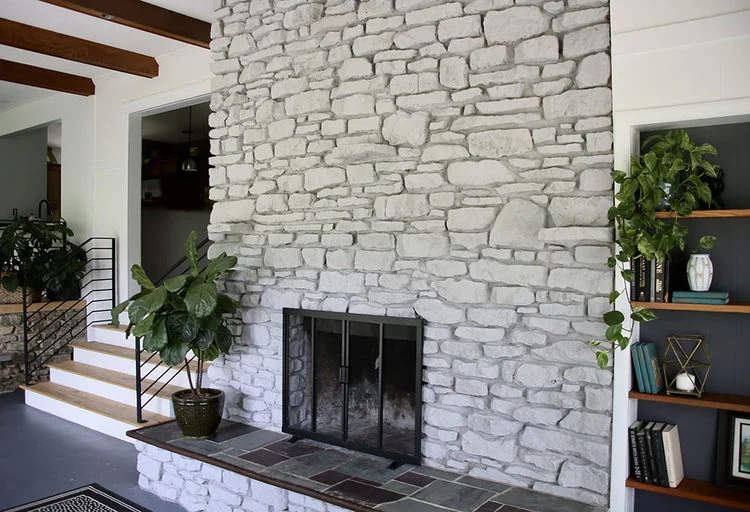
One of the most dramatic updates in my home cost less than $100 and was something I did myself over the course of a (kid free) weekend - white washing my stone fireplace. A lot of you have been asking me for more details, so buckle up! Here we go. 

White Washed Stone Fireplace
White Washing Fireplace

The giant sandstone fireplace was a huge selling point for us - we use it daily in the winter and love the cozy feeling a wood burning fireplace brings to a home. One thing I didn't love - the soot stains from years of use and the dirty look that came along with it. I tried scrubbing it but never got the stone to look the way I wanted. I also don't love brown tones, so... I took a risk and I love the final result.

But before we go on - I must caution you - this is a permanent solution. The porous nature of the stone absorbs the white wash and there is NO GOING BACK. I've seen some not-so-great examples on Pinterest that really had me pressing pause on this project for a long time. That said, there are also some gorgeous results out there, so I knew it was possible. 

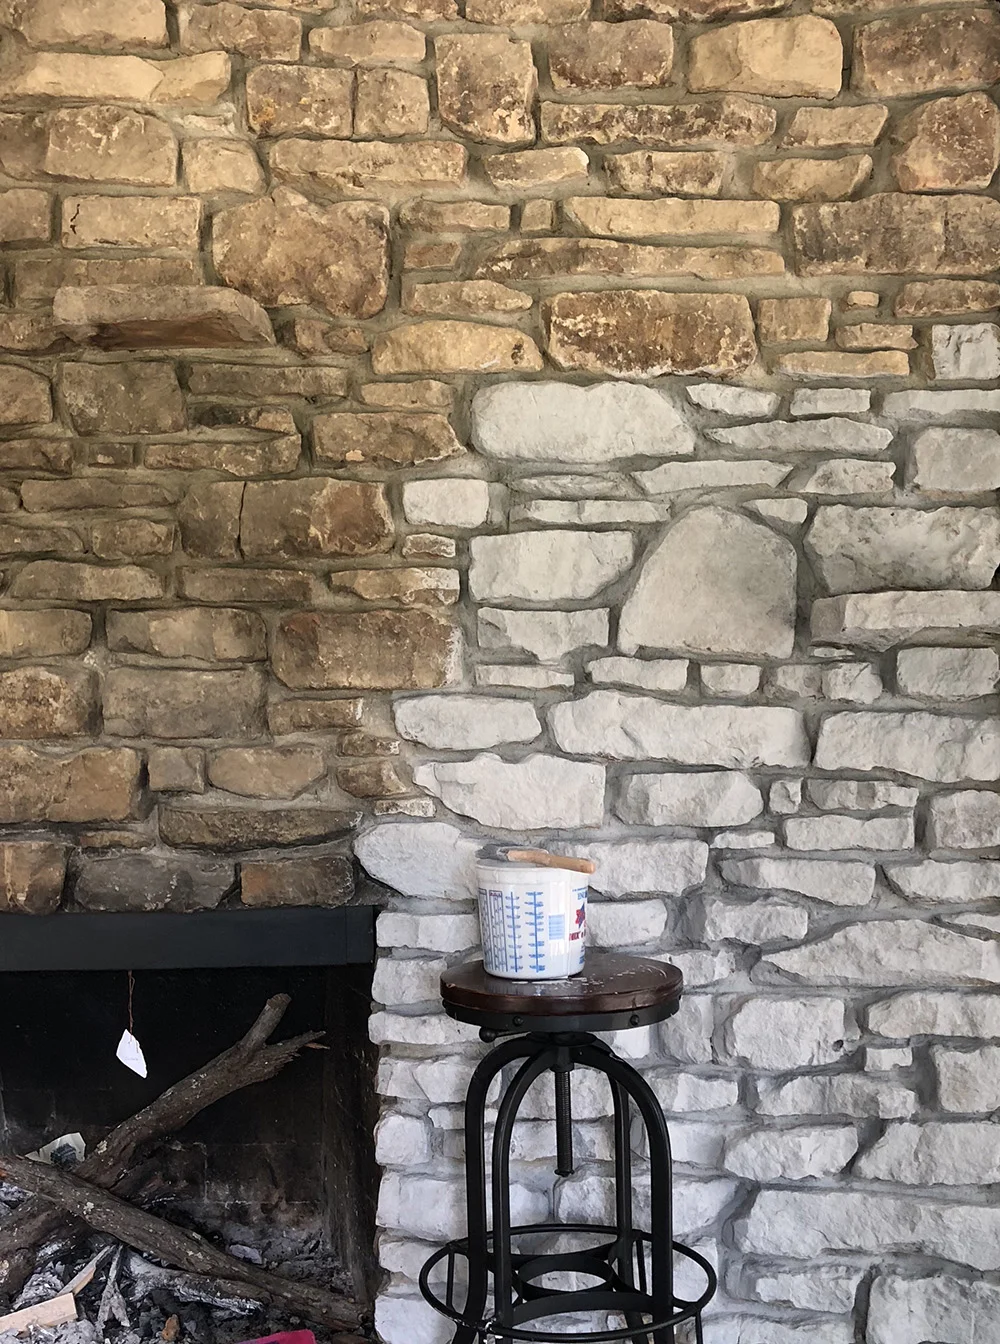
The process is pretty simple. I chose Rustoleum Chalked paint in Aged Grey and used a measuring bucket to ensure I could get the same ratio of paint to water with each batch (1:1 worked great for me). Once you've mixed up your paint and water, all you need is a stiff brush, rags to dab the wet slurry, a couple of awesome podcasts and time. Check out these progress shots (click to for larger view)

Fireplace Lead.jpg

I think this project was successful for a couple reasons:

 The 1:1 mixture of paint allowed for some of the natural variation in the color of the stone to come through. No matter what ratio you use, make note of it and repeat it! 

Matte paint is a must. Chalk paint worked well for this and the grey tone looks really nice against my bright white walls.

I worked in small sections and dabbed excess liquid as I went, especially in places I wantd some of the rock patterns to be more visible.

The actual texture of the stone work has a lot of highlights and shadows which adds to the dimension of the finished project.

I'm thrilled with the final results! It brightens the room by reflecting all of that pretty natural light and maintains an organic look. If you haven't seen the full room make over, you can do that here.

White+Washed+Stone+Fireplace+and+Sunroom+Makeover.jpg

Lastly, this is kind of wild, but I was nominated and selected as a finalist by Domino Magazine for Best Renovation Blog as part of their Design Blog Awards. WTH!? The winner will get featured on their site and win a trip to Chicago! Public votes will determine that! If you've enjoyed any of my before and after makeovers, I'd love your support!