Jessica Sews | Bishop Sleeve Bodysuit and Dawn Jean Flare Hack

Bishop Blouse and Dawn Flare Hack 4.jpg
Bishop Blouse and Dawn Flare Hack 3.jpg
Bishop Blouse and Dawn Flare Hack.jpg

Next up in newly stitched goodies - a bishop sleeve body suit paired with my sixth version of Megan Nielsen’s Dawn Jean pattern (altered into flares with seventies style patch pockets). Both of these were fun experiments, so let me tell you more about them!

The blouse is made from a large scarf I found at my local Goodwill. I loved the pattern (it’s woven, not printed) and I thought I might have enough yardage for the wide bishop sleeves from Simplicity 8789. I used the sleeves from view C paired with the bodice from view A and just barely eeked out my pattern pieces. The bodice itself was super straight forward, but once complete it’s attached to knit undies to form a body suit. For that fabric I cut up one of Adam’s old tee shirts. I really haven’t jumped into the world of knits, but I have to admit - these came out really great. I bought a double ball point needle to attach the elastic and it was so straight forward and simple. So I’m asking myself - have I been majorly missing out by not sewing knits? Maybe! Next time I will add just a little more length to the woven portion of the garment because even though I am shorter waisted, it could use a little more vertical space. I have an instagram story of this entire process (or at least some of it!) here if you’d like to take a look!

The jeans were made on a whim because…. well, just because I wanted some flare jeans I guess? I used the tapered leg as a base and drew straight onto my denim in tailor’s chalk. I measured 14” up from the hem to start my flare and drew down to a 21” leg opening. Instead of a traditional scoop pocket shape I did a shortened version of the patch pockets I drafted for my overalls. Again, if you’d like to see some action shots, check out my instagram story on making this pair of jeans.

After wearing the jeans a few times I felt they’d have a better fit by taking in some additional space at my hips. The end result is great! I would like to do these again in a nicer quality denim but I have a lot of projects on my list before that.

Listen - if you’ve been on the fence about making a pair of jeans I cannot recommend this pattern enough. I’ve made it seven times now (after these jeans I made a second pair of shorts that I LOVE). It really is that amazing of a pattern.

And something else I’ve mentioned on social media but not on here… those silver strands you see? Expect more of them as time goes on! I’ve decided to let my natural greying color come through and while it’s taking a little time to adjust to editing photos with all that white hair, IRL, I love it. Maybe because I rarely look at mysefl in a mirror and only in good lighting with a filter via my phone? If you’re also considering it, take a look at the #grombre movement on Instagram. It really helped confirm for me that this is a beautiful look and women with grey hair have this air of badassery about them. Now I just wish MORE white would come in and it would grow out faster!
Bishop Blouse and Dawn Flare Hack 6.jpg
Bishop Blouse and Dawn Flare Hack 2.jpg

Jessica Sews | Chambray Refashion Dress

Refashioned Chambray Dress B.jpg
Refashioned Chambray Dress D.jpg

Guys, this is one of my favorite sewing projects of the year and I’m so excited to tell you all about it. A couple weekends ago I was revisiting my spring outfit ideas page on Pinterest and on a whim did a search to see if one particular vintage sewing pattern (Butterick 6079) may be floating around on ebay or etsy. In a stroke of amazing luck, I tracked down the exact pattern I wanted in my size! Plus it was uncut and never used, so for six bucks I placed my order and waited patiently for it to arrive.

In the meantime I did some sketching and brainstormed ideas for fabric to use on the project. I’ve been wanting to do some seventies stye prairie dresses a la Gunne Sax, so the idea of using little ditty print cottons was one that would have definitely vibed with the pattern cover illustrations. As I jotted down ideas I started to think that chambray could be pretty, maybe in various shades. Since I’ve been thrifting multiple times a week lately, I also knew there were a lot of plus sized skirts just waiting to be used for fabric.

Sketch and Swatch.jpg

I visited both Goodwill stores in my town and bought four different skirts, all size 18 or larger. I didn’t even realize it at the time, but I picked up two of the same skirt (one slightly more faded than the other)- one at the east side location and the other across town.

Skirts Before 1.jpg
Untucked Pleats.jpg

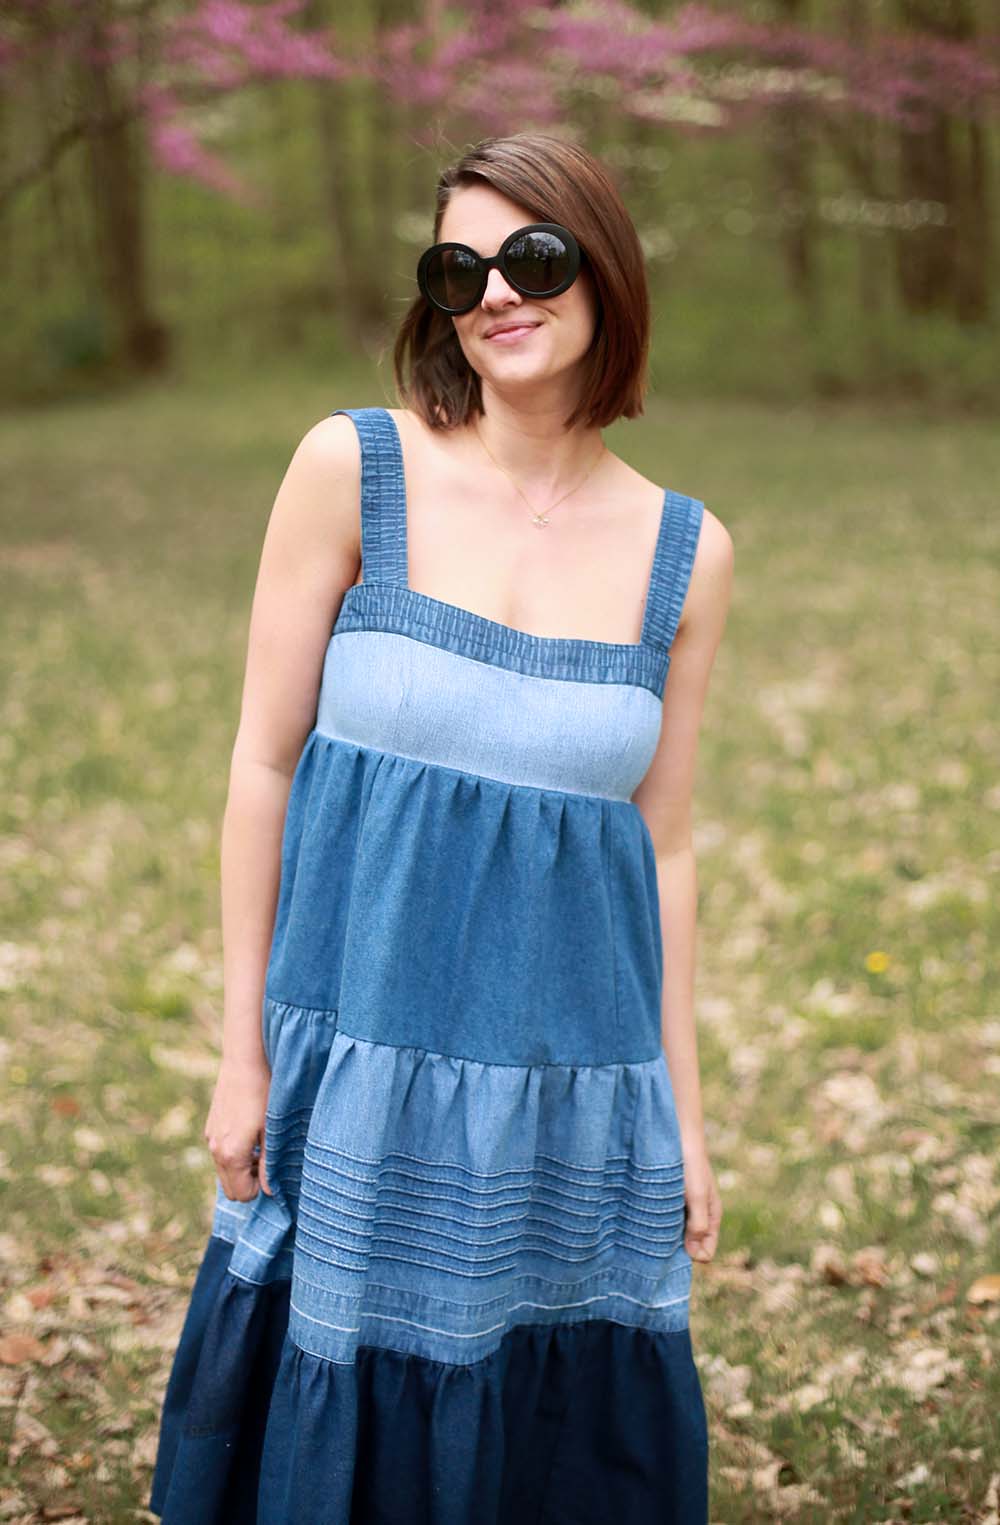
While I waiting for my mail carrier to deliver the pattern, I started picking apart the skirts. The elastic waistband on one had amazing depth from color loss after washing (that’s what I used for the top band and straps!) The pair of matching skirts had these tiny eighth inch pin tucks and a nice one inch hem that I picked out. Although I didn’t have any full yards of fabric, by sewing panels back together in an alternating triangle pattern (hem up, hem down, hem up) I was able to get plenty of usable fabric with the grain running straight. I even picked off the back pockets of the darkest chambray which you can see closely if you look! I love this detail!

Once I was able to open my pattern and start cutting I ended up finishing the dress in the same day. I mean, as I saw it coming together I just couldn’t put it down! This turned out even better than my greatest expectations. I love that I refashioned and upcycled second hand pieces, used thread and notions I already had and got use from a vintage pattern that would have otherwise sat in someone’s attic for years. I am so proud that my self made wardrobe is at least half made from repurposed fabric and truth be told, it’s the only way for me to get really unique and high quality fabric where I live.

Refashioned Chambray Dress A.jpg
Refashioned Chambray Dress C.jpg


Sewing FAQ

Frequently Asked Sewing Questions.jpg

New to the sewing game? Thinking of taking up an awesome hobby? It’s never too late to learn how to sew!  I went out to my Instafam and asked what questions you may have, so read on for some of the more frequently asked questions I get related to sewing!

Where do I start?

Assuming you have access to a sewing machine, buy an inexpensive pattern (I recommend elastic waist pajama pants), the recommended fabric type and yardage, notions (thread, elastic) and set aside some time alone to read the pattern and then get started!

What a good way to move beyond straight seams without too much frustration?

Like the old saying goes - Practice Makes Perfect. And that might not be entirely true, because I’ve probably passed the 10,000 hour mark for sewing and I still make mistakes too! (My personal rule to avoid getting too frustrated is to stop when I’ve made two mistakes in a row).

You don’t have do actually make things to practice either. When I was in school we did sample books to learn different techniques - inserting zippers, fancy seams, darts, you name it. Precision and accuracy will come with repetition (and attention to detail!) 

When there’s something I haven’t done in a while, like an automated button hole, I do practice runs! Even when I think I’ve got it, I do another, just to be sure for the real deal (and even so, I’ve had thread run out or break and had to tear out!)

What are some good beginner projects?

For your home, try making a throw pillow or a pillow case (which don’t really need patterns - just measurements and observation of similar items you already have). 

If you’d like to sew for yourself, look for pajama pants (here’s my video tutorial!) or a full skirt with straight waistband. Look for patterns marked “easy” or “beginner”. Often they include extra explanations or details that newbies might need. 

Select a basic cotton in a tight weave - I think muslin or quilters cotton is a good way to start experimenting and is generally not shifty or slippery - two fabric qualities that make sewing more difficult. Old sheets can make good practice fabric too - and there’s a lot of yardage!

Depending on the project - at any level of expertise - seamstresses will sometimes make a muslin mock up. It’s especially helpful for new silhouettes or techniques you’re unfamiliar with.

With more experience you can move to more fitted garments. If you’re the engineering or math savvy type, you can also venture into pattern alterations and adjustments, but that’s a huge post for another day (and there IS a lot of this kind of thing already online!)

Do I really need to pre-wash my fabric?

Always pre treat your fabric in the same manner you’ll use for future washing. For me, I do whatever I need to shrink it, which is usually a hot wash and dry. Then iron it flat, pin your (ironed!) pattern pieces down and cut out! Accuracy is so important, so go slowly, work at a comfortable height (I like a kitchen counter) and pay attention to pattern grainlines and markings).

Do classes help or should I just sew sew sew?

Yes and yes! Classes are great for hands on learning and some things are just easier to understand that way. I took classes in college as a part of my costuming degree and since then I’ve signed up for knitting lessons and a hat making workshop. I’d love to take classes for sewing knits or making bras. 

All that said, time at your machine is the only way to perfect your technique! 


Where do you find patterns?

Lately I’m really into indie pattern designers and companies, like Megan Nielsen Patterns (love the Dawn Jean), Papercut (Rite of Spring Short) and the Seamwork Hayden Tee. I want to try the Kelly Anorak from Closet Case Patterns too! But I also use patterns from McCalls, Simplicity, VOGUE and Butterick. Basically - I’m open to anything! I scan the pattern books at the fabric store and keep a running list and WAIT FOR SALES. I buy indie patterns at full price because I want to support these designers. I also sometimes use vintage patterns (and collect via thrifts and garage sales!)


How do I grow my skill set to more advanced sewing?

Start by picking more difficult projects! Chances are, you’re already capable! 


Equipment and Tools

Machine

I’ve been sewing on a Janome DC2019 for nearly a year. It was a nice upgrade from my last machine (read more below) and I do feel it’s been helpful in taking my sewing to the next level. That said I have nearly thirty years of experience and for the first 20 used an Singer Featherweight. You can create great garments and projects on any machine, but as you start to invest in higher end models with sturdier components (metal vs plastic), you’ll encounter fewer issues (this is my experiences).

I also highly recommend the Brother HC1850, which is available at a really reasonable $190. I’ve used mine for years and it was such an improvement over my previous machine (which was a Christmas gift when I was relatively new to sewing. Machine prices can range from under a hundred bucks to thousands. I certainly don’t recommend a huge investment if you’re not sure if you enjoy sewing, but if you’ve already spent some time using an entry priced machine and want my two cents, this one is for you.  (And speaking of two cents, if you do take my recommendation and buy through this affiliate link, I get a very small kickback).

If $200 is out of budget, my next suggestion is to visit a sewing repair shop and let them know you’d like to buy the best quality used machine at whatever your price point is. The folks that work in these stores are experts and can steer you in the right direction. In my opinion, you really only need front stitch, backstitch and a zig zag. Bonus points for an automatic buttonhole function, but I believe a sturdy machine is more important. The bells and whistles (my machine has over 100 stitches) are great, but truthfully, I use those main four stitches 99% of the time.

Lastly, I don’t use a serger/overlock machine and neaten my edges either through some self contained treatment (flat felled or French seams) or through a combo of straight line and zigzagged edges. Maybe one day if I get into sewing knits (which is something I’d like to learn!)

Iron

Pressing during construction is just as important as sewing in a straight line. Omitting the pressing steps is a recipe for mistakes and sloppy sewing. What iron you use is up to you, but a good steam and multiple heat settings are necessary.

Pressing Hams

The human body isn’t flat and sewing to fit your body will mean pressing curves - whether its darts, princess seams or the slope of your hips. A tailor’s pressing ham will help you get those seams nice and smooth. (They also come in longer cylindrical shapes for sleeve seams. I have both!)

Sewing Kit

Whether you sew by hand or use a machine, the bare basics are as follows, including the brand I recommend where applicable:

  • 8” Scissors (Gingher)

  • Regular Scissors (for paper - never cut paper with your good scissors!)

  • Straight Pins

  • Hand Sewing Needles in Variety Pack

  • Pin Cushion

  • Tape Measure

  • Seam Gage

  • Tackle Box

  • Machine Case

You might also want:

  • Replacement Universal Needles (for sewing machine)

  • Specialty Sewing Needles (for Denim or Knit)

  • Replacement Bobbins (specific to your machine)

  • Embroidery scissors or small snips

  • Thimble

  • Water Soluble Marking Pen

Recommended Reading

I swear by the Reader’s Digest Complete Guide to Sewing, which I’ve been using since it was a required textbook in my college courses. There’s no shame in refreshing your memory on a technique. And you don’t need the most recent edition! I actually collect sewing manuals from garage sales and thrift stores and it’s all good advice (some date back to the 1920s!) There’s also Google (but sometime’s that’s a rabbit hole best avoided when you want to get a project done in a timely manner)

Speaking of indie designers and sewing bloggers, the #memade tag on instagram is a good way to find home sewers and pattern companies. Just click around!


Personal Sewing

At what age did you start sewing?

I started with hand sewing and quilting in the 3rd or 4th grade (so around age 9 or 10?) and did my first machine project a year or so later (I cut up a Vera Bradley dress to make into a mini version of their popular handbag). My mom made a lot of my clothing - especially special dresses - throughout my entire childhood. As I got into middle and high school, she and I would play designer by picking fabrics and silhouettes and she’d do the sewing. I made some things like skirts, but my mom put in the zippers for me (to this day I don’t enjoy zippers and usually put them in by hand!)

In college I studied Apparel Merchandising for my Batchelor’s Degree and did an additional Associate’s Degree in Costume Construction Technology from Indiana University - Bloomington, which is where I learned flat pattern drafting, oodles of specialized sewing skills, intro to corsetry, millinery and glove making as well as beginning my fashion illustration skills. In the nearly 15 years since I’ve improve by leaps and bounds, and I attribute it to practice and anxiety medication (seriously)… now sewing is so zen for me. I absolutely love it!

You can see some of my makes here, here and here (I need to organize my tags!) And here are my historical costumes!


How do you sew with kids?

Screen time or outside childcare/school.

Will you make me something? I’ll pay you!

I’ll take the compliment! I’m not taking commissions at this time (unless you’ve got an offer I can’t refuse, then email me!)


I know I’m just skimming the surface here, but please let me know via comments if I can elaborate on any particular topic. I know some of you are looking for some pretty specific pattern recommendations and my best advice there is to google search your descriptors and follow other sewing bloggers (again, instagram is an awesome way to find them!) If you make anything, please share with me! I’d love to see!